


释放双眼,带上耳机,听听看~!
这篇文章是关于如何在Arduino上使用BMP180气压传感器的。它也适用于其他类似的气压传感器。
BMP180气压传感器简介
BMP180 气压传感器(型号 GY-68)是下图中的那个(前后视图)。它是一个非常小的模块,尺寸为 1mm x 1.1mm (0.039in x 0.043in)。
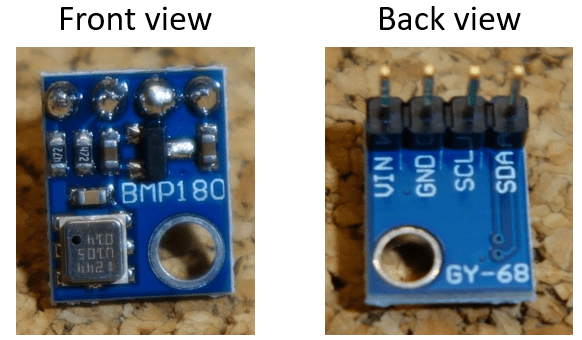
它测量周围空气的绝对压力。它的测量范围为 300 至 1100 hPa,精度低至 0.02 hPa。它还可以测量海拔高度和温度。
BMP180 气压传感器通过 I2C 接口进行通信。这意味着它仅使用 2 个引脚与 Arduino 通信。
引脚接线
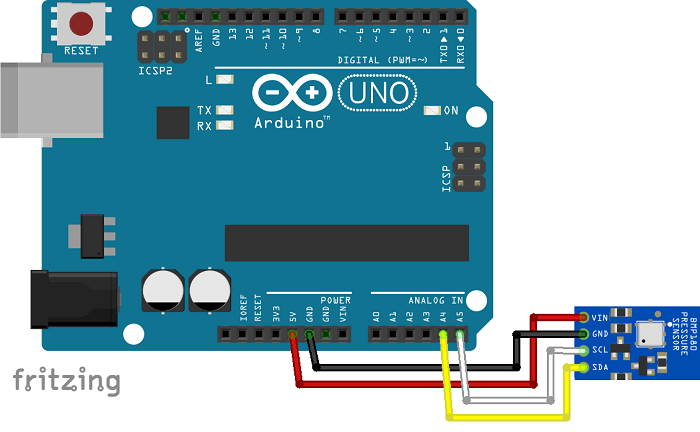
将传感器连接到Arduino非常简单:
| Pin | 连接到Arduino Uno |
| Vin | 5V |
| GND | GND |
| SCL | A5 |
| SDA | A4 |
连接图
将您的传感器连接到Arduino,如下图所示。
安装库
要控制 BMP180 气压传感器,您需要安装 SFE_BMP180 库。
安装 SFE_BMP180 库
- 单击此处下载SFE_BMP180库。“下载”文件夹中应该有一个 .zip 文件夹
- 解压缩 .zip 文件夹,您应该会得到 BMP180_Breakout_Arduino_Library-master 文件夹
- 将文件夹从 BMP180_Breakout_Arduino_Library-master 重命名为 BMP180_Breakout_Arduino_Library
- 将 BMP180_Breakout_Arduino_Library 文件夹移动到 Arduino IDE 安装库文件夹
- 最后,重新打开Arduino IDE
转到文件>示例>SparkfunBMP180 > SFE_BMP180_example。
这个例子对传感器如何读取压力、温度和计算高度进行了很好的评论和解释。
/* SFE_BMP180库示例草图
与大多数压力传感器一样,BMP180测量绝对压力。
这是设备所感知到的实际环境压力,会随着海拔和天气的变化而变化。
在进行压力读数之前,必须进行温度读数。
这是使用startTemperature()和getTemperature()完成的。
结果以摄氏度为单位。
一旦获得温度读数,就可以进行压力读数。
这是使用startPressure()和getPressure()完成的。
结果以毫巴(mb)或百帕(hPa)为单位。
如果您要监测天气模式,您可能希望消除海拔的影响。这将产生可以与其他位置的公布压力读数进行比较的读数。
要做到这一点,使用sealevel()函数。您需要提供测量压力的已知海拔。
如果您想测量海拔,您需要知道基准海拔的压力。这可以是平均海平面压力,或者是您所在海拔的先前压力读数,此后的海拔读数将是基准的正负。
这是使用altitude()函数完成的。
硬件连接:
-(GND)连接到GND
+(VDD)连接到3.3V

(警告:不要将+连接到5V,否则传感器将被损坏!)
您还需要将I2C引脚(SCL和SDA)连接到您的Arduino。
不同的Arduino引脚不同:
任何标记为:SDA SCL的Arduino引脚
Uno,Redboard,Pro:A4 A5
Mega2560,Due:20 21
Leonardo:2 3
将IO(VDDIO)引脚保持未连接。此引脚用于将BMP180连接到具有较低逻辑电平(例如1.8V)的系统。
玩得开心!-您在SparkFun的朋友。
SFE_BMP180库使用由Weather Station Data Logger项目开发的浮点方程:http://wmrx00.sourceforge.net/
我们的示例代码使用“beerware”许可证。您可以对此代码做任何事情。
V10 Mike Grusin,SparkFun Electronics 10/24/2013
*/

//您的程序必须#include此库和Wire库。
//(Wire是Arduino附带的标准库。):

#include <SFE_BMP180.h>
#include <Wire.h>

// You will need to create an SFE_BMP180 object, here called "pressure":

SFE_BMP180 pressure;

#define ALTITUDE 1655.0 // Altitude of SparkFun's HQ in Boulder, CO. in meters

void setup()
{
  Serial.begin(9600);
  Serial.println("REBOOT");

  // Initialize the sensor (it is important to get calibration values stored on the device).

  if (pressure.begin())
    Serial.println("BMP180 init success");
  else
  {
    // Oops, something went wrong, this is usually a connection problem,
    // see the comments at the top of this sketch for the proper connections.

    Serial.println("BMP180 init failnn");
    while(1); // Pause forever.
  }
}

void loop()
{
  char status;
  double T,P,p0,a;

  // Loop here getting pressure readings every 10 seconds.

  // If you want sea-level-compensated pressure, as used in weather reports,
  // you will need to know the altitude at which your measurements are taken.
  // We're using a constant called ALTITUDE in this sketch:

  Serial.println();
  Serial.print("provided altitude: ");
  Serial.print(ALTITUDE,0);
  Serial.print(" meters, ");
  Serial.print(ALTITUDE*3.28084,0);
  Serial.println(" feet");

  // If you want to measure altitude, and not pressure, you will instead need
  // to provide a known baseline pressure. This is shown at the end of the sketch.

  // You must first get a temperature measurement to perform a pressure reading.

  // Start a temperature measurement:
  // If request is successful, the number of ms to wait is returned.
  // If request is unsuccessful, 0 is returned.

  status = pressure.startTemperature();
  if (status != 0)
  {
    // Wait for the measurement to complete:
    delay(status);

    // Retrieve the completed temperature measurement:
    // Note that the measurement is stored in the variable T.
    // Function returns 1 if successful, 0 if failure.

    status = pressure.getTemperature(T);
    if (status != 0)
    {
      // Print out the measurement:
      Serial.print("temperature: ");
      Serial.print(T,2);
      Serial.print(" deg C, ");
      Serial.print((9.0/5.0)*T+32.0,2);
      Serial.println(" deg F");

      // Start a pressure measurement:
      // The parameter is the oversampling setting, from 0 to 3 (highest res, longest wait).
      // If request is successful, the number of ms to wait is returned.
      // If request is unsuccessful, 0 is returned.

      status = pressure.startPressure(3);
      if (status != 0)
      {
        // Wait for the measurement to complete:
        delay(status);

        // Retrieve the completed pressure measurement:
        // Note that the measurement is stored in the variable P.
        // Note also that the function requires the previous temperature measurement (T).
        // (If temperature is stable, you can do one temperature measurement for a number of pressure measurements.)
        // Function returns 1 if successful, 0 if failure.

        status = pressure.getPressure(P,T);
        if (status != 0)
        {
          // Print out the measurement:
          Serial.print("absolute pressure: ");
          Serial.print(P,2);
          Serial.print(" mb, ");
          Serial.print(P*0.0295333727,2);
          Serial.println(" inHg");

          // The pressure sensor returns abolute pressure, which varies with altitude.
          // To remove the effects of altitude, use the sealevel function and your current altitude.
          // This number is commonly used in weather reports.
          // Parameters: P = absolute pressure in mb, ALTITUDE = current altitude in m.
          // Result: p0 = sea-level compensated pressure in mb

          p0 = pressure.sealevel(P,ALTITUDE); // we're at 1655 meters (Boulder, CO)
          Serial.print("relative (sea-level) pressure: ");
          Serial.print(p0,2);
          Serial.print(" mb, ");
          Serial.print(p0*0.0295333727,2);
          Serial.println(" inHg");

          // On the other hand, if you want to determine your altitude from the pressure reading,
          // use the altitude function along with a baseline pressure (sea-level or other).
          // Parameters: P = absolute pressure in mb, p0 = baseline pressure in mb.
          // Result: a = altitude in m.

          a = pressure.altitude(P,p0);
          Serial.print("computed altitude: ");
          Serial.print(a,0);
          Serial.print(" meters, ");
          Serial.print(a*3.28084,0);
          Serial.println(" feet");
        }
        else Serial.println("error retrieving pressure measurementn");
      }
      else Serial.println("error starting pressure measurementn");
    }
    else Serial.println("error retrieving temperature measurementn");
  }
  else Serial.println("error starting temperature measurementn");

  delay(5000);  // Pause for 5 seconds.
}
设置海拔高度
在上传代码之前,您需要设置当前的高度。转到https://www.jiuwa.net/hbcx/,输入您的地址并检查您的海拔高度的位置。在代码中设置您的海拔高度。您应该写下海拔高度的地方被注释。
![]()
示范
上传代码后,以 9600 的波特率打开串行监视器。
您将能够看到您的传感器读数。

结束语
BMP180 是一款有趣的传感器,可用于您自己的气象站。
由于压力随海拔高度而变化,因此该传感器也能够计算海拔高度。


