
释放双眼,带上耳机,听听看~!
这个例子展示怎么从个人电脑发送数据到Arduino或者Genuino开发板来控制LED的亮度。这个数据是用特定的字节发送,每个数据的范围从0-255.程序读取三个字节,并且用它来设置LED的亮度。
简介
这个例子展示怎么从个人电脑发送数据到Arduino或者Genuino开发板来控制LED的亮度。这个数据是用特定的字节发送,每个数据的范围从0-255.程序读取三个字节,并且用它来设置LED的亮度。
你可以从任何可以接入电脑串口的软件发送字节到开发板。例如下面示范的Processing 和 Max/MSP version 5。
硬件要求
- Arduino 或 Genuino 开发板
- LED
- 220 Ω 电阻
软件要求
- Processing 或者 Max/MSP version 5
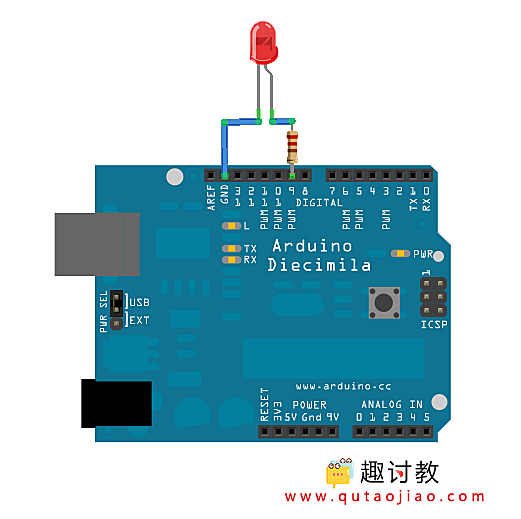
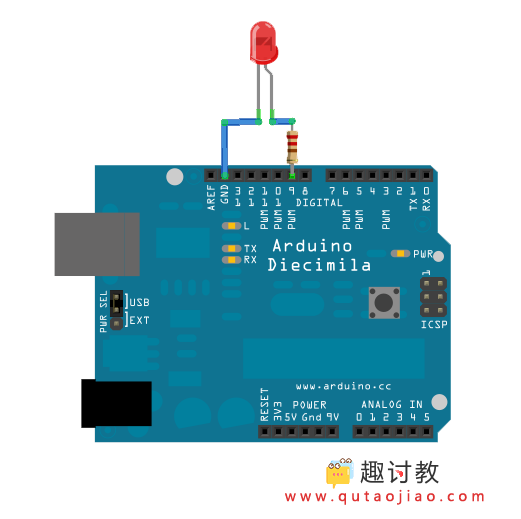
电路
LED灯串联一个220Ω限流电阻,再连接到数字引脚pin9。LED的长腿(正极或者阳极)应该连到电阻的输出端,而短腿(负极或者阴极)连接到地。
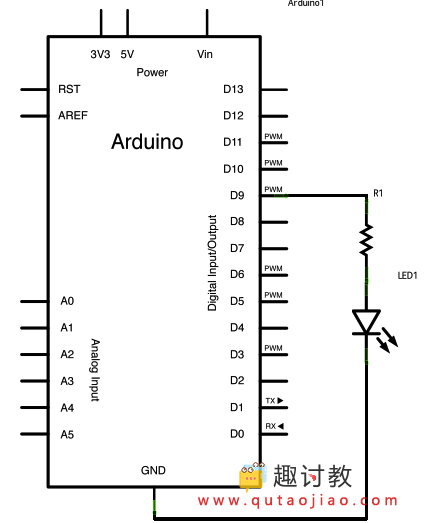
原理图
样例代码
const int ledPin = 9;      // the pin that the LED is attached to

void setup() {
  // initialize the serial communication:
  Serial.begin(9600);
  // initialize the ledPin as an output:
  pinMode(ledPin, OUTPUT);
}

void loop() {
  byte brightness;

  // check if data has been sent from the computer:
  if (Serial.available()) {
    // read the most recent byte (which will be from 0 to 255):
    brightness = Serial.read();
    // set the brightness of the LED:
    analogWrite(ledPin, brightness);
  }
}

/* Processing code for this example
 // Dimmer - sends bytes over a serial port
 // by David A. Mellis
 //This example code is in the public domain.

 import processing.serial.*;
 Serial port;

 void setup() {
 size(256, 150);

 println("Available serial ports:");
 // if using Processing 2.1 or later, use Serial.printArray()
 println(Serial.list());

 // Uses the first port in this list (number 0).  Change this to
 // select the port corresponding to your Arduino board.  The last
 // parameter (e.g. 9600) is the speed of the communication.  It
 // has to correspond to the value passed to Serial.begin() in your
 // Arduino sketch.
 port = new Serial(this, Serial.list()[0], 9600);

 // If you know the name of the port used by the Arduino board, you
 // can specify it directly like this.
 //port = new Serial(this, "COM1", 9600);
 }

 void draw() {
 // draw a gradient from black to white
 for (int i = 0; i < 256; i++) {
 stroke(i);
 line(i, 0, i, 150);
 }

 // write the current X-position of the mouse to the serial port as
 // a single byte
 port.write(mouseX);
 }
 */

/* Max/MSP v5 patch for this example

----------begin_max5_patcher----------
1008.3ocuXszaiaCD9r8uhA5rqAeHIa0aAMaAVf1S6hdoYQAsDiL6JQZHQ2M
YWr+2KeX4vjnjXKKkKhhiGQ9MeyCNz+X9rnMp63sQvuB+MLa1OlOalSjUvrC
ymEUytKuh05TKJWUWyk5nE9eSyuS6jesvHu4F4MxOuUzB6X57sPKWVzBLXiP
xZtGj6q2vafaaT0.BzJfjj.p8ZPukazsQvpfcpFs8mXR3plh8BoBxURIOWyK
rxspZ0YI.eTCEh5Vqp+wGtFXZMKe6CZc3yWZwTdCmYW.BBkdiby8v0r+ST.W
sD9SdUkn8FYspPbqvnBNFtZWiUyLmleJWo0vuKzeuj2vpJLaWA7YiE7wREui
FpDFDp1KcbAFcP5sJoVxp4NB5Jq40ougIDxJt1wo3GDZHiNocKhiIExx+owv
AdOEAksDs.RRrOoww1Arc.9RvN2J9tamwjkcqknvAE0l+8WnjHqreNet8whK
z6mukIK4d+Xknv3jstvJs8EirMMhxsZIusET25jXbX8xczIl5xPVxhPcTGFu
xNDu9rXtUCg37g9Q8Yc+EuofIYmg8QdkPCrOnXsaHwYs3rWx9PGsO+pqueG2
uNQBqWFh1X7qQG+3.VHcHrfO1nyR2TlqpTM9MDsLKNCQVz6KO.+Sfc5j1Ykj
jzkn2jwNDRP7LVb3d9LtoWBAOnvB92Le6yRmZ4UF7YpQhiFi7A5Ka8zXhKdA
4r9TRGG7V4COiSbAJKdXrWNhhF0hNUh7uBa4Mba0l7JUK+omjDMwkSn95Izr
TOwkdp7W.oPRmNRQsiKeu4j3CkfVgt.NYPEYqMGvvJ48vIlPiyzrIuZskWIS
xGJPcmPiWOfLodybH3wjPbMYwlbFIMNHPHFOtLBNaLSa9sGk1TxMzCX5KTa6
WIH2ocxSdngM0QPqFRxyPHFsprrhGc9Gy9xoBjz0NWdR2yW9DUa2F85jG2v9
FgTO4Q8qiC7fzzQNpmNpsY3BrYPVJBMJQ1uVmoItRhw9NrVGO3NMNzYZ+zS7
3WTvTOnUydG5kHMKLqAOjTe7fN2bGSxOZDkMrBrGQ9J1gONBEy0k4gVo8qHc
cxmfxVihWz6a3yqY9NazzUYkua9UnynadOtogW.JfsVGRVNEbWF8I+eHtcwJ
+wLXqZeSdWLo+FQF6731Tva0BISKTx.cLwmgJsUTTvkg1YsnXmxDge.CDR7x
D6YmX6fMznaF7kdczmJXwm.XSOOrdoHhNA7GMiZYLZZR.+4lconMaJP6JOZ8
ftCs1YWHZI3o.sIXezX5ihMSuXzZtk3ai1mXRSczoCS32hAydeyXNEu5SHyS
xqZqbd3ZLdera1iPqYxOm++v7SUSz
-----------end_max5_patcher-----------
 */
Processing代码
上面代码例子的Processing 程序将会通过电脑的串口发送字节到开发板上来使LED熄灭。
Max 代码
上面代码例子的Max/MSP补丁看起来像是下面的图片。复制它,然后粘贴到一个新的补丁窗口


