

释放双眼,带上耳机,听听看~!
物理像素这个例子示范了怎么用Arduino或者Genuino开发板来接受来自电脑的数据。当接受到字符“H”时,开发板打开LED;而接受到字符“L”时,开发板关闭LED灯。
简介
- 这个例子示范了怎么用Arduino或者Genuino开发板来接受来自电脑的数据。当接受到字符“H”时,开发板打开LED;而接受到字符“L”时,开发板关闭LED灯。
- 数据从Arduino IDE串口监视器或者其他类似Processing,Flash,PD,Max/MSP之类的程序发送。
硬件要求
- Arduino or Genuino 开发板
- LED (可选择)
- 220欧姆电阻
软件要求
- Processing 或者 Max/MSP version 5
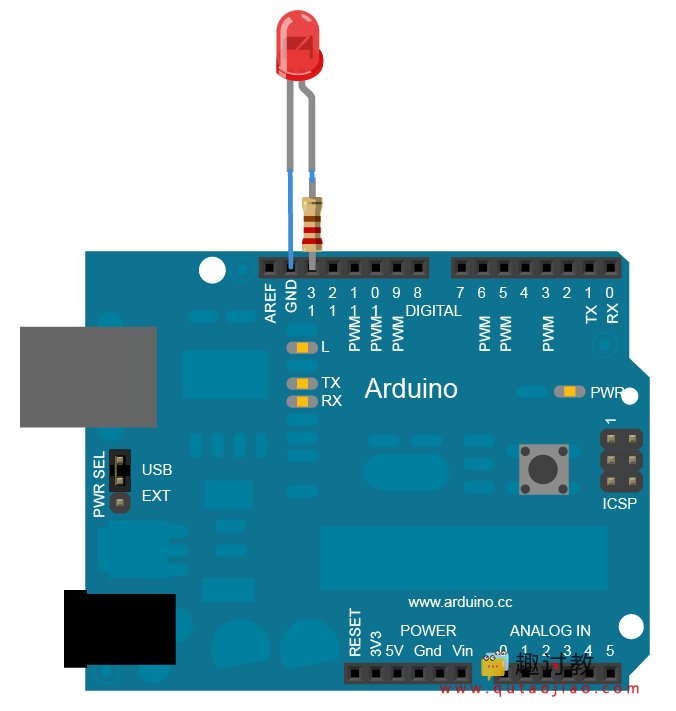
电路
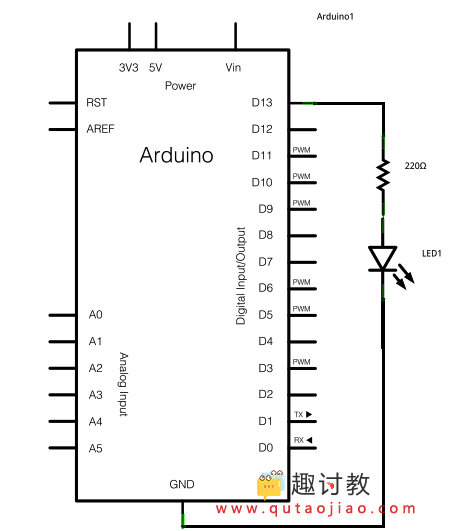
很多Arduino和Genuino开发板有一个连接到pin13的内置LED灯。如果你的开发板没有内置LED灯,连接一个额外的LED灯到pin13。长腿或者阳极,通过一个220 ohm电阻连接到pin13。短腿或者阴极,连接到地。
原理图
样例代码
const int ledPin = 13; // the pin that the LED is attached to
int incomingByte;      // a variable to read incoming serial data into

void setup() {
  // initialize serial communication:
  Serial.begin(9600);
  // initialize the LED pin as an output:
  pinMode(ledPin, OUTPUT);
}

void loop() {
  // see if there's incoming serial data:
  if (Serial.available() > 0) {
    // read the oldest byte in the serial buffer:
    incomingByte = Serial.read();
    // if it's a capital H (ASCII 72), turn on the LED:
    if (incomingByte == 'H') {
      digitalWrite(ledPin, HIGH);
    }
    // if it's an L (ASCII 76) turn off the LED:
    if (incomingByte == 'L') {
      digitalWrite(ledPin, LOW);
    }
  }
}

/* Processing code for this example

 // mouseover serial

 // Demonstrates how to send data to the Arduino I/O board, in order to
 // turn ON a light if the mouse is over a square and turn it off
 // if the mouse is not.

 // created 2003-4
 // based on examples by Casey Reas and Hernando Barragan
 // modified 30 Aug 2011
 // by Tom Igoe
 // This example code is in the public domain.


 import processing.serial.*;

 float boxX;
 float boxY;
 int boxSize = 20;
 boolean mouseOverBox = false;

 Serial port;

 void setup() {
 size(200, 200);
 boxX = width/2.0;
 boxY = height/2.0;
 rectMode(RADIUS);

 // List all the available serial ports in the output pane.
 // You will need to choose the port that the Arduino board is
 // connected to from this list. The first port in the list is
 // port #0 and the third port in the list is port #2.
 // if using Processing 2.1 or later, use Serial.printArray()
 println(Serial.list());

 // Open the port that the Arduino board is connected to (in this case #0)
 // Make sure to open the port at the same speed Arduino is using (9600bps)
 port = new Serial(this, Serial.list()[0], 9600);

 }

 void draw()
 {
 background(0);

 // Test if the cursor is over the box
 if (mouseX > boxX-boxSize && mouseX < boxX+boxSize &&
 mouseY > boxY-boxSize && mouseY < boxY+boxSize) {
 mouseOverBox = true;
 // draw a line around the box and change its color:
 stroke(255);
 fill(153);
 // send an 'H' to indicate mouse is over square:
 port.write('H');
 }
 else {
 // return the box to it's inactive state:
 stroke(153);
 fill(153);
 // send an 'L' to turn the LED off:
 port.write('L');
 mouseOverBox = false;
 }

 // Draw the box
 rect(boxX, boxY, boxSize, boxSize);
 }


 */

/*
Max/MSP version 5 patch to run with this example:

----------begin_max5_patcher----------
1672.3oc2ZszaaiCD9ryuBBebQVCQRYao8xhf1cQCPVfBzh8RRQ.sDsM2HSZ
HQmlzh9eu7gjsjsEk7y0oWjiHoHm4aluYHGlueUmtiDuPy5B9Cv8fNc99Uc5
XZR2Pm726zcF4knDRlYXciDylQ4xtWa6SReQZZ+iSeMiEQR.ej8BM4A9C7OO
kkAlSjQSAYTdbFfvA27o2c6sfO.Doqd6NfXgDHmRUCKkolg4hT06BfbQJGH3
5Qd2e8d.QJIQSow5tzebZ7BFW.FIHow8.2JAQpVIIYByxo9KIMkSjL9D0BRT
sbGHZJIkDoZOSMuQT.8YZ5qpgGI3locF4IpQRzq2nDF+odZMIJkRjpEF44M3
A9nWAum7LKFbSOv+PSRXYOvmIhYiYpg.8A2LOUOxPyH+TjPJA+MS9sIzTRRr
QP9rXF31IBZAHpVHkHrfaPRHLuUCzoj9GSoQRqIB52y6Z.tu8o4EX+fddfuj
+MrXiwPL5+9cXwrOVvkbxLpomazHbQO7EyX7DpzXYgkFdF6algCQpkX4XUlo
hA6oa7GWck9w0Gnmy6RXQOoQeCfWwlzsdnHLTq8n9PCHLv7Cxa6PAN3RCKjh
ISRVZ+sSl704Tqt0kocE9R8J+P+RJOZ4ysp6gN0vppBbOTEN8qp0YCq5bq47
PUwfA5e766z7NbGMuncw7VgNRSyQhbnPMGrDsGaFSvKM5NcWoIVdZn44.eOi
9DTRUT.7jDQzSTiF4UzXLc7tLGh4T9pwaFQkGUGIiOOkpBSJUwGsBd40krHQ
9XEvwq2V6eLIhV6GuzP7uzzXBmzsXPSRYwBtVLp7s5lKVv6UN2VW7xRtYDbx
7s7wRgHYDI8YVFaTBshkP49R3rYpH3RlUhTQmK5jMadJyF3cYaTNQMGSyhRE
IIUlJaOOukdhoOyhnekEKmZlqU3UkLrk7bpPrpztKBVUR1uorLddk6xIOqNt
lBOroRrNVFJGLrDxudpET4kzkstNp2lzuUHVMgk5TDZx9GWumnoQTbhXsEtF
tzCcM+z0QKXsngCUtTOEIN0SX2iHTTIIz968.Kf.uhfzUCUuAd3UKd.OKt.N
HTynxTQyjpQD9jlwEXeKQxfHCBahUge6RprSa2V4m3aYOMyaP6gah2Yf1zbD
jVwZVGFZHHxINFxpjr5CiTS9JiZn6e6nTlXQZTAFj6QCppQwzL0AxVtoi6WE
QXsANkEGWMEuwNvhmKTnat7A9RqLq6pXuEwY6xM5xRraoTiurj51J1vKLzFs
CvM7HI14Mpje6YRxHOSieTsJpvJORjxT1nERK6s7YTN7sr6rylNwf5zMiHI4
meZ4rTYt2PpVettZERbjJ6PjfqN2loPSrUcusH01CegsGEE5467rnCdqT1ES
QxtCvFq.cvGz+BaAHXKzRSfP+2Jf.KCvj5ZLJRAhwi+SWHvPyN3vXiaPn6JR
3eoA.0TkFhTvpsDMIrL20nAkCI4EoYfSHAuiPBdmJRyd.IynYYjIzMvjOTKf
3DLvnvRLDLpWeEOYXMfAZqfQ0.qsnlUdmA33t8CNJ7MZEb.u7fiZHLYzDkJp
R7CqEVLGN75U+1JXxFUY.xEEBcRCqhOEkz2bENEWnh4pbh0wY25EefbD6EmW
UA6Ip8wFLyuFXx+Wrp8m6iff1B86W7bqJO9+mx8er4E3.abCLrYdA16sBuHx
vKT6BlpIGQIhL55W7oicf3ayv3ixQCm4aQuY1HZUPQWY+cASx2WZ3f1fICuz
vj5R5ZbM1y8gXYN4dIXaYGq4NhQvS5MmcDADy+S.j8CQ78vk7Q7gtPDX3kFh
3NGaAsYBUAO.8N1U4WKycxbQdrWxJdXd10gNIO+hkUMmm.CZwknu7JbNUYUq
0sOsTsI1QudDtjw0t+xZ85wWZd80tMCiiMADNX4UzrcSeK23su87IANqmA7j
tiRzoXi2YRh67ldAk79gPmTe3YKuoY0qdEDV3X8xylCJMTN45JIakB7uY8XW
uVr3PO8wWwEoTW8lsfraX7ZqzZDDXCRqNkztHsGCYpIDDAOqxDpMVUMKcOrp
942acPvx2NPocMC1wQZ8glRn3myTykVaEUNLoEeJjVaAevA4EAZnsNgkeyO+
3rEZB7f0DTazDcQTNmdt8aACGi1QOWnMmd+.6YjMHH19OB5gKsMF877x8wsJ
hN97JSnSfLUXGUoj6ujWXd6Pk1SAC+Pkogm.tZ.1lX1qL.pe6PE11DPeMMZ2
.P0K+3peBt3NskC
-----------end_max5_patcher-----------


 */
Processing 代码
从上面的样例代码里复制processing代码。随着你鼠标经过中心方块区域,pin13上的LED灯应该会打开和关闭。processing的小程序看起来像这样:
![]()
鼠标经过中心方块区域来使LED灯打开和关闭
Max patch
Max/MSP patch看起来像下面的图案。从上面的样例代码复制,然后粘贴到一个新的patch窗口
![]()


