

释放双眼,带上耳机,听听看~!
通常你想循环一系列引脚,然后每个引脚做一些事情。如这个例子通过for()循环来重复点亮pin2-7上的6个LED灯。这些LED灯通过digitalWrite() 和delay()按顺序点亮和熄灭。
简介
- 通常你想循环一系列引脚,然后每个引脚做一些事情。如这个例子通过for()循环来重复点亮pin2-7上的6个LED灯。这些LED灯通过digitalWrite() 和delay()按顺序点亮和熄灭。
- 我们也叫这个例子为”Knight Rider”纪念80年代的电视剧,哪里David Hasselhoff 有一个叫KITI的AI机器操作他的Pontiac跑车。这辆车在所有可放置的地方用大量的LED灯来增强闪烁效果。特别地,它有一个来回扫描一行的显示屏,显示KITT和KARR之间的斗争。这个例子复制了KITT的显示。
硬件要求
- Arduino or Genuino 开发板
- 6 * 220 Ω 电阻
- 6 * LED
- 连接线
- 面包板
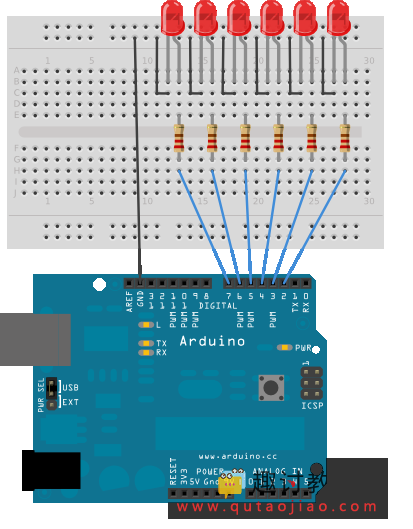
电路
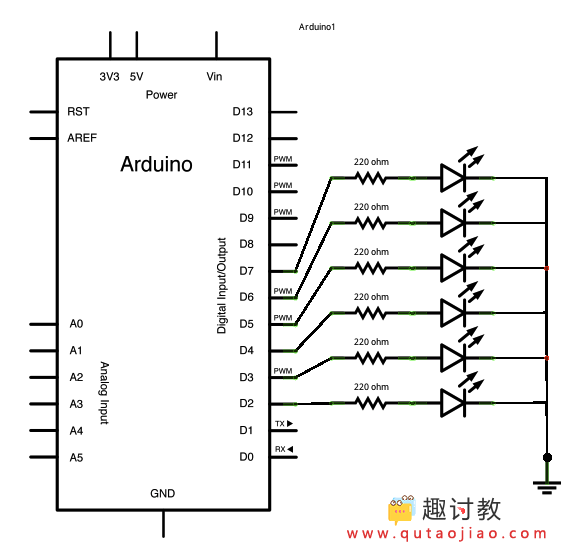
通过220 Ω电阻串联,连接6个LED灯到数字引脚pin2-pin7上。
原理图
样例代码
- 下面的代码用一个for()循环开始来设计数字引脚pin2-7作为6个LED灯的输出。
- 在代码的主循环里,两个for()循环用来逐渐循环LED灯,一个接一个,从pin2-7。一旦pin7被点亮,程序就会反过来,倒着点亮每一个LED灯。
int timer = 100;           // The higher the number, the slower the timing.

void setup() {
  // use a for loop to initialize each pin as an output:
  for (int thisPin = 2; thisPin < 8; thisPin++) {
    pinMode(thisPin, OUTPUT);
  }
}

void loop() {
  // loop from the lowest pin to the highest:
  for (int thisPin = 2; thisPin < 8; thisPin++) {
    // turn the pin on:
    digitalWrite(thisPin, HIGH);
    delay(timer);
    // turn the pin off:
    digitalWrite(thisPin, LOW);
  }

  // loop from the highest pin to the lowest:
  for (int thisPin = 7; thisPin >= 2; thisPin--) {
    // turn the pin on:
    digitalWrite(thisPin, HIGH);
    delay(timer);
    // turn the pin off:
    digitalWrite(thisPin, LOW);
  }
}


