
释放双眼,带上耳机,听听看~!
在for循环的变量示范了怎么用一个数组。一个数组是一个含多部分的变量。 如果你把一个变量理解为一个装数据的杯,你可以把一个数组理解为制冰格。它就像一系列的粘在一起的杯,上面装着一些最大的数值。
简介
- 在for循环的变量示范了怎么用一个数组。一个数组是一个含多部分的变量。 如果你把一个变量理解为一个装数据的杯,你可以把一个数组理解为制冰格。它就像一系列的粘在一起的杯,上面装着一些最大的数值。
- for循环示范了怎样点亮连接到Arduino或Genuino开发板上pin2到pin7的一系列的LED灯,这些引脚需要连续标记数字,而LED灯需要按顺序打开。
- 这个例子示范怎样顺序打开一些引脚,这些引脚的序号是不连续而且不按次序。为了实现这个目的,你可以把这些引脚序号放到一个数组里,然后在循环里重申完这个数组。
- 这个例子充分利用了通过220 ohm电阻连接在pin2到pin7的6个LED灯,就像在for循环里。然而,这里LED灯的顺序由它们在数组里的顺序确定,而不是他们的物理顺序。
- 这个把引脚放到数组的方式很方便。你不必把这些引脚一个接一个排好顺序,或者同一个顺序。你可以重新排列数组,按任何你想要的顺序。
硬件要求
- Arduino or Genuino 开发板
- 6*LEDs
- 6*220Ω电阻
- 连接线
- 面包板
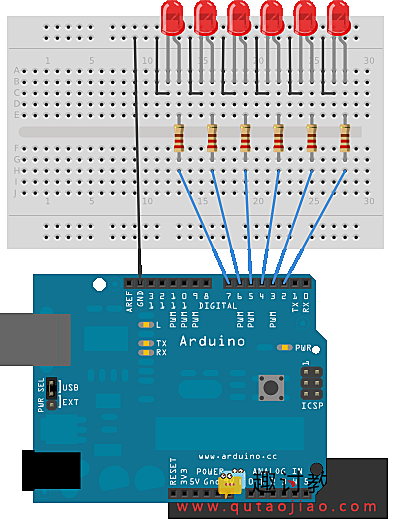
电路
通过220Ω电阻串联,连接6个LED灯到数字引脚pin2-pin7上。

原理图

样例代码
int timer = 100;           // The higher the number, the slower the timing.
int ledPins[] = {
  2, 7, 4, 6, 5, 3
};       // an array of pin numbers to which LEDs are attached
int pinCount = 6;           // the number of pins (i.e. the length of the array)

void setup() {
  // the array elements are numbered from 0 to (pinCount - 1).
  // use a for loop to initialize each pin as an output:
  for (int thisPin = 0; thisPin < pinCount; thisPin++) {
    pinMode(ledPins[thisPin], OUTPUT);
  }
}

void loop() {
  // loop from the lowest pin to the highest:
  for (int thisPin = 0; thisPin < pinCount; thisPin++) {
    // turn the pin on:
    digitalWrite(ledPins[thisPin], HIGH);
    delay(timer);
    // turn the pin off:
    digitalWrite(ledPins[thisPin], LOW);

  }

  // loop from the highest pin to the lowest:
  for (int thisPin = pinCount - 1; thisPin >= 0; thisPin--) {
    // turn the pin on:
    digitalWrite(ledPins[thisPin], HIGH);
    delay(timer);
    // turn the pin off:
    digitalWrite(ledPins[thisPin], LOW);
  }
}

