


在本教程中,您将学习如何使用带有 Arduino IDE 的 ESP8266 NodeMCU 板发出 HTTP GET 请求。我们将演示如何使用 ThingSpeak 解码 OpenWeatherMap.org 中的 JSON 数据并在连接图中绘制值。
HTTP GET 请求方式
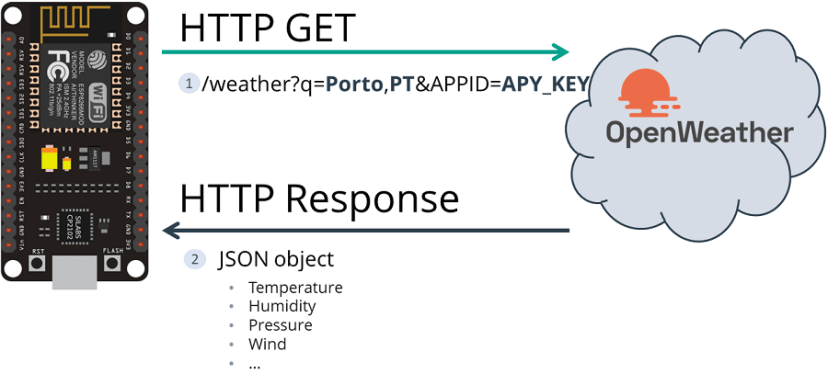
超文本传输协议 (HTTP) 用作客户端和服务器之间的请求-响应协议。下面是一个示例:
- ESP8266(客户端)向服务器(例如:OpenWeatherMap.org 或 ThingSpeak)提交 HTTP 请求;
- 服务器向ESP8266(客户端)返回响应;
- 最后,响应包含有关请求的状态信息,也可能包含请求的内容。
HTTP 获取
请注意,查询字符串(name = field1 和 value = value1)在 HTTP GET 请求的 URL 中发送。
(使用 HTTP GET,数据对 URL 请求中的每个人都可见。
先决条件
在继续学习本教程之前,请确保完成以下先决条件。
Arduino集成开发环境
我们将使用 Arduino IDE 对 ESP8266 NodeMCU 进行编程,因此请确保您已安装 ESP8266 附加组件。
Arduino_JSON库
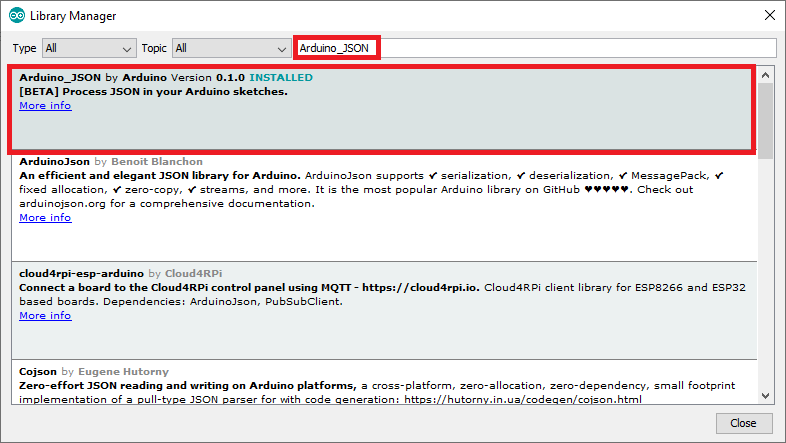
您还需要安装 Arduino_JSON 库。您可以在 Arduino IDE 库管理器中安装此库。只需转到“程序”>“包含库”>“管理库”,然后搜索库名称,如下所示:
其他 Web 服务或 API
在本教程中,您将学习如何设置 ESP8266 NodeMCU 开发板,以执行对 OpenWeatherMap.org 和 ThingSpeak 的 HTTP 请求。如果您更喜欢使用本地解决方案进行学习,则可以将 HTTP 与 Node-RED 一起使用。本教程中介绍的所有示例也适用于其他 API。
总之,要使本教程与任何服务兼容,您需要搜索服务 API 文档。然后,您需要服务器名称(URL 或 IP 地址)和要在请求中发送的参数(URL 路径或请求正文)。最后,修改我们的示例以与您要使用的任何 API 集成。
1. ESP8266 HTTP GET:JSON 数据(OpenWeatherMap.org)
在此示例中,你将了解如何发出 API 请求来访问数据。例如,我们将使用 OpenWeatherMap API。此 API 有一个免费计划,并提供了许多有关世界上几乎任何地方天气的有用信息。
使用 OpenWeatherMap API
应用程序编程接口 (API) 是由软件开发人员编写的一组函数,使任何人都可以使用他们的数据或服务。OpenWeatherMap 项目有一个 API,使用户能够请求天气数据。
在此项目中,您将使用该 API 请求所选位置的当天天气预报。学习使用 API 是一项很棒的技能,因为它允许您访问各种不断变化的信息,例如当前股价、货币汇率、最新新闻、流量更新、推文等等。
注意:API 密钥对用户是唯一的,不应与任何人共享。
OpenWeatherMap 的免费计划提供了完成此项目所需的一切。要使用 API,您需要一个 API 密钥,称为 APIID。若要获取 APIID,请执行以下操作:
- 打开浏览器并转到 https://openweathermap.org/appid/
- 按“注册”按钮并创建一个免费帐户。
- 转到此链接:https://home.openweathermap.org/api_keys 并获取您的 API 密钥。

- 在“API 密钥”选项卡上,你将看到一个默认密钥(在上图中以红色矩形突出显示);这是从站点中提取信息所需的唯一密钥。将此密钥复制并粘贴到某处;你一会儿就会用到它。
- 要提取所选位置的天气信息,请输入以下 URL:
http://api.openweathermap.org/data/2.5/weather?q=yourCityName,yourCountryCode&APPID=yourUniqueAPIkey将 yourCityName 替换为要为其提供数据的城市,将 yourCountryCode 替换为该城市的国家/地区代码,将 yourUniqueAPIkey 替换为步骤 4 中的唯一 API 密钥。例如,葡萄牙波尔图市更新后的 API URL 为:
http://api.openweathermap.org/data/2.5/weather?q=Porto,
PT&APPID=801d2603e9f2e1c70e042e4f5f6e0---- 将您的 URL 复制到浏览器中,API 将返回一堆与您当地天气相对应的信息。在编写本教程的当天,我们得到了有关葡萄牙波尔图天气的以下信息。
{"coord":{"lon":-8.611,"lat":41.1496},"weather":[{"id":803,"main":"Clouds","description":"broken clouds","icon":"04d"}],"base":"stations","main":{"temp":294.58,"feels_like":294.95,"temp_min":293.82,"temp_max":295.65,"pressure":1016,"humidity":83},"visibility":10000,"wind":{"speed":8.94,"deg":180,"gust":8.94},"clouds":{"all":75},"dt":1666877635,"sys":{"type":2,"id":2009460,"country":"PT","sunrise":1666853957,"sunset":1666892227},"timezone":3600,"id":2735943,"name":"Porto","cod":200}这是缩进时的样子,以提高可读性。
{
  "coord": {
    "lon": -8.611,
    "lat": 41.1496
  },
  "weather": [
    {
      "id": 803,
      "main": "Clouds",
      "description": "broken clouds",
      "icon": "04d"
    }
  ],
  "base": "stations",
  "main": {
    "temp": 294.58,
    "feels_like": 294.95,
    "temp_min": 293.82,
    "temp_max": 295.65,
    "pressure": 1016,
    "humidity": 83
  },
  "visibility": 10000,
  "wind": {
    "speed": 8.94,
    "deg": 180,
    "gust": 8.94
  },
  "clouds": {
    "all": 75
  },
  "dt": 1666877635,
  "sys": {
    "type": 2,
    "id": 2009460,
    "country": "PT",
    "sunrise": 1666853957,
    "sunset": 1666892227
  },
  "timezone": 3600,
  "id": 2735943,
  "name": "Porto",
  "cod": 200
}
接下来,您将了解如何使用此信息来获取特定数据,例如温度、湿度、压力、风速等。
代码ESP8266 HTTP GET OpenWeatherMap.org
安装必要的板附加组件和库后,将以下代码复制到 Arduino IDE,但不要上传。您需要进行一些更改才能使其适合您。
/*

  更多Arduino/ESP8266/ESP32等教程请访问: https://www.qutaojiao.com
*/

#include <ESP8266WiFi.h>
#include <ESP8266HTTPClient.h>
#include <WiFiClient.h>
#include <Arduino_JSON.h>

const char* ssid = "REPLACE_WITH_YOUR_SSID";
const char* password = "REPLACE_WITH_YOUR_PASSWORD";

// Your Domain name with URL path or IP address with path
String openWeatherMapApiKey = "REPLACE_WITH_YOUR_OPEN_WEATHER_MAP_API_KEY";
// Example:
//String openWeatherMapApiKey = "bd939aa3d23ff33d3c8f5dd1dd4";

// Replace with your country code and city
String city = "Porto";
String countryCode = "PT";

// THE DEFAULT TIMER IS SET TO 10 SECONDS FOR TESTING PURPOSES
// For a final application, check the API call limits per hour/minute to avoid getting blocked/banned
unsigned long lastTime = 0;
// Timer set to 10 minutes (600000)
//unsigned long timerDelay = 600000;
// Set timer to 10 seconds (10000)
unsigned long timerDelay = 10000;

String jsonBuffer;

void setup() {
  Serial.begin(115200);

  WiFi.begin(ssid, password);
  Serial.println("Connecting");
  while(WiFi.status() != WL_CONNECTED) {
    delay(500);
    Serial.print(".");
  }
  Serial.println("");
  Serial.print("Connected to WiFi network with IP Address: ");
  Serial.println(WiFi.localIP());

  Serial.println("Timer set to 10 seconds (timerDelay variable), it will take 10 seconds before publishing the first reading.");
}

void loop() {
  // Send an HTTP GET request
  if ((millis() - lastTime) > timerDelay) {
    // Check WiFi connection status
    if(WiFi.status()== WL_CONNECTED){
      String serverPath = "http://api.openweathermap.org/data/2.5/weather?q=" + city + "," + countryCode + "&APPID=" + openWeatherMapApiKey;

      jsonBuffer = httpGETRequest(serverPath.c_str());
      Serial.println(jsonBuffer);
      JSONVar myObject = JSON.parse(jsonBuffer);

      // JSON.typeof(jsonVar) can be used to get the type of the var
      if (JSON.typeof(myObject) == "undefined") {
        Serial.println("Parsing input failed!");
        return;
      }

      Serial.print("JSON object = ");
      Serial.println(myObject);
      Serial.print("Temperature: ");
      Serial.println(myObject["main"]["temp"]);
      Serial.print("Pressure: ");
      Serial.println(myObject["main"]["pressure"]);
      Serial.print("Humidity: ");
      Serial.println(myObject["main"]["humidity"]);
      Serial.print("Wind Speed: ");
      Serial.println(myObject["wind"]["speed"]);
    }
    else {
      Serial.println("WiFi Disconnected");
    }
    lastTime = millis();
  }
}

String httpGETRequest(const char* serverName) {
  WiFiClient client;
  HTTPClient http;

  // Your IP address with path or Domain name with URL path
  http.begin(client, serverName);

  // Send HTTP POST request
  int httpResponseCode = http.GET();

  String payload = "{}";

  if (httpResponseCode>0) {
    Serial.print("HTTP Response code: ");
    Serial.println(httpResponseCode);
    payload = http.getString();
  }
  else {
    Serial.print("Error code: ");
    Serial.println(httpResponseCode);
  }
  // Free resources
  http.end();

  return payload;
}
设置网络凭据
使用您的网络凭据修改下一行:SSID 和密码。该代码对您应该在何处进行更改进行了很好的注释。
// Replace with your network credentials
const char* ssid     = "REPLACE_WITH_YOUR_SSID";
const char* password = "REPLACE_WITH_YOUR_PASSWORD";
设置 OpenWeatherMap.org API 密钥
在以下行中插入 API 密钥:
String openWeatherMapApiKey = "REPLACE_WITH_YOUR_OPEN_WEATHER_MAP_API_KEY";设置您的城市和国家/地区
在以下变量中输入要获取其数据的城市以及国家/地区代码(中国地区码是CN):
// Replace with your country code and city
String city = "Porto";
String countryCode = "PT";
进行这些更改后,您可以将代码上传到您的开发板。继续阅读以了解代码的工作原理。
HTTP GET 请求(JSON 对象)
在 loop() 中,调用 httpGETRequest() 函数以发出 HTTP GET 请求:
String serverPath = "http://api.openweathermap.org/data/2.5/weather?q=" + city + "," + countryCode + "&APPID=" + openWeatherMapApiKey;

jsonBuffer = httpGETRequest(serverPath.c_str());
httpGETRequest() 函数向 OpenWeatherMap 发出请求,并检索一个带有 JSON 对象的字符串,该对象包含有关您所在城市天气的所有信息。
String httpGETRequest(const char* serverName) {
  WiFiClient client;
  HTTPClient http;

  // Your IP address with path or Domain name with URL path
  http.begin(client, serverName);

  // Send HTTP POST request
  int httpResponseCode = http.GET();

  String payload = "{}";

  if (httpResponseCode>0) {
    Serial.print("HTTP Response code: ");
    Serial.println(httpResponseCode);
    payload = http.getString();
  }
  else {
    Serial.print("Error code: ");
    Serial.println(httpResponseCode);
  }
  // Free resources
  http.end();

  return payload;
}
解码 JSON 对象
若要访问这些值,请解码 JSON 对象并将所有值存储在 jsonBuffer 数组中。
JSONVar myObject = JSON.parse(jsonBuffer);
// JSON.typeof(jsonVar) can be used to get the type of the var

if (JSON.typeof(myObject) == "undefined") {
  Serial.println("Parsing input failed!");
  return;
}

Serial.print("JSON object = ");
Serial.println(myObject);
Serial.print("Temperature: ");
Serial.println(myObject["main"]["temp"]);
Serial.print("Pressure: ");
Serial.println(myObject["main"]["pressure"]);
Serial.print("Humidity: ");
Serial.println(myObject["main"]["humidity"]);
Serial.print("Wind Speed: ");
Serial.println(myObject["wind"]["speed"]);
HTTP GET 演示
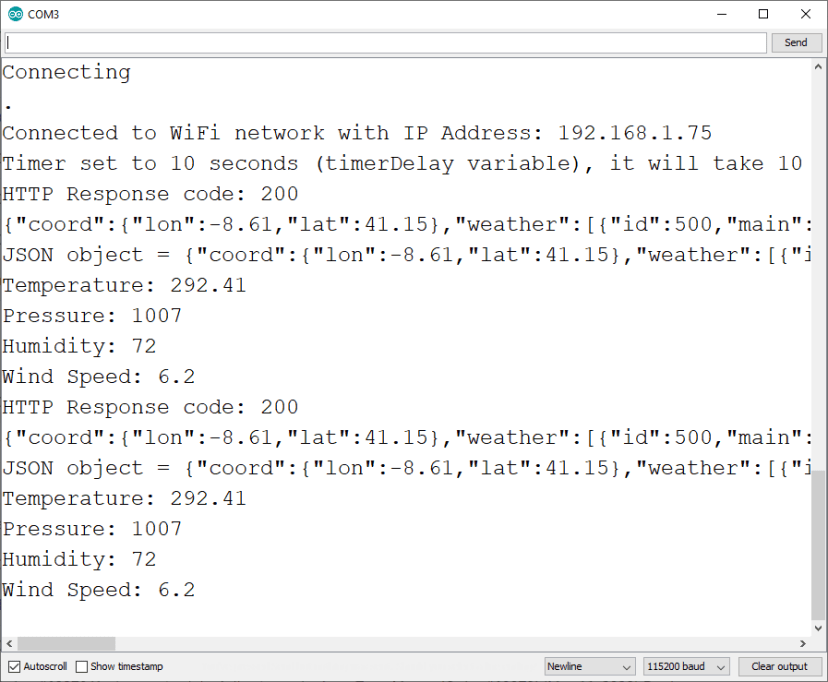
上传代码后,打开串行监视器,你将看到它正在接收以下 JSON 数据:
{"coord":{"lon":-8.61,"lat":41.15},"weather":[{"id":801,"main":"Clouds","description":"few clouds","icon":"02d"}],"base":"stations","main":{"temp":294.44,"feels_like":292.82,"temp_min":292.15,"temp_max":297.04,"pressure":1008,"humidity":63},"visibility":10000,"wind":{"speed":4.1,"deg":240},"clouds":{"all":20},"dt":1589288330,"sys":{"type":1,"id":6900,"country":"PT","sunrise":1589260737,"sunset":1589312564},"timezone":3600,"id":2735943,"name":"Porto","cod":200}然后,它在 Arduino IDE 串行监视器中打印解码的 JSON 对象,以获取温度(以开尔文为单位)、压力、湿度和风速值。
出于演示目的,我们每 10 秒请求一次新数据。但是,对于长期项目,您应该增加计时器或检查每小时/分钟的 API 调用限制,以避免被阻止/禁止。
2. ESP8266 HTTP GET:更新值 (ThingSpeak)
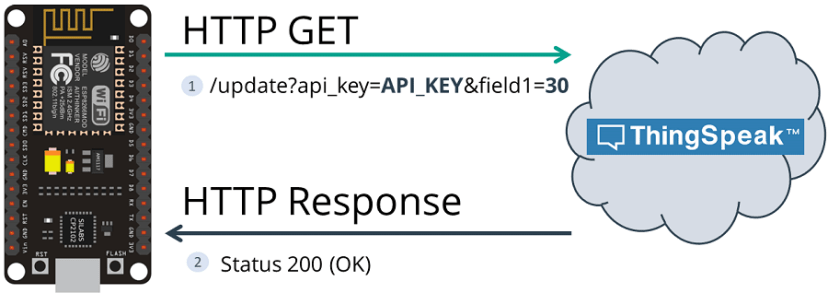
在此示例中,ESP8266发出 HTTP GET 请求以更新 ThingSpeak 中的读数。
使用 ThingSpeak API
ThingSpeak 有一个免费的 API,允许您使用 HTTP 存储和检索数据。在本教程中,您将使用 ThingSpeak API 从任何位置在连接图中发布和可视化数据。例如,我们将发布随机值,但在实际应用中,您将使用真实的传感器读数。
要将 ThingSpeak 与 ESP 配合使用,您需要一个 API 密钥。请按照以下步骤操作:
- 转到 ThingSpeak.com 并创建一个免费帐户。
- 然后,打开“频道”选项卡。
- 创建一个新频道。
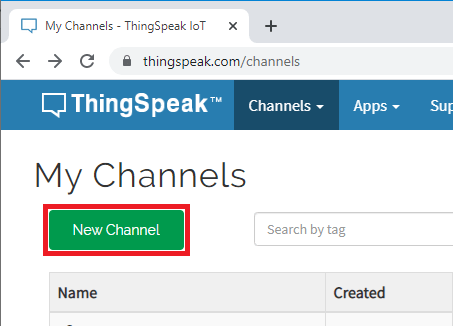
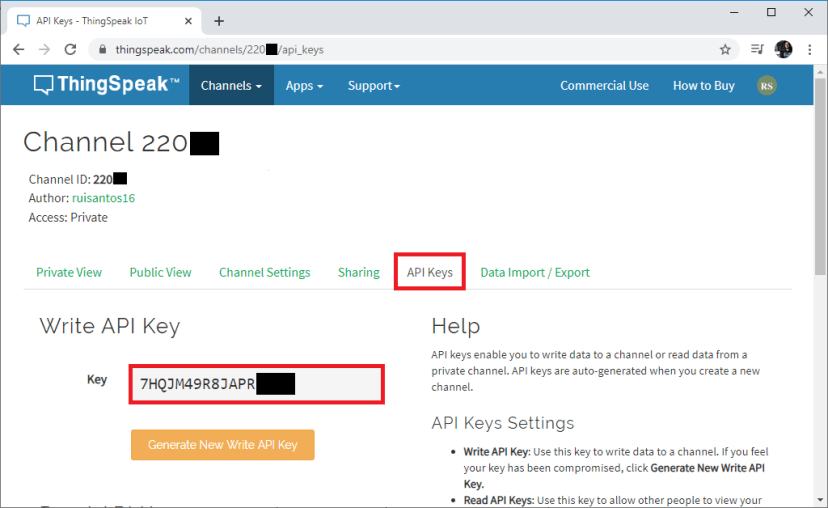
- 打开新创建的频道,然后选择“API 密钥”选项卡以复制 API 密钥。
HTTP GET ThingSpeak ESP8266代码
将下一个程序复制到Arduino IDE(键入SSID,密码和API密钥):
/*

  更多Arduino/ESP8266/ESP32等教程请访问: https://www.qutaojiao.com
*/

#include <ESP8266WiFi.h>
#include <ESP8266HTTPClient.h>
#include <WiFiClient.h>

const char* ssid = "REPLACE_WITH_YOUR_SSID";
const char* password = "REPLACE_WITH_YOUR_PASSWORD";

// REPLACE WITH THINGSPEAK.COM API KEY
String serverName = "http://api.thingspeak.com/update?api_key=REPLACE_WITH_YOUR_API_KEY";
// EXAMPLE:
//String serverName = "http://api.thingspeak.com/update?api_key=7HQJM49R8JAPR";

// THE DEFAULT TIMER IS SET TO 10 SECONDS FOR TESTING PURPOSES
// For a final application, check the API call limits per hour/minute to avoid getting blocked/banned
unsigned long lastTime = 0;
// Timer set to 10 minutes (600000)
//unsigned long timerDelay = 600000;
// Set timer to 10 seconds (10000)
unsigned long timerDelay = 10000;

void setup() {
  Serial.begin(115200);

  WiFi.begin(ssid, password);
  Serial.println("Connecting");
  while(WiFi.status() != WL_CONNECTED) {
    delay(500);
    Serial.print(".");
  }
  Serial.println("");
  Serial.print("Connected to WiFi network with IP Address: ");
  Serial.println(WiFi.localIP());

  Serial.println("Timer set to 10 seconds (timerDelay variable), it will take 10 seconds before publishing the first reading.");

  // Random seed is a number used to initialize a pseudorandom number generator
  randomSeed(analogRead(0));
}

void loop() {
  // Send an HTTP GET request
  if ((millis() - lastTime) > timerDelay) {
    // Check WiFi connection status
    if(WiFi.status()== WL_CONNECTED){
      WiFiClient client;
      HTTPClient http;

      String serverPath = serverName + "&field1=" + String(random(40));

      // Your Domain name with URL path or IP address with path
      http.begin(client, serverPath.c_str());

      // Send HTTP GET request
      int httpResponseCode = http.GET();

      if (httpResponseCode>0) {
        Serial.print("HTTP Response code: ");
        Serial.println(httpResponseCode);
        String payload = http.getString();
        Serial.println(payload);
      }
      else {
        Serial.print("Error code: ");
        Serial.println(httpResponseCode);
      }
      // Free resources
      http.end();
    }
    else {
      Serial.println("WiFi Disconnected");
    }
    lastTime = millis();
  }
}
设置网络凭据
使用您的网络凭据修改下一行:SSID 和密码。该代码对您应该在何处进行更改进行了很好的注释。
// Replace with your network credentials
const char* ssid     = "REPLACE_WITH_YOUR_SSID";
const char* password = "REPLACE_WITH_YOUR_PASSWORD";
设置 serverName(API 密钥)
修改 serverName 变量以包含您的 API 密钥。
String serverName = "http://api.thingspeak.com/update?api_key=REPLACE_WITH_YOUR_API_KEY";现在,将代码上传到您的开发板,它应该可以立即工作。如果您想了解如何发出 HTTP GET 请求,请阅读下一节。
HTTP GET 请求
在 loop() 中,您每 10 秒使用随机值发出一次 HTTP GET 请求:
if(WiFi.status()== WL_CONNECTED){
  WiFiClient client;
  HTTPClient http;

  String serverPath = serverName + "&field1=" + String(random(40));

  // Your Domain name with URL path or IP address with path
  http.begin(client, serverPath.c_str());

  // Send HTTP GET request
  int httpResponseCode = http.GET();
ESP8266在以下 URL 中发出新请求,以使用新值 (30) 更新传感器 field1。
http://api.thingspeak.com/update?api_key=REPLACE_WITH_YOUR_API_KEY&field1=30然后,以下代码行保存来自服务器的 HTTP 响应。
if (httpResponseCode>0) {
  Serial.print("HTTP Response code: ");
  Serial.println(httpResponseCode);
  String payload = http.getString();
  Serial.println(payload);
}
else {
  Serial.print("Error code: ");
  Serial.println(httpResponseCode);
}
在Arduino IDE串行监视器中,您应该看到HTTP响应代码200(这意味着请求已成功)。
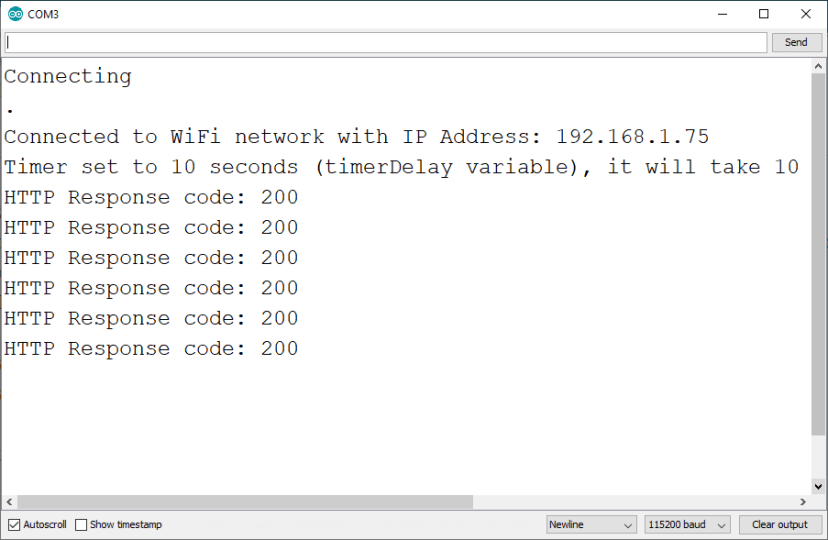
您的 ThingSpeak 仪表板应该每 10 秒接收一次新读数。
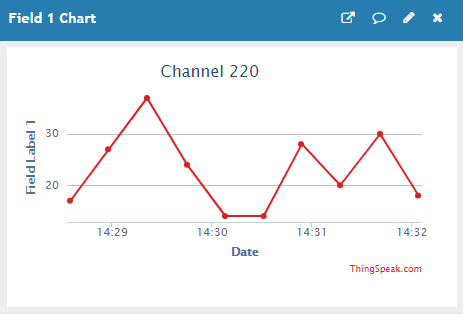
对于最终应用程序,您可能需要增加计时器或检查每小时/分钟的 API 调用限制,以避免被阻止/禁止。
注意:为了更轻松地使用ESP8266将传感器读数发送到 ThingSpeak,我们推荐以下教程:
- ESP8266 NodeMCU 将传感器读数发布到 ThingSpeak(最简单的方法)
总结
在本教程中,您学习了如何使用 HTTP GET 请求将 ESP8266 与 Web 服务集成。您还可以使用 ESP8266发出 HTTP POST 请求。


666
真的想学,可是坑太多
ho
在OpenWeatherMap.org中,温度是292? 甚么单位?