

简介
在嵌入式硬件上运行机器学习模型的令人兴奋的方面之一是,只有在有价值的情况下,才可以使用具有更高上下文意识的低功耗设备来触发高能设备。
作为概念验证,我们希望使用低功耗Arduino Nano 33 BLE Sense和ArduCam Mini 2MP以及TensorFlow Lite库,以在识别到人时触发我们的DonkeyCar打开/关闭。
步骤一 材料准备
硬件准备:
arduino nano
arducam mini 2mp
adafruit Micro-Lipo充电器
adafruit 锂离子聚合电池
软件准备:
tensorflow
arduino IDE
步骤二 原理说明
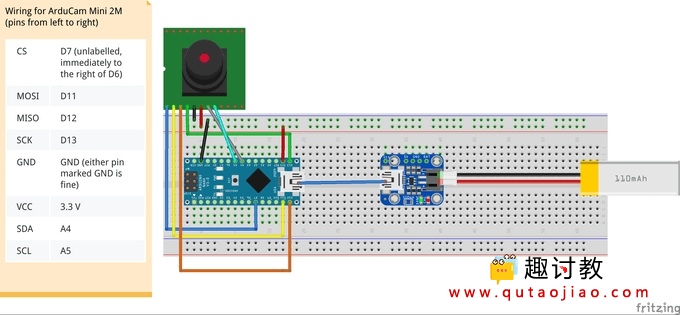
基本接线
请按照以下接线图将Arduino Nano 33 BLE Sense连接到ArduCam Mini 2MP。此图还显示了刷新Arduino之后如何添加脂电池。
官方TensorFlow回购中已发布了一些微型模型的示例,其中micro_speech模型是显示最广泛的示例。我们想刷新视觉(person_detection)演示,但是,在撰写本文时,并不是所有的资源都可用。从micro_speech示例中,我们看到这些Arduino zip软件包与Google 每晚的TensorFlow构建都存储在同一位置。导航到此链接时,您会看到一个文档树,其中包含指向所有夜间构建的链接:
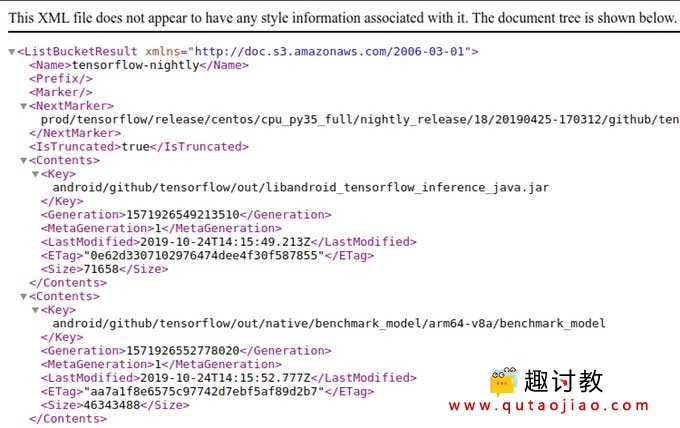
在文档树中进行快速单词搜索,我们能够找到丢失的包!(更新:TF团队正在更新缺少的链接)

下载此程序包链接,并将其重命名为person_detection.zip。如官方说明所述,这将是我们作为库上传到Arduino IDE的软件包。
上载此zip程序包后,我们希望对它们进行一些修改,以使运行平稳。使用您选择的文本编辑器,找到Arduino库的安装位置,然后打开library.properties文件进行编辑
# In our case, our Arduino library is in ~/Arduino/libraries
$ cd ~/Arduino/libraries/person_detection
$ vim library.properties
将声明库名称的第一行更改为TensorFlowLite:person_detection。您的文件应如下所示:
name=TensorFlowLite:person_detection
version=1.14-ALPHA
author=TensorFlow Authors
maintainer=Pete Warden <petewarden@google.com>
sentence=Allows you to run machine learning models locally on your device.
paragraph=This library runs TensorFlow machine learning models on microcontrollers, allowing you to build AI/ML applications powered by deep learning and neural networks. With the included examples, you can recognize speech, detect people using a camera, and recognise "magic wand" gestures using an accelerometer. The examples work best with the Arduino Nano 33 BLE Sense board, which has a microphone and accelerometer.
category=Data Processing
url=https://www.tensorflow.org/lite/microcontrollers/overview
ldflags=-lm
includes=TensorFlowLite.h
这使其在Arduino IDE示例菜单中可见。最后,导航到同一位置的examples /目录,并将子目录重命名为person_detection。所有这些更改解决了使演示运行所需的差异。
从这里,您可以按照官方说明下载ArduCam和JPEG解码库。
要运行该示例,请导航至文件->示例-> TensorflowLite:person_detection并选择person_detection示例脚本。确保已将Arduino BLE 33感应器连接到计算机,并且已选择将其在Arduino IDE上闪烁。刷新示例,它应立即启动。板载LED将闪烁蓝色,表示已捕获图像且推断已完成。如果未检测到人,则指示灯将变为红色,而当未检测到时,指示灯将变为绿色。由于人的检测模型对于设备而言相当大,因此推理需要约19秒。
步骤三 电路搭建
使用Arduino作为智能开关
微控制器非常节能,有些可以使用纽扣电池工作多年!通过最小化在嵌入式设备上运行的机器学习模型的最新努力,我们可以构建智能的“开关”,可以调用这些开关来供电或触发其他需要更多功率才能运行的设备。通过此人检测模型在Arduino BLE感知上运行,我们可以触发高能耗的Donkeycar,使其仅在有人在场时才打开。我们将使用连接到Arduino的继电器,并根据推理结果将其打开/关闭。
按照以下接线图连接继电器,pi和arduino:
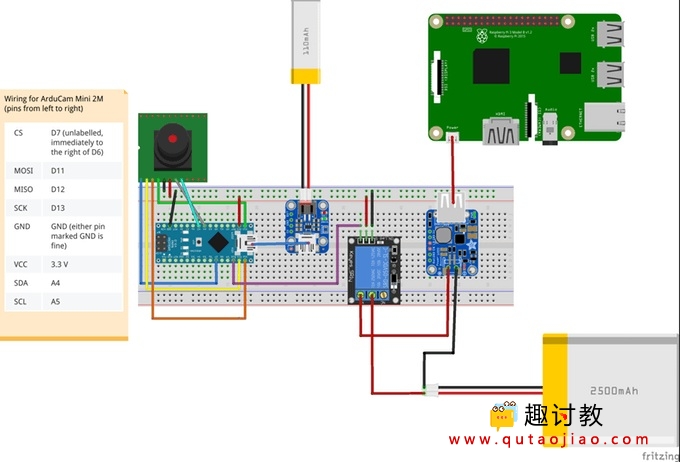
我们当前的Donkeycar设置将RC车和树莓派的动力分开。现在,我们将配置Arduino智能开关以打开/关闭Donkeycar上的pi。通过升级新的DonkeyCar草帽帽子,您可以控制整个装置的电源。
现在,只需在person_detection.ino示例中添加几行内容,以查看推理结果并打开/关闭继电器。
// at the top of the script, initialize a variable for the relay signal
int relayOut = 10;

// in the setup() loop, initialize the relayOut pin as output
void setup(){
   /*  ....   */
   pinMode(relayOut, OUTPUT);
}

// in the void() loop:
void loop() {
// Get image from provider.
if (kTfLiteOk != GetImage(error_reporter, kNumCols, kNumRows, kNumChannels,
input->data.uint8)) {
error_reporter->Report("Image capture failed.");
}
// Run the model on this input and make sure it succeeds.
if (kTfLiteOk != interpreter->Invoke()) {
error_reporter->Report("Invoke failed.");
}
TfLiteTensor* output = interpreter->output(0);
// Process the inference results.
uint8_t person_score = output->data.uint8[kPersonIndex];
uint8_t no_person_score = output->data.uint8[kNotAPersonIndex];
RespondToDetection(error_reporter, person_score, no_person_score);

// Add the following lines:
if (person_score >= no_person_score){
  digitalWrite(relayOut, HIGH);
}
else {
  digitalWrite(relayOut, LOW);
}

}
未来的工作
通过启用Arduino与DonkeyCar上的接收器之间的BLE通信,我们可以廉价地分发许多关于安全或监视应用程序设置的类似传感器。更多内容即将推出!
步骤四 验证结果
接下来;完成我们自己的识别吧


