

释放双眼,带上耳机,听听看~!
简介
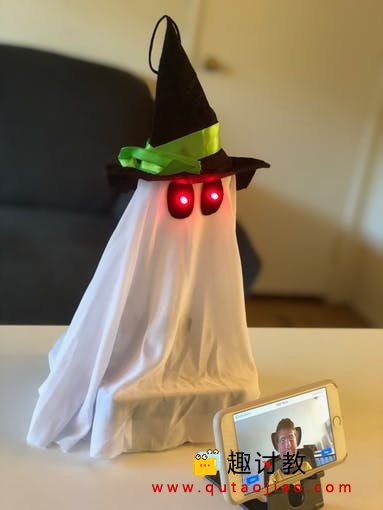
万圣节快到了!我们决定打造一些很棒的东西。我们决定搭建一个机器人,他们可以跟随您的脸,并且知道您何时微笑然后与您一起笑!
该项目是使用iRobbie App的另一个示例,该应用程序将iPhone转换为Arduino项目的强大工具箱。
该应用程序能够捕获和处理视频,然后通过HM-10蓝牙模块将X和Y坐标以及微笑状态发送给Arduino。
步骤一 材料准备
硬件准备:
arduino uno
HM-10蓝牙模块
带有伺服电机的云台模块
面包板
红色LED
软件准备:
arduino IDE
iRobbie App
步骤二 原理说明
我们利用iRobbie,和arduino通过蓝牙进行交流,将客户端采集到的信息用来控制。
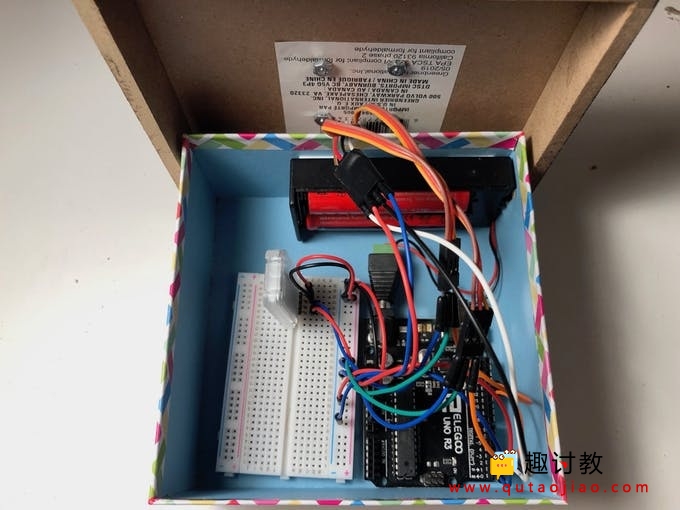
步骤三 电路搭建
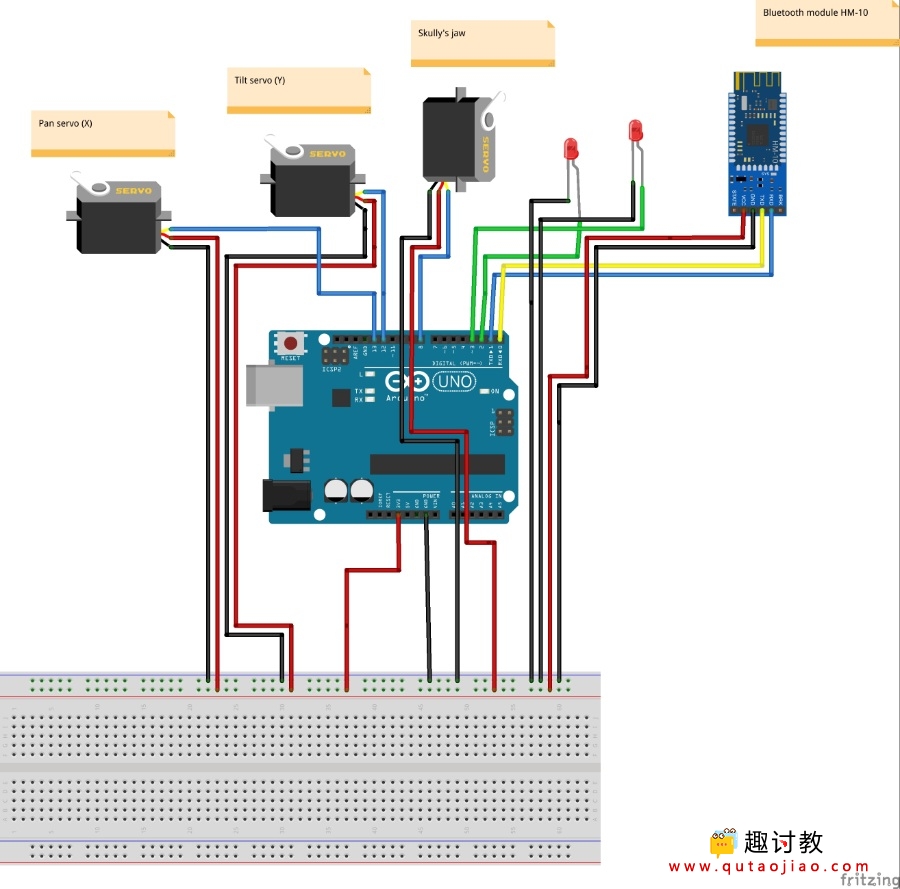
根据原理图搭建我们的ghost机器人,机器人的搭建是一个技术活,可以根据我们自己的想法发挥创意进行创作,这里提供我的作品仅供参考
步骤四 编写程序
#include "servo.h"

Servo servox;
Servo servoy;
Servo servoz;

int angle = 0;
boolean forward1 = false ;
String bluetoothRead, Str_x, Str_y, Str_p, Str_s;

int x ;
int y ;
int x1 ;
int y1 ;
int points;
int length;

const int buzzer = 10;

int s;
int led1 = 3;           // the pin that the LED1 is attached to
int led2 = 2;           // the pin that the LED2 is attached to
int brightness = 0;    // how bright the LED is
int fadeAmount = 1;    // how many points to fade the LED by

const long interval = 1000;  // interval at which to blink (milliseconds
const long interval_short = 100;
int ledState = LOW;             // ledState used to set the LED
unsigned long previousMillis = 0;        // will store last time LED was updated

#define ENA 11
#define ENB 6
#define IN1 5
#define IN2 7
#define IN3 8
#define IN4 9
#define DELAY 20

void setup() {
  Serial.begin(9600);
  Serial.flush();
  pinMode(IN1,OUTPUT);
  pinMode(IN2,OUTPUT);
  pinMode(IN3,OUTPUT);
  pinMode(IN4,OUTPUT);
  pinMode(ENA,OUTPUT);
  pinMode(ENB,OUTPUT);
  pinMode(buzzer, OUTPUT);
  pinMode(led1, OUTPUT);
  pinMode(led2, OUTPUT);

 servox.attach(13);
 servoy.attach(12);
 servoz.attach(8);
 servox.write(90);
 servoy.write(90);
 servoz.write(90);
}


void loop() {
 int i=0;
  char commandbuffer[200];
  if(Serial.available()){
     delay(15);

     while( Serial.available() && i< 199) {
        commandbuffer[i++] = Serial.read();
     }
     commandbuffer[i++]=' ';
     bluetoothRead = (char*)commandbuffer;
     length = bluetoothRead.length();
     Serial.println(bluetoothRead);

     if(bluetoothRead.substring(0, 1).equals("x")){
       int i=1;
       while(bluetoothRead.substring(i, i+1) != ("y")){
       i++;
       }
       Str_x = bluetoothRead.substring(1, i);
       x = Str_x.toInt();
       Str_y = bluetoothRead.substring(i+1, length - 2);
       y = Str_y.toInt();
        Str_p = bluetoothRead.substring(length - 2, length - 1);
        points = Str_p.toInt();

               Str_s = bluetoothRead.substring(length - 1, length);

        s = Str_s.toInt();
       i = 1;


  Serial.println(x);
  Serial.println(y);
  Serial.println(points);
  Serial.println(s);
  Serial.println(length );
}
}

    servomove();

     if (x1 != 0 && y1 != 0) {

    ledblink();

       if (s == 1) {

    ledlaugh();

    servomouth();

    Serial.println("Smile!");

     }

     }

     else{

      ledState = LOW;

      Serial.println("NotSmile");

      digitalWrite(led1, ledState);

      digitalWrite(led2, ledState);

     }


}


void servomove(){


    x1 = x/3;

    y1 = y/4;

 if (points == 4) {
    servox.write(90-x1);
       servoy.write(90-y1);
    delay(10);
  }

 if (points == 3)
  {
    servox.write(90+x1);
     servoy.write(90-y1);
     delay(10);
  }


if (points == 7)
  {
    servox.write(90+x1);
     servoy.write(y1+90);
     delay(10);
  }


  if (points == 8)
  {
    servox.write(90-x1);
     servoy.write(y1+90);
     delay(10);
  }


  if (x1 == 0 && y1 == 0)
  {
    servox.write(90);
        servoy.write(90);
     delay(10);
  }
}

void ledblink(){
  unsigned long currentMillis = millis();
  if (currentMillis - previousMillis >= interval) {
    // save the last time you blinked the LED
    previousMillis = currentMillis;

    // if the LED is off turn it on and vice-versa:
    if (ledState == LOW) {
      ledState = HIGH;
    } else {
      ledState = LOW;
    }

     // set the LED with the ledState of the variable:

    digitalWrite(led1, ledState);
    digitalWrite(led2, ledState);
  }
}


void ledlaugh(){
  unsigned long currentMillis = millis();
  if (currentMillis - previousMillis >= interval_short) {
    // save the last time you blinked the LED
    previousMillis = currentMillis;
    // if the LED is off turn it on and vice-versa:
    if (ledState == LOW) {
      ledState = HIGH;
    } else {
      ledState = LOW;
    }

     // set the LED with the ledState of the variable:
    digitalWrite(led1, ledState);
    digitalWrite(led2, ledState);
  }
}

void servomouth(){
    unsigned long currentMillis = millis();
    if (millis() - previousMillis >= DELAY)
      {
       previousMillis += DELAY;
      if (forward1)
      {
       servoz.write(-- angle);
        if(angle == 100)
        forward1 = false;
      }

      else
      {
       servoz.write(++ angle);
        if (angle == 140)
        forward1 = true;
      }
      }
}
步骤五 验证结果
参考我的code然后进行二次开发,制造属于你的ghost机器人吧
源码
提取码:无
解压码:无


