
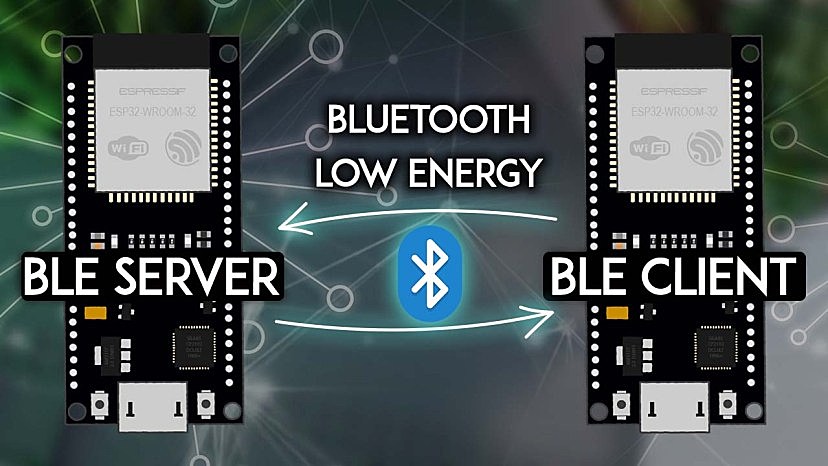

这篇教程将带领大家了解如何在两个 ESP32 板之间建立 BLE(低功耗蓝牙)连接。一个 ESP32 将成为服务器,另一个 ESP32 将成为客户端。BLE 服务器通告包含客户端可以读取的传感器读数的特征。ESP32 BLE 客户端读取这些特性(温度和湿度)的值并将它们显示在 OLED 显示器上。

什么是低功耗蓝牙?
在直接进入项目之前,快速浏览一些基本的 BLE 概念非常重要,这样您以后能够更好地理解项目。如果您已经熟悉 BLE,可以跳到项目概述部分。
低功耗蓝牙,简称BLE,是蓝牙的一种省电变体。BLE 的主要应用是少量数据的短距离传输(低带宽)。与始终开启的蓝牙不同,BLE 始终处于睡眠模式,除非在启动连接时。
这使得它消耗非常低的功率。BLE 的功耗比蓝牙低大约 100 倍(取决于用例)。您可以在此处查看蓝牙和低功耗蓝牙之间的主要区别。
BLE 服务器和客户端
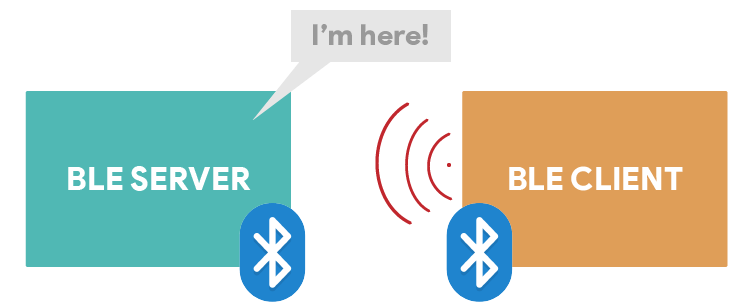
使用蓝牙低功耗,有两种类型的设备:服务器和客户端。ESP32 既可以作为客户端,也可以作为服务器。
服务器宣传它的存在,因此它可以被其它设备发现并包含客户端可以读取的数据。客户端扫描附近的设备,当它找到它正在寻找的服务器时,它会建立连接并监听传入的数据。这称为点对点通信。
还有其它可能的通信模式,如广播模式和网状网络(本教程未涉及)。
GATT
GATT 代表通用属性,它定义了向连接的 BLE 设备公开的分层数据结构。这意味着 GATT 定义了两个 BLE 设备发送和接收标准消息的方式。理解这个层次结构很重要,因为它可以更容易地理解如何将 BLE 与 ESP32 一起使用。
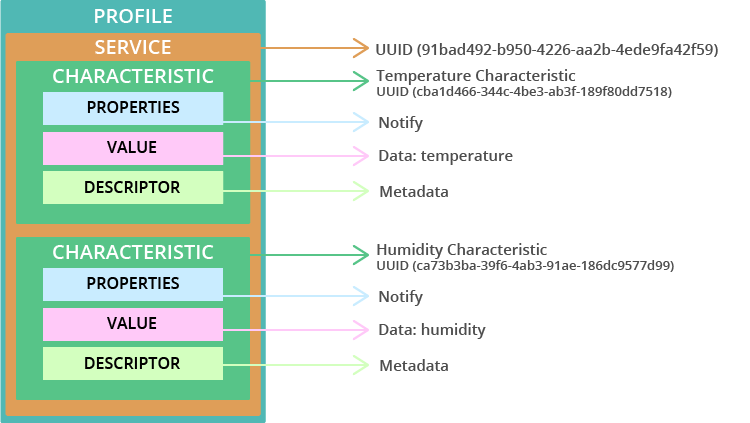
- Profile:针对特定用例的标准服务集合;
- Service:收集相关信息,如传感器读数、电池电量、心率等;
- Characteristic:它是实际数据保存在层次结构(值)上的位置;
- Descriptor:关于数据的元数据;
- Properties:描述如何与特征值交互。例如:读、写、通知、广播、指示等。
在我们的示例中,我们将创建一个具有两个特征的服务。一个用于温度,另一个用于湿度。实际温度和湿度读数保存在其特性值上。每个特征都有notify属性,以便在值更改时通知客户端。
UUID
每个服务、特征和描述符都有一个 UUID(通用唯一标识符)。UUID 是唯一的 128 位(16 字节)数字。例如:
55072829-bc9e-4c53-938a-74a6d4c78776
SIG(蓝牙特殊兴趣组)中指定的所有类型、服务和配置文件都有缩短的 UUID 。
但是,如果您的应用程序需要自己的 UUID,您可以使用此UUID 生成器网站生成它。
总之,UUID 用于唯一标识信息。例如,它可以识别蓝牙设备提供的特定服务。
项目概况
在本教程中,您将学习如何在两个 ESP32 板之间建立 BLE 连接。一个 ESP32 将作为 BLE 服务器,另一个 ESP32 将作为 BLE 客户端。

ESP32 BLE 服务器连接到BME280 传感器,每 30 秒更新一次温度和湿度特性值。
ESP32 客户端连接到 BLE 服务器,并通知它的温度和湿度特性值。此 ESP32 连接到 OLED 显示器并打印最新读数。
本项目分为两部分:
- 第 1 部分 – ESP32 BLE 服务器
- 第 2 部分 – ESP32 BLE 客户端
所需零件
以下是完成此项目所需的部件列表:
ESP32 BLE 服务器:
- ESP32 DOIT DEVKIT V1 Board
- BME280 传感器
- 连接线
- 面包板
- 带蓝牙的智能手机(可选)
ESP32 BLE 客户端:
- ESP32 DOIT DEVKIT V1 Board
- OLED显示屏
- 连接线
- 面包板
1) ESP32 BLE 服务器
在这一部分中,我们将设置 BLE 服务器来宣传包含两个特征的服务:一个是温度,另一个是湿度。这些特征具有通知属性以将新值通知给客户端。
原理图
ESP32 BLE 服务器将通过 BME280 传感器发布温度和湿度特性。只要在代码中添加所需的行,您就可以使用任何其它传感器。
我们将使用 I2C 通信与 BME280 传感器模块。为此,将传感器连接到默认的 ESP32 SCL(通用输入输出接口 22) 和 SDA (通用输入输出接口 21) 引脚,如下图所示。

安装 BME280 库
如前所述,我们将获取来自 BME280 传感器的传感器读数。因此,您需要安装以下库以与 BME280 传感器连接:
您可以使用 Arduino Library Manager 安装库。转到 Sketch > Include Library > Manage Libraries 并搜索库名称。
ESP32 BLE 服务器 – 代码
准备好电路并安装所需的库后,将以下代码复制到 Arduino IDE :
您可以上传代码,它会立即使用温度和湿度特性来通知其服务。
示例部分中有几个示例展示了如何将 BLE 与 ESP32 一起使用。在您的 Arduino IDE 中,转到文件>示例> ESP32 BLE Arduino。此服务器程序基于通知示例。
导入库
代码首先导入所需的库。
#include <BLEDevice.h>
#include <BLEServer.h>
#include <BLEUtils.h>
#include <BLE2902.h>
#include <Wire.h>
#include <Adafruit_Sensor.h>
#include <Adafruit_BME280.h>
选择温度单位
默认情况下,ESP 以摄氏度发送温度。您可以评论以下行或将其删除以发送华氏温度。
//Comment the next line for Temperature in Fahrenheit
#define temperatureCelsius
BLE 服务器名称
以下行定义了我们的 BLE 服务器的名称。保留默认的 BLE 服务器名称。否则,客户端代码中的服务器名称也需要更改(因为它们必须匹配)。
//BLE server name
#define bleServerName "BME280_ESP32"
BME280 传感器
创建一个Adafruit_BME280称为对象bme在默认的 ESP32 I2C 引脚上。
Adafruit_BME280 bme; // I2C
temp,tempF和hum变量将分别保存以摄氏度为单位的温度、以华氏度为单位的温度以及从 BME280 传感器读取的湿度。
float temp;
float tempF;
float hum;
其它变量
以下计时器变量定义了我们希望写入温度和湿度特性的频率。我们设置定时器undefined可变为 30000 毫秒(30 秒),但您可以更改它。
// Timer variables
unsigned long lastTime = 0;
unsigned long timerDelay = 30000;
deviceConnected布尔变量允许我们跟踪客户端是否连接到服务器。
bool deviceConnected = false;
BLE UUID
在接下来的几行中,我们为服务、以摄氏度为单位的温度特性、以华氏度为单位的温度特性以及湿度定义了 UUID。
// https://www.uuidgenerator.net/
#define SERVICE_UUID "91bad492-b950-4226-aa2b-4ede9fa42f59"
// Temperature Characteristic and Descriptor
#ifdef temperatureCelsius
BLECharacteristic bmeTemperatureCelsiusCharacteristics(“cba1d466-344c-4be3-ab3f-189f80dd7518”, BLECharacteristic::PROPERTY_NOTIFY);
BLEDescriptor bmeTemperatureCelsiusDescriptor(BLEUUID((uint16_t)0x2902));
#else
BLECharacteristic bmeTemperatureFahrenheitCharacteristics(“f78ebbff-c8b7-4107-93de-889a6a06d408”, BLECharacteristic::PROPERTY_NOTIFY);
BLEDescriptor bmeTemperatureFahrenheitDescriptor(BLEUUID((uint16_t)0x2901));
#endif
// Humidity Characteristic and Descriptor
BLECharacteristic bmeHumidityCharacteristics(“ca73b3ba-39f6-4ab3-91ae-186dc9577d99”, BLECharacteristic::PROPERTY_NOTIFY);
BLEDescriptor bmeHumidityDescriptor(BLEUUID((uint16_t)0x2903));
我建议保留所有默认 UUID。否则,您还需要更改客户端的代码——以便客户端可以找到服务并检索特征值。
setup()
在函数 setup() 里面,初始化串行监视器和 BME280 传感器。
// Start serial communication
Serial.begin(115200);
// Init BME Sensor
initBME();
使用您之前定义的 BLE 服务器名称创建一个新的 BLE 设备:
// Create the BLE Device
BLEDevice::init(bleServerName);
将 BLE 设备设置为服务器并分配回调函数。
// Create the BLE Server
BLEServer *pServer = BLEDevice::createServer();
pServer->setCallbacks(new MyServerCallbacks());
回调函数MyServerCallbacks()更改布尔变量设备已连接至真的或者错误的根据BLE设备的当前状态。这意味着如果客户端连接到服务器,则状态为真的. 如果客户端断开连接,则布尔变量更改为错误的. 这是定义的代码部分MyServerCallbacks()功能。
//Setup callbacks onConnect and onDisconnect
class MyServerCallbacks: public BLEServerCallbacks {
  void onConnect(BLEServer* pServer) {
    deviceConnected = true;
  };
  void onDisconnect(BLEServer* pServer) {
    deviceConnected = false;
  }
};
使用之前定义的服务 UUID 启动 BLE 服务。
BLEService *bmeService = pServer->createService(SERVICE_UUID);
然后,创建温度 BLE 特性。如果您使用摄氏度,它会设置以下特征和描述符:
#ifdef temperatureCelsius
  bmeService->addCharacteristic(&bmeTemperatureCelsiusCharacteristics);
  bmeTemperatureCelsiusDescriptor.setValue("BME temperature Celsius");
  bmeTemperatureCelsiusCharacteristics.addDescriptor(new BLE2902());
否则,它会设置华氏特性:
#else
  bmeService->addCharacteristic(&dhtTemperatureFahrenheitCharacteristics);
  bmeTemperatureFahrenheitDescriptor.setValue("BME temperature Fahrenheit");
  bmeTemperatureFahrenheitCharacteristics.addDescriptor(new BLE2902());
#endif
之后,它设置湿度特性:
// Humidity
bmeService->addCharacteristic(&bmeHumidityCharacteristics);
bmeHumidityDescriptor.setValue("BME humidity");
bmeHumidityCharacteristics.addDescriptor(new BLE2902());
最后,您启动服务,服务器启动广告,以便其它设备可以找到它。
// Start the service
bmeService->start();
// Start advertising
BLEAdvertising *pAdvertising = BLEDevice::getAdvertising();
pAdvertising->addServiceUUID(SERVICE_UUID);
pServer->getAdvertising()->start();
Serial.println(“Waiting a client connection to notify…”);
loop()
这loop()功能相当简单,不断检查设备是否连接到客户端。如果它已连接,并且timerdelay()已经执行,它会读取当前的温度和湿度。
if (deviceConnected) {
  if ((millis() - lastTime) > timerDelay) {
    // Read temperature as Celsius (the default)
    temp = bme.readTemperature();
    // Fahrenheit
    tempF = temp*1.8 +32;
    // Read humidity
    hum = bme.readHumidity();
如果您使用的是以摄氏度为单位的温度,则它运行以下代码节。首先,它将温度转换为一个char变量(tematureCTemp变量)。我们必须将温度转换为char变量类型,才能在setValue()函数中使用它。
static char temperatureCTemp[6];
dtostrf(temp, 6, 2, temperatureCTemp);
然后,它使用setValue()函数将bmeTemperatureCelsiusCharacteristic值设置为新的温度值(TematureCTemp)。设置新值后,我们可以使用Notify()函数通知连接的客户端。
//Set temperature Characteristic value and notify connected client
bmeTemperatureCelsiusCharacteristics.setValue(temperatureCTemp);
bmeTemperatureCelsiusCharacteristics.notify();
我们对华氏温度遵循类似的程序。
#else
    static char temperatureFTemp[6];
    dtostrf(f, 6, 2, temperatureFTemp);
    //Set temperature Characteristic value and notify connected client
    bmeTemperatureFahrenheitCharacteristics.setValue(tempF);
    bmeTemperatureFahrenheitCharacteristics.notify();
    Serial.print("Temperature Fahrenheit: ");
    Serial.print(tempF);
    Serial.print(" *F");
#endif
发送湿度也使用相同的过程。
//Notify humidity reading from DHT
static char humidityTemp[6];
dtostrf(hum, 6, 2, humidityTemp);
//Set humidity Characteristic value and notify connected client
bmeHumidityCharacteristics.setValue(humidityTemp);
bmeHumidityCharacteristics.notify();
Serial.print(" - Humidity: ");
Serial.print(hum);
Serial.println(" %");
测试 ESP32 BLE 服务器
将代码上传到您的板上,然后打开串行监视器。它将显示一条消息,如下所示。
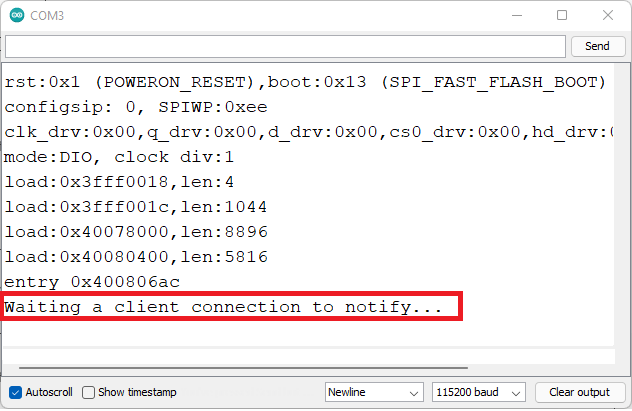
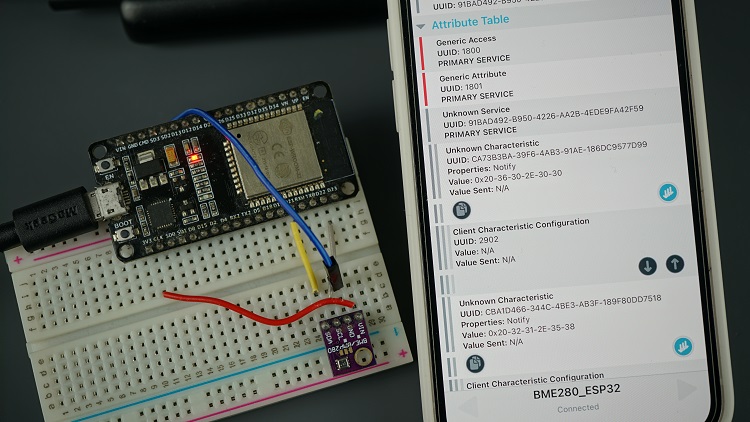
然后,您可以使用智能手机上的 BLE 扫描应用程序(如nRF Connect )来测试 BLE 服务器是否按预期工作。此应用程序适用于Android和iOS。
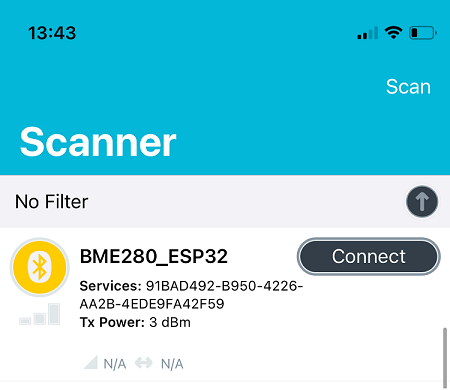
安装应用程序后,在您的智能手机上启用蓝牙。打开 nRF Connect 应用程序并单击扫描按钮。它将找到附近的所有蓝牙设备,包括您的BME280_ESP32设备(它是您在代码中定义的 BLE 服务器名称)。
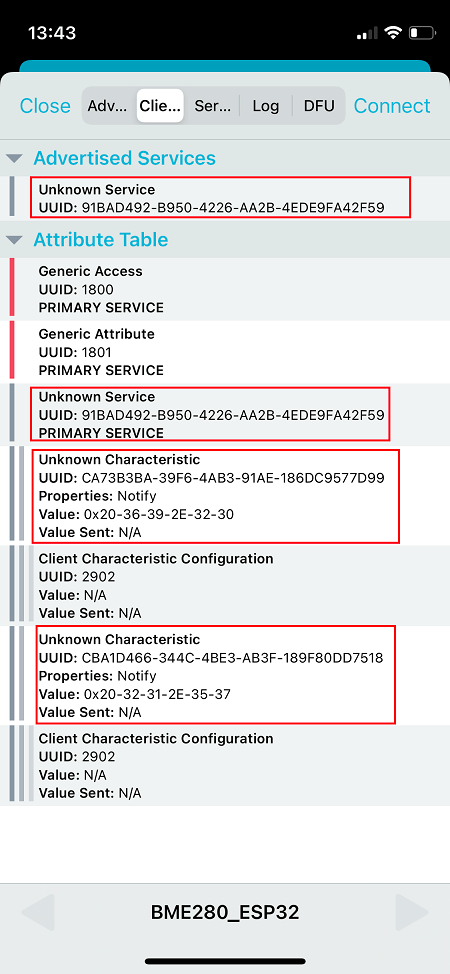
连接到您的 BME280_ESP32 设备,然后选择客户端选项卡(界面可能略有不同)。您可以检查它是否使用我们在代码中定义的 UUID 以及温度和湿度特性来通知服务。请注意,这些特征具有Notify属性。
您的 ESP32 BLE 服务器已准备就绪!
转到下一部分,创建一个连接到服务器的 ESP32 客户端,以访问温度和湿度特性,并获取读数以在 OLED 显示器上显示它们。
2) ESP32 BLE 客户端
在本节中,我们将创建 ESP32 BLE 客户端,它将与 ESP32 BLE 服务器建立连接,并在 OLED 显示屏上显示读数。
示意图
ESP32 BLE 客户端连接到 OLED 显示器。显示屏显示通过蓝牙接收的读数。
按照下一个示意图将 OLED 显示器连接到 ESP32。SCL 引脚连接到通用输入输出接口 22和 SDA 引脚到通用输入输出接口 21.

安装 SSD1306、GFX 和 BusIO 库
您需要安装以下库来与 OLED 显示器交互:
要安装库,请转到 Sketch > Include Library > Manage Libraries,然后搜索库的名称。
ESP32 BLE 客户端 – 代码
将 BLE 客户端 Sketch 复制到您的 Arduino IDE 或主文件如果您将 VS Code 与 PlatformIO.
#include "BLEDevice.h"
#include <Wire.h>
#include <Adafruit_SSD1306.h>
#include <Adafruit_GFX.h>
//Default Temperature is in Celsius
//Comment the next line for Temperature in Fahrenheit
#define temperatureCelsius

//BLE Server name (the other ESP32 name running the server sketch)
#define bleServerName "BME280_ESP32"

/* UUID's of the service, characteristic that we want to read*/
// BLE Service
static BLEUUID bmeServiceUUID("91bad492-b950-4226-aa2b-4ede9fa42f59");

// BLE Characteristics
#ifdef temperatureCelsius
//Temperature Celsius Characteristic
static BLEUUID temperatureCharacteristicUUID("cba1d466-344c-4be3-ab3f-189f80dd7518");
#else
//Temperature Fahrenheit Characteristic
static BLEUUID temperatureCharacteristicUUID("f78ebbff-c8b7-4107-93de-889a6a06d408");
#endif

// Humidity Characteristic
static BLEUUID humidityCharacteristicUUID("ca73b3ba-39f6-4ab3-91ae-186dc9577d99");

//Flags stating if should begin connecting and if the connection is up
static boolean doConnect = false;
static boolean connected = false;

//Address of the peripheral device. Address will be found during scanning...
static BLEAddress *pServerAddress;

//Characteristicd that we want to read
static BLERemoteCharacteristic* temperatureCharacteristic;
static BLERemoteCharacteristic* humidityCharacteristic;

//Activate notify
const uint8_t notificationOn[] = {0x1, 0x0};
const uint8_t notificationOff[] = {0x0, 0x0};

#define SCREEN_WIDTH 128 // OLED display width, in pixels
#define SCREEN_HEIGHT 64 // OLED display height, in pixels

//Declaration for an SSD1306 display connected to I2C (SDA, SCL pins)
Adafruit_SSD1306 display(SCREEN_WIDTH, SCREEN_HEIGHT, &Wire, -1);

//Variables to store temperature and humidity
char* temperatureChar;
char* humidityChar;

//Flags to check whether new temperature and humidity readings are available
boolean newTemperature = false;
boolean newHumidity = false;

//Connect to the BLE Server that has the name, Service, and Characteristics
bool connectToServer(BLEAddress pAddress) {
BLEClient* pClient = BLEDevice::createClient();

// Connect to the remove BLE Server.
pClient->connect(pAddress);
Serial.println(" - Connected to server");

// Obtain a reference to the service we are after in the remote BLE server.
BLERemoteService* pRemoteService = pClient->getService(bmeServiceUUID);
if (pRemoteService == nullptr) {
Serial.print("Failed to find our service UUID: ");
Serial.println(bmeServiceUUID.toString().c_str());
return (false);
}

// Obtain a reference to the characteristics in the service of the remote BLE server.
temperatureCharacteristic = pRemoteService->getCharacteristic(temperatureCharacteristicUUID);
humidityCharacteristic = pRemoteService->getCharacteristic(humidityCharacteristicUUID);

if (temperatureCharacteristic == nullptr || humidityCharacteristic == nullptr) {
Serial.print("Failed to find our characteristic UUID");
return false;
}
Serial.println(" - Found our characteristics");

//Assign callback functions for the Characteristics
temperatureCharacteristic->registerForNotify(temperatureNotifyCallback);
humidityCharacteristic->registerForNotify(humidityNotifyCallback);
return true;
}

//Callback function that gets called, when another device's advertisement has been received
class MyAdvertisedDeviceCallbacks: public BLEAdvertisedDeviceCallbacks {
void onResult(BLEAdvertisedDevice advertisedDevice) {
if (advertisedDevice.getName() == bleServerName) { //Check if the name of the advertiser matches
advertisedDevice.getScan()->stop(); //Scan can be stopped, we found what we are looking for
pServerAddress = new BLEAddress(advertisedDevice.getAddress()); //Address of advertiser is the one we need
doConnect = true; //Set indicator, stating that we are ready to connect
Serial.println("Device found. Connecting!");
}
}
};

//When the BLE Server sends a new temperature reading with the notify property
static void temperatureNotifyCallback(BLERemoteCharacteristic* pBLERemoteCharacteristic,
uint8_t* pData, size_t length, bool isNotify) {
//store temperature value
temperatureChar = (char*)pData;
newTemperature = true;
}

//When the BLE Server sends a new humidity reading with the notify property
static void humidityNotifyCallback(BLERemoteCharacteristic* pBLERemoteCharacteristic,
uint8_t* pData, size_t length, bool isNotify) {
//store humidity value
humidityChar = (char*)pData;
newHumidity = true;
Serial.print(newHumidity);
}

//function that prints the latest sensor readings in the OLED display
void printReadings(){

display.clearDisplay();
// display temperature
display.setTextSize(1);
display.setCursor(0,0);
display.print("Temperature: ");
display.setTextSize(2);
display.setCursor(0,10);
display.print(temperatureChar);
display.setTextSize(1);
display.cp437(true);
display.write(167);
display.setTextSize(2);
Serial.print("Temperature:");
Serial.print(temperatureChar);
#ifdef temperatureCelsius
//Temperature Celsius
display.print("C");
Serial.print("C");
#else
//Temperature Fahrenheit
display.print("F");
Serial.print("F");
#endif

//display humidity
display.setTextSize(1);
display.setCursor(0, 35);
display.print("Humidity: ");
display.setTextSize(2);
display.setCursor(0, 45);
display.print(humidityChar);
display.print("%");
display.display();
Serial.print(" Humidity:");
Serial.print(humidityChar);
Serial.println("%");
}

void setup() {
//OLED display setup
// SSD1306_SWITCHCAPVCC = generate display voltage from 3.3V internally
if(!display.begin(SSD1306_SWITCHCAPVCC, 0x3C)) { // Address 0x3C for 128x32
Serial.println(F("SSD1306 allocation failed"));
for(;;); // Don't proceed, loop forever
}
display.clearDisplay();
display.setTextSize(2);
display.setTextColor(WHITE,0);
display.setCursor(0,25);
display.print("BLE Client");
display.display();

//Start serial communication
Serial.begin(115200);
Serial.println("Starting Arduino BLE Client application...");

//Init BLE device
BLEDevice::init("");

// Retrieve a Scanner and set the callback we want to use to be informed when we
// have detected a new device.  Specify that we want active scanning and start the
// scan to run for 30 seconds.
BLEScan* pBLEScan = BLEDevice::getScan();
pBLEScan->setAdvertisedDeviceCallbacks(new MyAdvertisedDeviceCallbacks());
pBLEScan->setActiveScan(true);
pBLEScan->start(30);
}

void loop() {
// If the flag "doConnect" is true then we have scanned for and found the desired
// BLE Server with which we wish to connect.  Now we connect to it.  Once we are
// connected we set the connected flag to be true.
if (doConnect == true) {
if (connectToServer(*pServerAddress)) {
Serial.println("We are now connected to the BLE Server.");
//Activate the Notify property of each Characteristic
temperatureCharacteristic->getDescriptor(BLEUUID((uint16_t)0x2902))->writeValue((uint8_t*)notificationOn, 2, true);
humidityCharacteristic->getDescriptor(BLEUUID((uint16_t)0x2902))->writeValue((uint8_t*)notificationOn, 2, true);
connected = true;
} else {
Serial.println("We have failed to connect to the server; Restart your device to scan for nearby BLE server again.");
}
doConnect = false;
}
//if new temperature readings are available, print in the OLED
if (newTemperature && newHumidity){
newTemperature = false;
newHumidity = false;
printReadings();
}
delay(1000); // Delay a second between loops.
}
导入库
您首先导入所需的库:
#include "BLEDevice.h"
#include <Wire.h>
#include <Adafruit_SSD1306.h>
#include <Adafruit_GFX.h>
选择温度单位
默认情况下,客户端将接收以摄氏度为单位的温度,如果您评论以下行或将其删除,它将开始接收以华氏度为单位的温度。
//Default Temperature is in Celsius
//Comment the next line for Temperature in Fahrenheit
#define temperatureCelsius
BLE 服务器名称和 UUID
然后,定义我们要连接的 BLE 服务器名称以及我们要读取的服务和特征 UUID。保留默认的 BLE 服务器名称和 UUID 以匹配服务器程序中定义的名称。
//BLE Server name (the other ESP32 name running the server sketch)
#define bleServerName "BME280_ESP32"
/* UUID’s of the service, characteristic that we want to read*/
// BLE Service
static BLEUUID bmeServiceUUID(“91bad492-b950-4226-aa2b-4ede9fa42f59”);
// BLE Characteristics
#ifdef temperatureCelsius
//Temperature Celsius Characteristic
static BLEUUID temperatureCharacteristicUUID(“cba1d466-344c-4be3-ab3f-189f80dd7518”);
#else
//Temperature Fahrenheit Characteristic
static BLEUUID temperatureCharacteristicUUID(“f78ebbff-c8b7-4107-93de-889a6a06d408”);
#endif
// Humidity Characteristic
static BLEUUID humidityCharacteristicUUID(“ca73b3ba-39f6-4ab3-91ae-186dc9577d99”);
声明变量
然后,您需要声明一些稍后将与蓝牙一起使用的变量,以检查我们是否连接到服务器。
//Flags stating if should begin connecting and if the connection is up
static boolean doConnect = false;
static boolean connected = false;
创建静态变量BLEAddress那是指我们要连接的服务器的地址。该地址将在扫描期间找到。
//Address of the peripheral device. Address will be found during scanning...
static BLEAddress *pServerAddress;
设置我们要读取的特性(温度和湿度)。
//Characteristicd that we want to read
static BLERemoteCharacteristic* temperatureCharacteristic;
static BLERemoteCharacteristic* humidityCharacteristic;
OLED显示器
您还需要声明一些变量以使用 OLED。定义 OLED 宽度和高度:
#define SCREEN_WIDTH 128 // OLED display width, in pixels
#define SCREEN_HEIGHT 64 // OLED display height, in pixels
使用前面定义的宽度和高度实例化 OLED 显示器。
Adafruit_SSD1306 display(SCREEN_WIDTH, SCREEN_HEIGHT, &Wire);
温度和湿度变量
定义 char 变量来保存服务器接收到的温度和湿度值。
//Variables to store temperature and humidity
char* temperatureChar;
char* humidityChar;
以下变量用于检查是否有新的温度和湿度读数可用,以及是否需要更新 OLED 显示屏。
//Flags to check whether new temperature and humidity readings are available
boolean newTemperature = false;
boolean newHumidity = false;
printReadings()
我们创建了一个名为打印读数()在 OLED 显示屏上显示温度和湿度读数。
void printReadings(){

  display.clearDisplay();
  // display temperature
  display.setTextSize(1);
  display.setCursor(0,0);
  display.print("Temperature: ");
  display.setTextSize(2);
  display.setCursor(0,10);
  display.print(temperatureChar);
  display.print(" ");
  display.setTextSize(1);
  display.cp437(true);
  display.write(167);
  display.setTextSize(2);
  Serial.print("Temperature:");
  Serial.print(temperatureChar);
  #ifdef temperatureCelsius
    //Temperature Celsius
    display.print("C");
    Serial.print("C");
  #else
    //Temperature Fahrenheit
    display.print("F");
    Serial.print("F");
  #endif
//display humidity
display.setTextSize(1);
display.setCursor(0, 35);
display.print("Humidity: ");
display.setTextSize(2);
display.setCursor(0, 45);
display.print(humidityChar);
display.print("%");
display.display();
Serial.print(" Humidity:");
Serial.print(humidityChar);
Serial.println("%");
}
setup()
在函数 setup() 里面, 启动 OLED 显示屏。
//OLED display setup
// SSD1306_SWITCHCAPVCC = generate display voltage from 3.3V internally
if(!display.begin(SSD1306_SWITCHCAPVCC, 0x3C)) { // Address 0x3C for 128x32
  Serial.println(F("SSD1306 allocation failed"));
  for(;;); // Don't proceed, loop forever
}
然后,在第一行打印一条消息“BME SENSOR”。
display.clearDisplay();
display.setTextSize(2);
display.setTextColor(WHITE,0);
display.setCursor(0,25);
display.print("BLE Client");
display.display();
以 115200 的波特率启动串行通信。
Serial.begin(115200);
并初始化BLE设备。
//Init BLE device
BLEDevice::init("");
扫描附近的设备
以下方法扫描附近的设备。
// Retrieve a Scanner and set the callback we want to use to be informed when we
// have detected a new device.  Specify that we want active scanning and start the
// scan to run for 30 seconds.
BLEScan* pBLEScan = BLEDevice::getScan();
pBLEScan->setAdvertisedDeviceCallbacks(new MyAdvertisedDeviceCallbacks());
pBLEScan->setActiveScan(true);
pBLEScan->start(30);
MyAdvertisedDeviceCallbacks() 函数
请注意,MyAdvertisedDeviceCallbacks()函数,在找到 BLE 设备后,检查找到的设备是否具有正确的 BLE 服务器名称。如果有,它会停止扫描并更改做连接布尔变量真的. 这样我们就知道我们找到了我们正在寻找的服务器,我们可以开始建立连接。
//Callback function that gets called, when another device's advertisement has been received
class MyAdvertisedDeviceCallbacks: public BLEAdvertisedDeviceCallbacks {
  void onResult(BLEAdvertisedDevice advertisedDevice) {
    if (advertisedDevice.getName() == bleServerName) { //Check if the name of the advertiser matches
      advertisedDevice.getScan()->stop(); //Scan can be stopped, we found what we are looking for
      pServerAddress = new BLEAddress(advertisedDevice.getAddress()); //Address of advertiser is the one we need
      doConnect = true; //Set indicator, stating that we are ready to connect
      Serial.println("Device found. Connecting!");
    }
  }
};
连接到服务器
如果做连接变量是真的,它会尝试连接到 BLE 服务器。connectToServer()函数处理客户端和服务器之间的连接。
//Connect to the BLE Server that has the name, Service, and Characteristics
bool connectToServer(BLEAddress pAddress) {
   BLEClient* pClient = BLEDevice::createClient();

  // Connect to the remove BLE Server.
  pClient->connect(pAddress);
  Serial.println(" - Connected to server");

  // Obtain a reference to the service we are after in the remote BLE server.
  BLERemoteService* pRemoteService = pClient->getService(bmeServiceUUID);
  if (pRemoteService == nullptr) {
    Serial.print("Failed to find our service UUID: ");
    Serial.println(bmeServiceUUID.toString().c_str());
    return (false);
  }

  // Obtain a reference to the characteristics in the service of the remote BLE server.
  temperatureCharacteristic = pRemoteService->getCharacteristic(temperatureCharacteristicUUID);
  humidityCharacteristic = pRemoteService->getCharacteristic(humidityCharacteristicUUID);
if (temperatureCharacteristic == nullptr || humidityCharacteristic == nullptr) {
Serial.print("Failed to find our characteristic UUID");
return false;
}
Serial.println(" - Found our characteristics");

//Assign callback functions for the Characteristics
temperatureCharacteristic->registerForNotify(temperatureNotifyCallback);
humidityCharacteristic->registerForNotify(humidityNotifyCallback);
return true;
}
它还分配一个回调函数,负责处理接收到新值时发生的情况。
//Assign callback functions for the Characteristics
temperatureCharacteristic->registerForNotify(temperatureNotifyCallback);
humidityCharacteristic->registerForNotify(humidityNotifyCallback);
BLE 客户端连接到服务器后,您需要为每个特征激活通知属性。为此,使用写值()描述符上的方法。
if (connectToServer(*pServerAddress)) {
  Serial.println("We are now connected to the BLE Server.");
  //Activate the Notify property of each Characteristic
  temperatureCharacteristic->getDescriptor(BLEUUID((uint16_t)0x2902))->writeValue((uint8_t*)notificationOn, 2, true);
  humidityCharacteristic->getDescriptor(BLEUUID((uint16_t)0x2902))->writeValue((uint8_t*)notificationOn, 2, true);
通知新值
当客户端收到一个新的 notify 值时,会调用这两个函数:temperatureNotifyCallback()和humidityNotifyCallback()负责检索新值,用新读数更新 OLED 并将它们打印在串行监视器上。
//When the BLE Server sends a new temperature reading with the notify property
static void temperatureNotifyCallback(BLERemoteCharacteristic* pBLERemoteCharacteristic,
                                        uint8_t* pData, size_t length, bool isNotify) {
  //store temperature value
  temperatureChar = (char*)pData;
  newTemperature = true;
}
//When the BLE Server sends a new humidity reading with the notify property
static void humidityNotifyCallback(BLERemoteCharacteristic* pBLERemoteCharacteristic,
                                    uint8_t* pData, size_t length, bool isNotify) {
  //store humidity value
  humidityChar = (char*)pData;
  newHumidity = true;
  Serial.print(newHumidity);
}
每次 BLE 服务器通知客户端一个新值时,都会执行这两个前面的函数,该值每 30 秒发生一次。这些函数保存接收到的值温度字符和湿度字符变量。这些也改变了新温度和新湿度变量为真的,以便我们知道我们收到了新的读数。
显示新的温度和湿度读数
在函数 loop() 里面,有一个 if 语句检查是否有新的读数可用。如果有新的读数,我们会查看新温度和新湿度变量为错误的,以便我们以后能够收到新的读数。然后,我们调用打印读数()在 OLED 上显示读数的功能。
//if new temperature readings are available, print in the OLED
if (newTemperature && newHumidity){
  newTemperature = false;
  newHumidity = false;
  printReadings();
}
测试项目
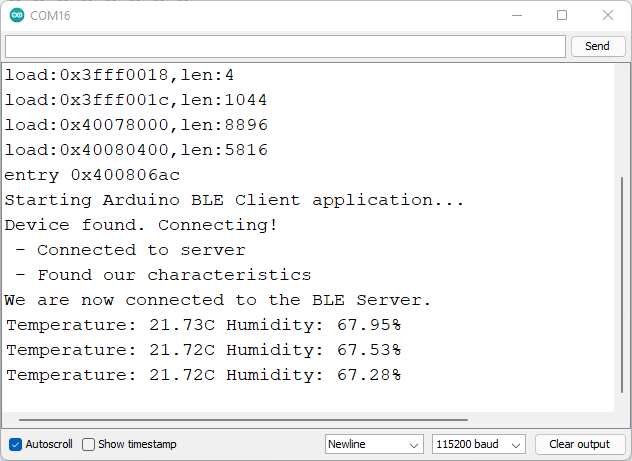
代码上传后。为 ESP32 BLE 服务器供电,然后使用客户端程序为 ESP32 供电。客户端开始扫描附近的设备,当它找到另一个 ESP32 时,它会建立蓝牙连接。每 30 秒,它会使用最新读数更新显示。
重要提示:不要忘记断开智能手机与 BLE 服务器的连接。否则,ESP32 BLE 客户端将无法连接到服务器。
总结
在本教程中,您学习了如何使用 ESP32 创建 BLE 服务器和 BLE 客户端。您学习了如何在 BLE 服务器特性上设置新的温度和湿度值。然后,其它 BLE 设备(客户端)可以连接到该服务器并读取这些特征值以获取最新的温度和湿度值。这些特征具有notify属性,因此每当有新值时都会通知客户端。
除了 Wi-Fi,使用 BLE 是您可以与 ESP32 板一起使用的另一种通信协议。我们希望您发现本教程很有用。


6