


介绍
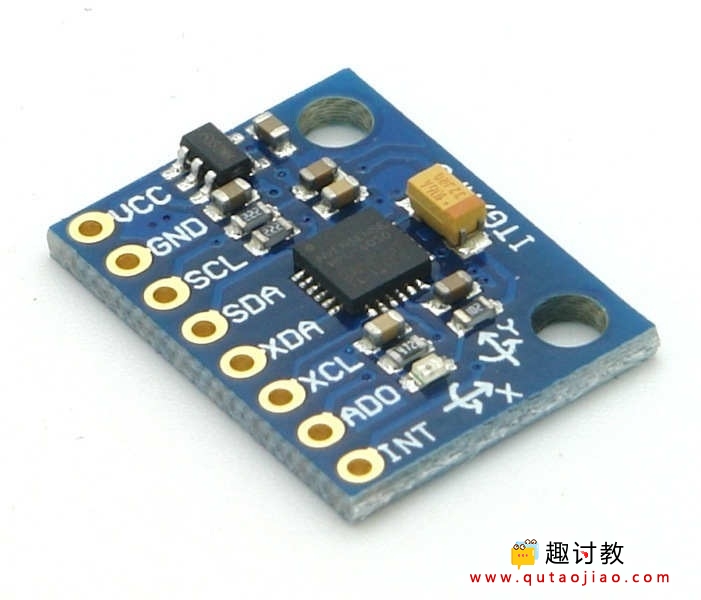
MPU6050模块
MPU6050传感器模块是一个集成的6轴运动跟踪设备。
它有一个3轴陀螺仪,3轴加速度计,数字运动处理器和温度传感器,所有这些都集成在一个IC中。
它可以使用其辅助I2C总线接受来自其他传感器的输入,如3轴磁力计或压力传感器。
如果连接外部3轴磁力计,它可以提供完整的9轴运动融合输出。
微控制器可以使用I2C通信协议与该模块通信。通过使用I2C通信从某些寄存器的地址读取值,可以找到各种参数。
沿X,Y和Z轴读取的陀螺仪和加速度计有2种补码形式。温度读数也有符号整数形式。
陀螺仪读数以度/秒(dps)为单位; 加速度计读数以g为单位,温度读数以摄氏度为单位。
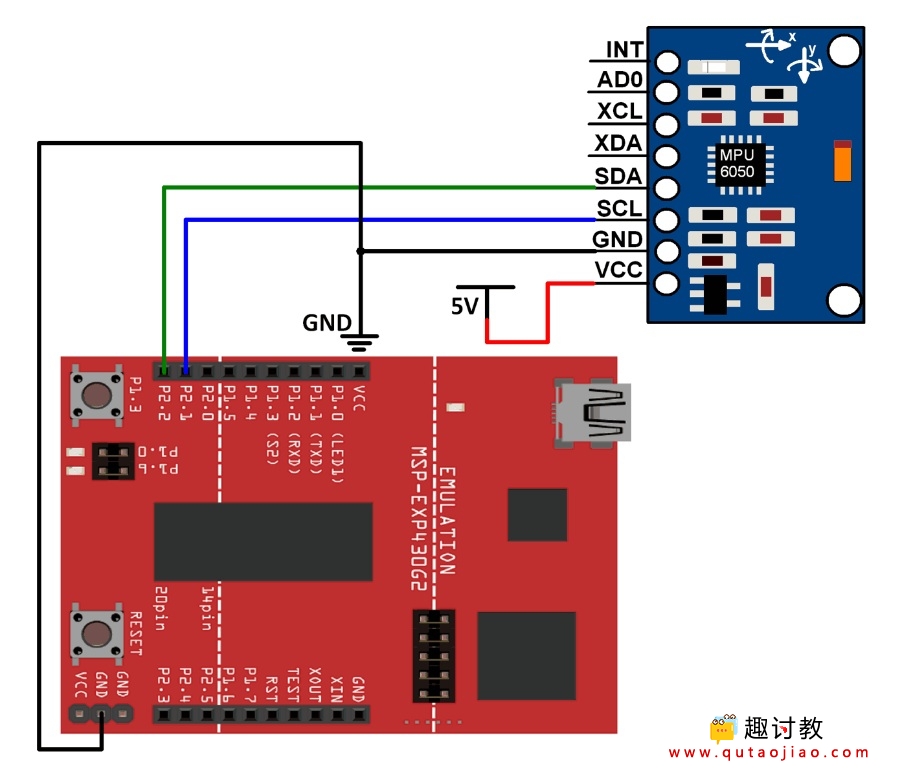
连接图
HMC5883L磁力计模块与MSP-EXP430G2 TI Launchpad接口
例
从MPU6050模块读取加速度计,陀螺仪和温度参数,并在Energia串行监视器上显示。
在这里,我们将使用MPU6050库。该库适用于Arduino,但也适用于MSP -EXP430G2 TI Launchpad。
库下载:
提取库并将其添加到Energia IDE的库文件夹路径中。
有关如何将自定义库添加到Energia IDE并使用其中的示例的信息,请参阅“基础知识”部分中的“ 将库添加到Energia IDE ”。
将库添加到Energia IDE后,打开IDE并从添加的库中的示例列表中打开所需的示例程序。
重要提示: MSP-EXP430G2 TI Launchpad的SCL和SDA分别位于引脚14(P1_6)和15(P1_7)上。Energia IDE利用基于软件的I2C实现(twi_sw)为MSP-EXP430G2 TI Launchpad。这种基于软件的I2C实现通过引脚9(P2_1)和10(P2_2)定义为SCL和SDA引脚。因此,我们需要将这些引脚用于Energia的I2C功能(在大多数库中使用),以便在MSP-EXP430G2 TI Launchpad板上工作。这已在Energia 17和18上完成(我们尚未检查IDE的早期版本)。
注意: MSP-EXP430G2 TI Launchpad主板具有512字节的RAM,可轻松上传,尤其是在使用不同库时。有时您需要串行缓冲区足够大以包含所需的数据,并且您必须修改串行库的缓冲区大小。在做这些事情时,我们必须确保代码不会使用超过70%的RAM。这可能导致代码以不稳定的方式工作,有时运行良好并且在其他方面失败。
有些时候RAM使用率可能会超过70%并且代码将完全正常工作,并且即使RAM使用率为65%,代码也无法工作。
在这种情况下,可能需要对缓冲区大小和/或变量进行一些试验和错误。
用于简单加速度计测量的程序
/*
    MPU6050 Triple Axis Gyroscope & Accelerometer. Simple Accelerometer Example.
    Read more: http://www.jarzebski.pl/arduino/czujniki-i-sensory/3-osiowy-zyroskop-i-akcelerometr-mpu6050.html
    GIT: https://github.com/jarzebski/Arduino-MPU6050
    Web: http://www.jarzebski.pl
    (c) 2014 by Korneliusz Jarzebski
*/

#include <Wire.h>
#include <MPU6050.h>

MPU6050 mpu;

void setup()
{
  Serial.begin(115200);

  Serial.println("Initialize MPU6050");
while(!mpu.begin(MPU6050_SCALE_2000DPS, MPU6050_RANGE_2G))
  {
    Serial.println("Could not find a valid MPU6050 sensor, check wiring!");
    delay(500);
  }
// If you want, you can set accelerometer offsets// mpu.setAccelOffsetX();// mpu.setAccelOffsetY();// mpu.setAccelOffsetZ();
  checkSettings();
}

void checkSettings()
{
  Serial.println();
  Serial.print(" * Sleep Mode:            ");
  Serial.println(mpu.getSleepEnabled() ? "Enabled" : "Disabled");
  Serial.print(" * Clock Source:          ");
  switch(mpu.getClockSource())
  {case MPU6050_CLOCK_KEEP_RESET:     Serial.println("Stops the clock and keeps the timing generator in reset"); break;
    case MPU6050_CLOCK_EXTERNAL_19MHZ: Serial.println("PLL with external 19.2MHz reference"); break;
    case MPU6050_CLOCK_EXTERNAL_32KHZ: Serial.println("PLL with external 32.768kHz reference"); break;
    case MPU6050_CLOCK_PLL_ZGYRO:      Serial.println("PLL with Z axis gyroscope reference"); break;
    case MPU6050_CLOCK_PLL_YGYRO:      Serial.println("PLL with Y axis gyroscope reference"); break;
    case MPU6050_CLOCK_PLL_XGYRO:      Serial.println("PLL with X axis gyroscope reference"); break;
    case MPU6050_CLOCK_INTERNAL_8MHZ:  Serial.println("Internal 8MHz oscillator"); break;
  }
  Serial.print(" * Accelerometer:         ");
  switch(mpu.getRange())
  {case MPU6050_RANGE_16G:            Serial.println("+/- 16 g"); break;
    case MPU6050_RANGE_8G:             Serial.println("+/- 8 g"); break;
    case MPU6050_RANGE_4G:             Serial.println("+/- 4 g"); break;
    case MPU6050_RANGE_2G:             Serial.println("+/- 2 g"); break;
  }

  Serial.print(" * Accelerometer offsets: ");
  Serial.print(mpu.getAccelOffsetX());
  Serial.print(" / ");
  Serial.print(mpu.getAccelOffsetY());
  Serial.print(" / ");
  Serial.println(mpu.getAccelOffsetZ());
  Serial.println();
}
余下程序:
使用的功能
1. mpu.readRawAccel()
- 此函数给出X,Y和Z方向上加速度的16位值的十进制等值。
- 这不会以g为单位给出加速度值。
2. mpu.readNormalizeAccel()
- 此功能以g为单位给出X,Y和Z方向上的加速度值。
- 它考虑了为加速度计选择的范围设置和相应的灵敏度。使用它可以得到g单位的加速度,可以从0到所选范围变化。
3. mpu.begin(gyro_scale,accelo_range)
- 此功能用于设置加速度计的范围和陀螺仪的比例。
- gyro_scale可以分别为250 dps,500 dps,1000 dps或2000 dps的MPU6050_SCALE_250DPS,MPU6050_SCALE_500DPS,MPU6050_SCALE_1000DPS或MPU6050_SCALE_2000DPS。
- aceelo_range可以是MPU6050_RANGE_2G,MPU6050_RANGE_4G,MPU6050_RANGE_8G或MPU6050_RANGE_16G,测量范围分别为2g,4g,8g或16g。
使用加速度计进行滚动和俯仰测量的程序
/*
    MPU6050 Triple Axis Gyroscope & Accelerometer. Pitch & Roll Accelerometer Example.
    Read more: http://www.jarzebski.pl/arduino/czujniki-i-sensory/3-osiowy-zyroskop-i-akcelerometr-mpu6050.html
    GIT: https://github.com/jarzebski/Arduino-MPU6050
    Web: http://www.jarzebski.pl
    (c) 2014 by Korneliusz Jarzebski
*/

#include <Wire.h>
#include <MPU6050.h>

MPU6050 mpu;

void setup()
{
  Serial.begin(115200);

  Serial.println("Initialize MPU6050");
while(!mpu.begin(MPU6050_SCALE_2000DPS, MPU6050_RANGE_2G))
  {
    Serial.println("Could not find a valid MPU6050 sensor, check wiring!");
    delay(500);
  }
}
余下程序: 余下程序: 1. mpu.readRawGyro() 2. mpu.readNormalizeGyro() 余下程序: 余下程序:简单陀螺仪测量的程序
/*
    MPU6050 Triple Axis Gyroscope & Accelerometer. Simple Gyroscope Example.
    Read more: http://www.jarzebski.pl/arduino/czujniki-i-sensory/3-osiowy-zyroskop-i-akcelerometr-mpu6050.html
    GIT: https://github.com/jarzebski/Arduino-MPU6050
    Web: http://www.jarzebski.pl
    (c) 2014 by Korneliusz Jarzebski
*/

#include <Wire.h>
#include <MPU6050.h>

MPU6050 mpu;

void setup()
{
  Serial.begin(115200);
// Initialize MPU6050
  Serial.println("Initialize MPU6050");
  while(!mpu.begin(MPU6050_SCALE_2000DPS, MPU6050_RANGE_2G))
  {
    Serial.println("Could not find a valid MPU6050 sensor, check wiring!");
    delay(500);
  }// If you want, you can set gyroscope offsets// mpu.setGyroOffsetX(155);// mpu.setGyroOffsetY(15);// mpu.setGyroOffsetZ(15);// Calibrate gyroscope. The calibration must be at rest.// If you don't want calibrate, comment this line.
  mpu.calibrateGyro();
// Set threshold sensivty. Default 3.// If you don't want use threshold, comment this line or set 0.// mpu.setThreshold(3);// Check settings
  checkSettings();
}

void checkSettings()
{
  Serial.println();
  Serial.print(" * Sleep Mode:        ");
  Serial.println(mpu.getSleepEnabled() ? "Enabled" : "Disabled");
  Serial.print(" * Clock Source:      ");
  switch(mpu.getClockSource())
  {case MPU6050_CLOCK_KEEP_RESET:     Serial.println("Stops the clock and keeps the timing generator in reset"); break;
    case MPU6050_CLOCK_EXTERNAL_19MHZ: Serial.println("PLL with external 19.2MHz reference"); break;
    case MPU6050_CLOCK_EXTERNAL_32KHZ: Serial.println("PLL with external 32.768kHz reference"); break;
    case MPU6050_CLOCK_PLL_ZGYRO:      Serial.println("PLL with Z axis gyroscope reference"); break;
    case MPU6050_CLOCK_PLL_YGYRO:      Serial.println("PLL with Y axis gyroscope reference"); break;
    case MPU6050_CLOCK_PLL_XGYRO:      Serial.println("PLL with X axis gyroscope reference"); break;
    case MPU6050_CLOCK_INTERNAL_8MHZ:  Serial.println("Internal 8MHz oscillator"); break;
  }
  Serial.print(" * Gyroscope:         ");
  switch(mpu.getScale())
  {case MPU6050_SCALE_2000DPS:        Serial.println("2000 dps"); break;
    case MPU6050_SCALE_1000DPS:        Serial.println("1000 dps"); break;
    case MPU6050_SCALE_500DPS:         Serial.println("500 dps"); break;
    case MPU6050_SCALE_250DPS:         Serial.println("250 dps"); break;
  }
  Serial.print(" * Gyroscope offsets: ");
  Serial.print(mpu.getGyroOffsetX());
  Serial.print(" / ");
  Serial.print(mpu.getGyroOffsetY());
  Serial.print(" / ");
  Serial.println(mpu.getGyroOffsetZ());
  Serial.println();
}

void loop()
{
  Vector rawGyro = mpu.readRawGyro();
  Vector normGyro = mpu.readNormalizeGyro();

  Serial.print(" Xraw = ");
  Serial.print(rawGyro.XAxis);
  Serial.print(" Yraw = ");
  Serial.print(rawGyro.YAxis);
  Serial.print(" Zraw = ");
  Serial.println(rawGyro.ZAxis);
使用的功能
使用陀螺仪进行滚动,俯仰和偏航测量的程序
/*
    MPU6050 Triple Axis Gyroscope & Accelerometer. Pitch & Roll & Yaw Gyroscope Example.
    Read more: http://www.jarzebski.pl/arduino/czujniki-i-sensory/3-osiowy-zyroskop-i-akcelerometr-mpu6050.html
    GIT: https://github.com/jarzebski/Arduino-MPU6050
    Web: http://www.jarzebski.pl
    (c) 2014 by Korneliusz Jarzebski
*/

#include <Wire.h>
#include <MPU6050.h>

MPU6050 mpu;

// Timers
unsigned long timer = 0;
float timeStep = 0.01;

// Pitch, Roll and Yaw values
float pitch = 0;
float roll = 0;
float yaw = 0;

void setup()
{
  Serial.begin(115200);
// Initialize MPU6050while(!mpu.begin(MPU6050_SCALE_2000DPS, MPU6050_RANGE_2G))
  {
    Serial.println("Could not find a valid MPU6050 sensor, check wiring!");
    delay(500);
  }// Calibrate gyroscope. The calibration must be at rest.// If you don't want calibrate, comment this line.
  mpu.calibrateGyro();
// Set threshold sensivty. Default 3.// If you don't want use threshold, comment this line or set 0.// mpu.setThreshold(3);
}

void loop()
{
  timer = millis();
// Read normalized values
  Vector norm = mpu.readNormalizeGyro();
// Calculate Pitch, Roll and Yaw
  pitch = pitch + norm.YAxis * timeStep;
  roll = roll + norm.XAxis * timeStep;
  yaw = yaw + norm.ZAxis * timeStep;
用于简单温度测量的程序
/*
    MPU6050 Triple Axis Gyroscope & Accelerometer. Temperature Example.
    Read more: http://www.jarzebski.pl/arduino/czujniki-i-sensory/3-osiowy-zyroskop-i-akcelerometr-mpu6050.html
    GIT: https://github.com/jarzebski/Arduino-MPU6050
    Web: http://www.jarzebski.pl
    (c) 2014 by Korneliusz Jarzebski
*/

#include <Wire.h>
#include <MPU6050.h>

MPU6050 mpu;

void setup()
{
  Serial.begin(115200);

  Serial.println("Initialize MPU6050");
while(!mpu.begin(MPU6050_SCALE_2000DPS, MPU6050_RANGE_2G))
  {
    Serial.println("Could not find a valid MPU6050 sensor, check wiring!");
    delay(500);
  }
}


