


简介
在看这篇文章之前,建议先学习第一篇基础文章:
步骤一 材料准备
硬件准备:
- Arduino UNO*1
- TLC5940*1
- 2KΩ电阻*1
- 0.1uF陶瓷和4.7uF电解电容*1
- 杜邦线若干
- USB数据线*1
软件准备:
- Arduino IDE
- TLC5940库
步骤二 原理说明
由于TLC5940产生PWM(脉冲宽度调制)输出,因此它也非常适合驱动伺服系统。就像LED一样 – 您可以同时控制多达16个。非常适合制作蜘蛛般的机器人,奇怪的时钟或制造噪音。选择伺服时,请确保在运行时(每通道的最大电流)不超过120 mA,并注意本教程末尾的“ 管理电流和热量”部分。并且使用带伺服的外部电源,不要依赖Arduino的5V线路。
步骤三 电路搭建
电路搭建图参考第一篇文章的驱动LED的原理连接图,把LED换成舵机即可:
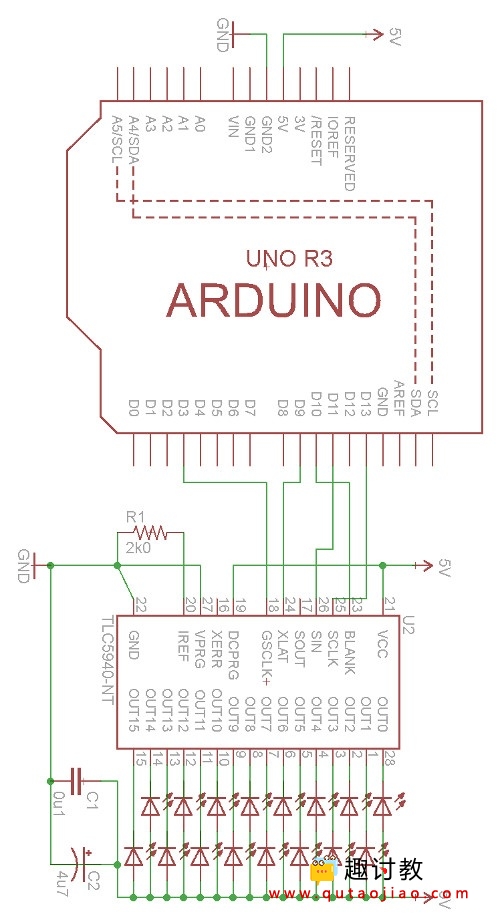
连接伺服舵机很简单 :
- GND线连接到GND;
- 5V(或电源电压引线)连接到5v(或其他合适的电源);
- 伺服控制引脚连接到TLC5940的一个输出;
- 最后 – 这很重要 – 在使用的TLC5940输出引脚和5V之间连接一个2.2kΩ电阻
步骤四 编写程序
首先你需要下载库文件加入到库里面,下载地址:
控制伺服与LED没有什么不同。您需要程序开头的前两行加入头文件:
#include "Tlc5940.h"
#include "tlc_servos.h"
然后在 void setup()中加入以下程序:
tlc_initServos();
接下来,使用以下函数选择要操作的伺服(通道)和所需的角度(角度):
tlc_setServo(channel, angle);
就像LED一样,您可以将其中的一些组合在一起同时控制,然后执行以下命令:
Tlc.update();
让我们看看所有这些都在运行程序中。以下是旋转了90度的四个伺服示例程序:
步骤五 验证结果
如果您的伺服系统没有旋转到正确的角度 – 例如您要求180度但是它们仅旋转到90度左右,则需要一些额外的工作。
您需要打开位于TLC5940 Arduino库文件夹中的 tlc_servos.h文件,并试验SERVO_MIN_WIDTH和SERVO_MAX_WIDTH的值。例如,将SERVO_MIN_WIDTH从200更改为203,将SERVO_MAX_WIDTH从400更改为560。
管理电流和热量
如前所述,TLC5940每个通道最多可以处理120 mA。经过一些实验之后,您可能会注意到TLC5940确实变烫了——这是正常的。然而,在破坏部件之前,可以消耗的功率是有最大限度的。如果您只是使用普通的普通led或更小的伺服系统,电源将不会有问题。但是,如果您打算最大限度地使用TLC5940—请查看库文件原作者提供的注释说明(以下为英文说明,不需要的可以忽略):
Explanation
Vcc is +5V for regular Arduino’s.
Icc (Supply current) is listed in Electrical Characteristics on pg 4 of the datasheet:
http://tlc5940arduino.googlecode.com/files/icc_table.png’ />
I’ll assume you’re using R_iref = ~2k, so Icc < 25mA. (Data transfer is usually 8MHz, and assuming outputs are on).
Vout is the voltage going into the tlc pin, which would be the voltage going into the LED minus the forward voltage drop across the LED. For example, +4V –> LED –> TLC, then Vout = 4 – (forward voltage drop across LED, usually 2.1V, see the LED datasheet) = 1.9V. I’ll assume you’re using +5V, so +5V – 2.1V = 2.9V.
Imax is the calculated from the Riref resistor, Imax = 39.06 / Riref. I’ll assume Riref = 2k so Imax = 39.06 / 2000 = 20mA.
DCn is the dot correction value for channel n. Unless you’re setting the dot correction, it’s 63.
dpwm is the current channel setting, (aka GS PWM value), divided by 4095. For example, Tlc.set(0, 4095) means dpwm = 4095/4095 = 1. Lets assume dpwm = 1.
N is the number of channels set to dpwm. For example, if we know that we’re not going to turn on more than 5 channels at once, then N = 5. Lets assume N = 16, or we might turn all channels on at some point.
Example Calculation
Here’s our assumptions from above:
Vcc = 5V
Icc iref = 2k from table above)
Vout = 2.9V (assuming +5V –> LED with Vf of 2.1V –> TLC)
Imax = 39.06 / Riref = 20mA. (Assuming Riref = 2k)
DCn = 63 (unless you explicitly set this)
dpwm = 1 (whatever the maximum channel setting will be, eg Tlc.set(0, 4095) -> 4095/4095 = 1)
N = 16 (maximum number of channels that will be on at once)
Pd = (Vcc Icc) + (Vout Imax (DCn / 63) dpwm N)
= (5V 25mA) + (2.9V 20mA (63 / 63 = 1) 1 16) = 1053mW
http://tlc5940arduino.googlecode.com/files/dissipation_ratings.png’ />
Let’s assume that the chip is in an environment with a ambient temperature Ta = 30C. Then by power dissipation table (DIP is the package that fits on a breadboard), the maximum power dissipation is 2456mW – 19.65mW (Ta – 25C = 30C – 25C = 5) = 2357.75mW.
So from before, if Riref = 2k, the LED voltage is 5V, and all the outputs are on, the chip generates 1053mW and we should be fine.
Now assume that we lowered the LED voltage to 4V (so +4V –> LED –> TLC). Then
Pd = (5V 25mA) + (1.9V 20mA (63 / 63 = 1) 1 16) = 733mW
So if you’re afraid of burning out TLCs, lower the LED voltage. But make sure it’s enough voltage to turn on the LEDs! It should be a bit above the forward voltage drop from the LED datasheet.


