


释放双眼,带上耳机,听听看~!
设备装置准备
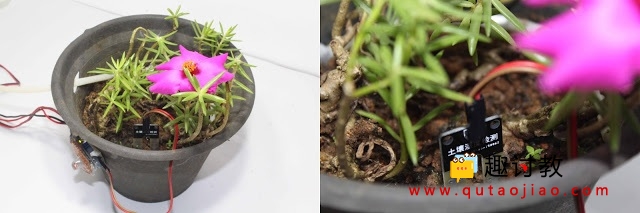
光传感器和土壤湿度传感器
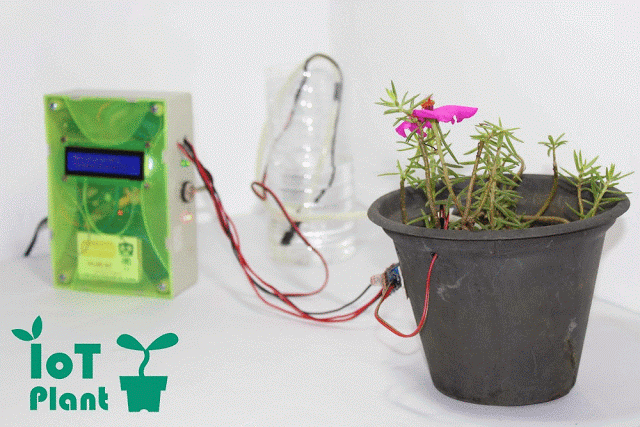
如何从世界各地种植任何植物,有没有可能实现呢?当然,这个名为“物联网监控植物”的项目是可能的。
您可以通过Android应用程序中提供的不同模式为植物浇水,您将在智能手机上获得植物的湿度,温度和光线的实时读数。当您的工厂需要水,粪便等时,您也会收到一封电子邮件。
让我们详细了解一下 –
什么是物联网(物联网)? – 简单的定义
物联网是可通过互联网访问的连接物理设备的生态系统。
物联网工厂的特点
便宜的价格
您可以监控工厂的实时要求。
不同类型植物的不同供水方式
你可以监控什么?
土壤的湿度。
可监控植物叶子的光强度和大气温度。
不同的 供水方式
手动模式 – 您可以手动供水。
定时器模式 – 可用于定期间隔或每天特定时间供水。
自动模式 – 根据工厂要求自动供水。适合总是需要水的植物(例如:水稻种植)
技术细节

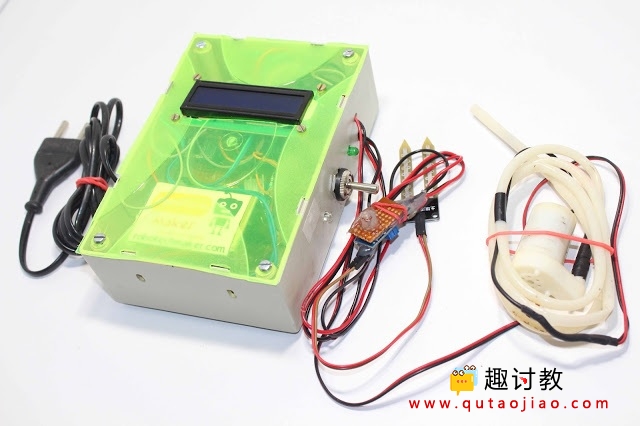
这个项目是使用arduino微控制器完成的。 – 它是便宜的开源板,可以通过arduino IDE软件使用C ++语言编程,当然也可以用不同的应用程序。在这个项目中,一个叫做EP8266的物联网板, 彻底改变了物联网。只需10元左右,您就可以为项目添加全球无线功能。这就是为什么我们选择ESP8266来制作这个项目的原因。 它使用一些传感器,如土壤湿度传感器,温度传感器和光传感器来监控工厂的实时环境。还有一个水泵和继电器,用于将水泵送到工厂。
对于这个项目,我使用了名为“Blynk”的物联网应用程序。通过这个应用,我们控制水泵,通过不同类型的图表查看工厂的环境或水需求。
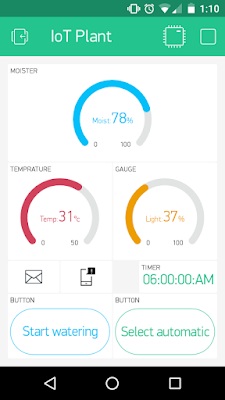
物联网应用 – ‘Blynk’
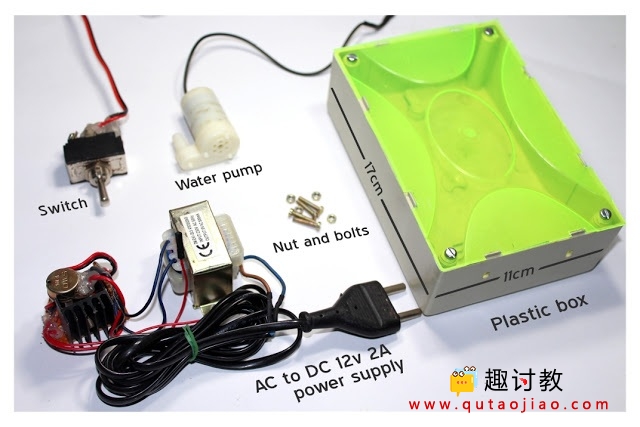
使用的零件电子
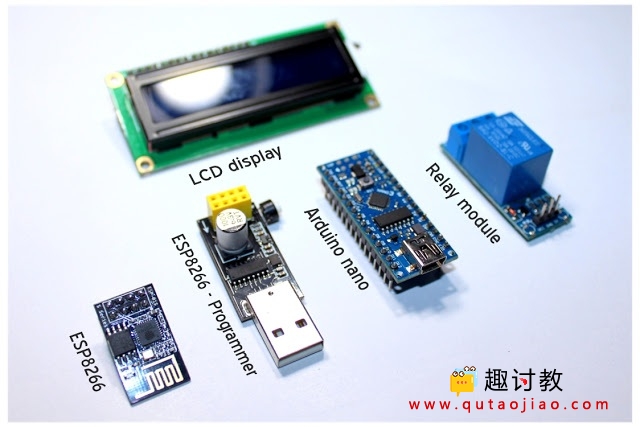
- Arduino nano
- ESP8266
- 液晶显示器
- 继电器模块
- 塑料盒(17 x 11厘米宽)
- AC转DC 12伏2AH稳压器。
- 水泵
- 开关
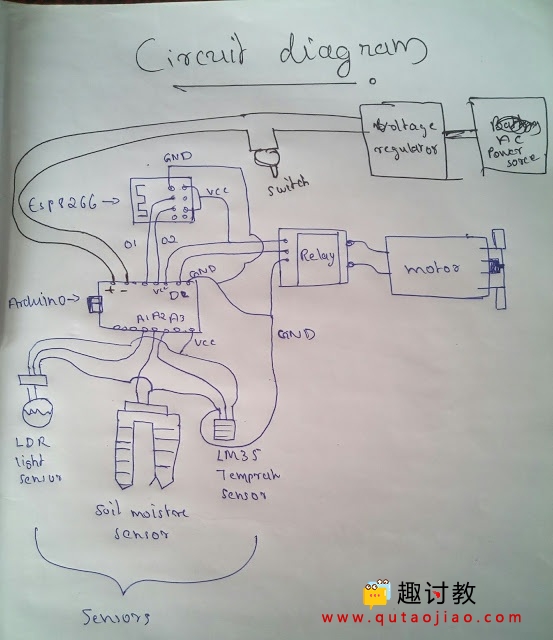
电路原理图dianl
Arduino代码(C ++语言)
这是上传到arduino板的程序:
const int mPin = A1;
const int lPin = A2;
const int tPin = A3;

 int mValue = 0;
 int lValue = 0;
 int tValue = 0;

 int moist = 0;
 int light = 0;
 int temp = 0;

 //--
 byte datas1 = 0;
 byte datas2 = 0;
 byte datas3 = 0;
 //--

 const int motor_in = 2;
 const int auto_in = 4;
 const int motor_out = 7;
 int mstate = 0;
 int astate = 0;

 //-------LCD--------  #include   #include   #include   #define I2C_ADDR  0x3F // <<----- Add your address here. Find it from I2C Scanner  #define BACKLIGHT_PIN 3  #define En_pin 2  #define Rw_pin 1  #define Rs_pin 0  #define D4_pin 4  #define D5_pin 5  #define D6_pin 6  #define D7_pin 7  LiquidCrystal_I2C lcd(I2C_ADDR,En_pin,Rw_pin,Rs_pin,D4_pin,D5_pin,D6_pin,D7_pin);
 //-------LCD--------


 void setup() {

  Serial.begin(115200);

  //-------LCD--------
  lcd.begin (16,2); // <<----- My LCD was 16x2  // Switch on the backlight
  lcd.setBacklightPin(BACKLIGHT_PIN,POSITIVE);
  lcd.setBacklight(HIGH);
  lcd.home (); // go home
  lcd.print("** IOT PLANT **");
  delay(1000);
  //-------LCD--------

  pinMode(motor_in, INPUT);
  pinMode(auto_in, INPUT);
  pinMode(motor_out, OUTPUT);
 }

 void loop() {

  // read the analog in value:
  mValue = analogRead(mPin);
  lValue = analogRead(lPin);
  tValue = analogRead(tPin);

  moist = map(mValue, 300, 1023, 100, 0);
  light = map(lValue, 0, 1023, 100, 0);
  temp = (5.0 * tValue * 100.0) / 1024;

  mstate = digitalRead(motor_in);
  astate = digitalRead(auto_in);

 //---------- manuel mode ----  if (mstate == HIGH && astate == LOW)
  {
   digitalWrite(motor_out, HIGH);

   lcd.clear();//***************
   lcd.setCursor (0,0);    // go to start of 1nd line
   lcd.print("Water is pumping");

   lcd.setCursor (0,1);    // go to start of 2nd line
   lcd.print("Moisture:");
   lcd.setCursor (9,1);
   lcd.print(moist);
   lcd.setCursor (11,1);
   lcd.print("%");
   delay(1000);
  }
 //---------- automatic mode ----  else if (mstate == LOW && astate == HIGH)
  {
   if (moist < 25)
   {
   digitalWrite(motor_out, HIGH);
   lcd.clear();//***************
   lcd.setCursor (0,0);    // go to start of 1nd line
   lcd.print("Water is pumping");
   lcd.setCursor (0,1);    // go to start of 2nd line
   lcd.print("Moisture:");
   lcd.setCursor (9,1);
   lcd.print(moist);
   lcd.setCursor (11,1);
   lcd.print("%");
   delay(1000);
   }
   else
   {
    digitalWrite(motor_out, LOW);
    lcd.clear();//***************
    lcd.setCursor (0,0);    // go to start of 1nd line
    lcd.print("Water is excess");
    lcd.setCursor (0,1);    // go to start of 1nd line
    lcd.print("motor turned off");
    delay(1000);
   }

  }
  else
  {
   digitalWrite(motor_out, LOW);
     //-------------------------------------------
   lcd.clear();//*******

   lcd.setCursor (0,0);    // go to start of 1nd line
   lcd.print("Moisture:");
   lcd.setCursor (9,0);
   lcd.print(moist);
   lcd.setCursor (11,0);
   lcd.print("%");

   lcd.setCursor (0,1);    // go to start of 2nd line
   lcd.print("Temperature:");
   lcd.setCursor (12,1);
   lcd.print(temp);
   lcd.setCursor (15,1);
   lcd.print("C");

   delay(1000);

   lcd.clear();//***************

   lcd.setCursor (0,0);    // go to start of 1nd line
   lcd.print("Moisture:");
   lcd.setCursor (9,0);
   lcd.print(moist);
   lcd.setCursor (11,0);
   lcd.print("%");

   lcd.setCursor (0,1);    // go to start of 2nd line
   lcd.print("Light:");
   lcd.setCursor (6,1);
   lcd.print(light);
   lcd.setCursor (8,1);
   lcd.print("%");

   delay(1000);
   //------------------------------------------------
  }
 //----------

   datas1 = moist & 0xFF;
   Serial.write(0x8);
   Serial.write(datas1);
   datas2 = light & 0xFF;
   Serial.write(0x7);
   Serial.write(datas2);
   datas3 = temp & 0xFF;
   Serial.write(0x6);
   Serial.write(datas3);
   delay(5);
 }
ESP8266代码(C ++语言)
这是上传到ESP8266板的程序:
未来的计划/更新
- 添加相机以监控植物的生长
- 添加传感器监测土壤中的氮含量,为植物提供粪便。


