


释放双眼,带上耳机,听听看~!
智能手机控制,避障跟随机器人
如果你是arduino的初学者,根据这个教程你也是可以做一个这样的机器人的。
如果你还没有使用过arduino吗 – 那这节课就来感受一下吧。
制作自己的机器人怎么样?这真的很酷吗?但不知道从哪里开始。那么本教程(最好)适合您。在本教程中,我将展示如何以低廉的价格制作具有不同功能的arduino机器人。我们可以学习不同功能的不同程序的使用,主要是具有障碍物避免器的智能手机控制机器人,墙壁跟随器或迷宫求解器机器人等,或者您也可以将其用于单个功能。
材料准备
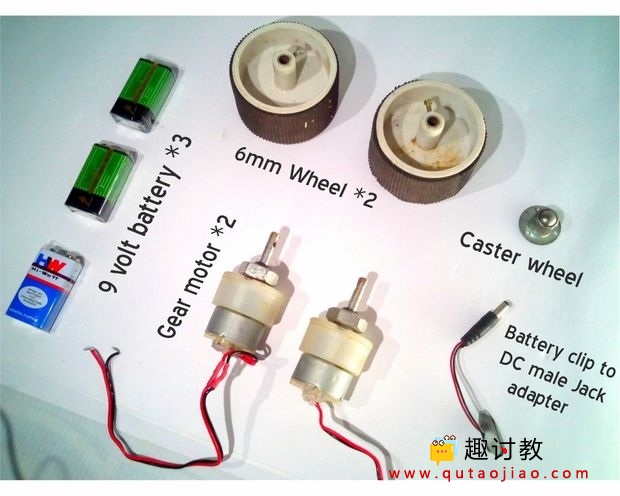

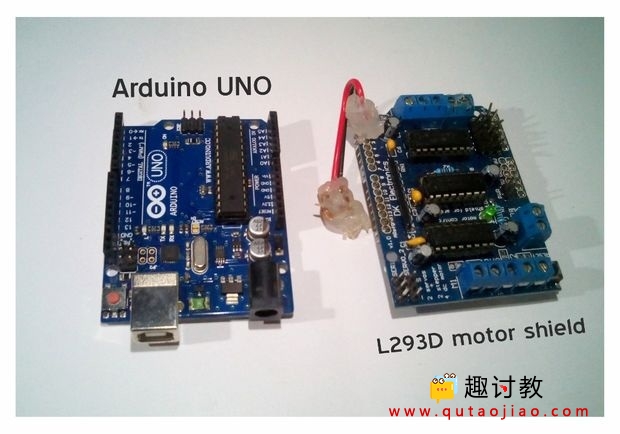
- Arduino uno
- L293D电机护罩
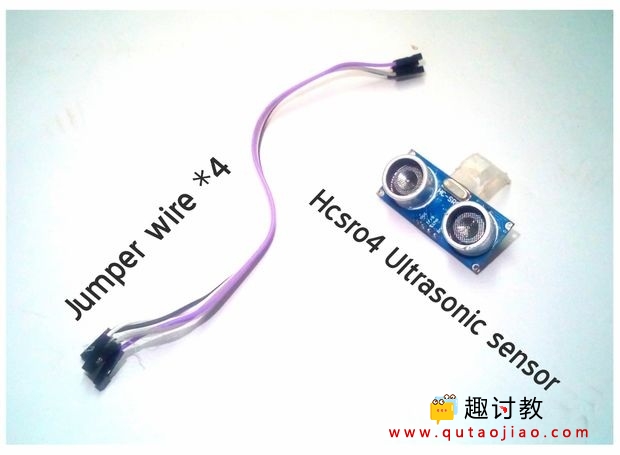
- Hc-sro4超声波传感器
- Hc-05蓝牙模块
- 2 x减速电机
- 2 x 轮子
- 3 x 9V电池
- 3 x电池盒
- DC公插孔
- 8 x母对母杜邦线
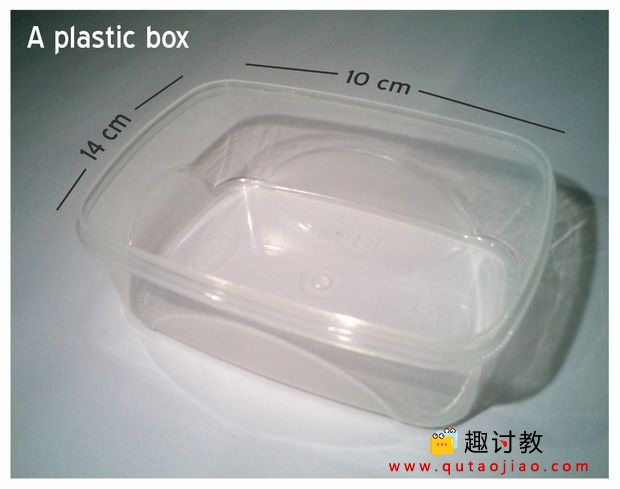
- 塑料盒(尺寸 – 14厘米x 10厘米)
原理介绍
电机控制器如何控制电机
电机控制其实就是通过给点击控制器L293D的InputA和InputB引脚高或低电平,就可以让点击前进或后退。
来看看控制的表格吧:

电路连接
在这里,我将使用l293d电机控制器或模块来控制电机,总的电路连接图如下:

参考程序
//趣讨教https://static.qutaojiao.com

#define trigPin 3 // define the pins of your sensor
#define echoPin 4

//Constants and variable
int motor1Pin1 = 6; // pin 2 on L293D IC
int motor1Pin2 = 7; // pin 7 on L293D IC

int motor2Pin1 = 8; // pin 10 on L293D IC
int motor2Pin2 = 9; // pin 15 on L293D IC


char dataIn = 'S';
char determinant;
char det;
int vel = 0; //Bluetooth Stuff
int whitelight = 13;
int redlight = 10;


void setup() {
  Serial.begin(9600); // set up Serial library at 9600 bps

  pinMode(trigPin, OUTPUT);// set the trig pin to output (Send sound waves)
  pinMode(echoPin, INPUT);// set the echo pin to input (recieve sound waves)

  // sets the pins as outputs:
  pinMode(motor1Pin1, OUTPUT);
  pinMode(motor1Pin2, OUTPUT);
  pinMode(motor2Pin1, OUTPUT);
  pinMode(motor2Pin2, OUTPUT);


  //Initalization messages
  Serial.println("Arduin robot");

  digitalWrite(whitelight, LOW);
  digitalWrite(redlight, LOW);

}

void loop() {
  det = check(); //call check() subrotine to get the serial code

  //serial code analysis
  switch (det) {
    case 'F': // F, move forward
      digitalWrite(motor1Pin1, HIGH);
      digitalWrite(motor1Pin2, LOW);
      digitalWrite(motor2Pin1, LOW);
      digitalWrite(motor2Pin2, HIGH);
      det = check();
      break;

    case 'B': // B, move back
      digitalWrite(motor1Pin1, LOW);
      digitalWrite(motor1Pin2, HIGH);
      digitalWrite(motor2Pin1, HIGH);
      digitalWrite(motor2Pin2, LOW);
      det = check();
      break;

    case 'L':// L, move wheels left
      digitalWrite(motor1Pin1, HIGH);
      digitalWrite(motor1Pin2, LOW);
      digitalWrite(motor2Pin1, LOW);
      digitalWrite(motor2Pin2, LOW);
      det = check();
      break;

    case 'R': // R, move wheels right
      digitalWrite(motor1Pin1, LOW);
      digitalWrite(motor1Pin2, LOW);
      digitalWrite(motor2Pin1, LOW);
      digitalWrite(motor2Pin2, HIGH);
      det = check();
      break;

    case 'S': // S, stop
      digitalWrite(motor1Pin1, LOW);
      digitalWrite(motor1Pin2, LOW);
      digitalWrite(motor2Pin1, LOW);
      digitalWrite(motor2Pin2, LOW);
      det = check();
      break;

    case 'm':

      //for wall follower robot.

      long duration, distance; // start the scan
      digitalWrite(trigPin, LOW);
      delayMicroseconds(2); // delays are required for a succesful sensor operation.
      digitalWrite(trigPin, HIGH);

      delayMicroseconds(10); //this delay is required as well!
      digitalWrite(trigPin, LOW);
      duration = pulseIn(echoPin, HIGH);
      distance = (duration / 2) / 29.1; // convert the distance to centimeters.
      if (distance < 30) { /*The distance that need to to keep with the wall */
        Serial.println ("Wall is ditected!" );
        Serial.println (" Started following the wall ");
        Serial.println (" Turning !");
        digitalWrite(motor1Pin1, HIGH);
        digitalWrite(motor1Pin2, LOW);
        digitalWrite(motor2Pin1, LOW);
        digitalWrite(motor2Pin2, LOW);
        delay(500); // wait for a second
      }

      else {
        Serial.println ("No Wall detected. turning round");
        delay (15);
        digitalWrite(motor1Pin1, LOW);
        digitalWrite(motor1Pin2, LOW);
        digitalWrite(motor2Pin1, LOW);
        digitalWrite(motor2Pin2, HIGH);

      }
      break;

    case 'b':
      //obstacle avoider robot


      long Aduration, Adistance; // start the scan
      digitalWrite(trigPin, LOW);
      delayMicroseconds(2); // delays are required for a succesful sensor operation.
      digitalWrite(trigPin, HIGH);

      delayMicroseconds(10); //this delay is required as well!
      digitalWrite(trigPin, LOW);
      Aduration = pulseIn(echoPin, HIGH);
      Adistance = (Aduration / 2) / 29.1; // convert the distance to centimeters.
      if (Adistance < 25) { /*if there's an obstacle 25 centimers, ahead, do the following: */
        Serial.println ("Close Obstacle detected!" );
        Serial.println ("Obstacle Details:");
        Serial.print ("Distance From Robot is " );
        Serial.print ( Adistance);
        Serial.print ( " CM!");// print out the distance in centimeters.

        Serial.println (" The obstacle is declared a threat due to close distance. ");
        Serial.println (" Turning !");
        digitalWrite(motor1Pin1, LOW);
        digitalWrite(motor1Pin2, HIGH);
        digitalWrite(motor2Pin1, LOW);
        digitalWrite(motor2Pin2, HIGH);

      }
      else {
        Serial.println ("No obstacle detected. going forward");
        delay (15);
        digitalWrite(motor1Pin1, HIGH);
        digitalWrite(motor1Pin2, LOW);
        digitalWrite(motor2Pin1, LOW);
        digitalWrite(motor2Pin2, HIGH);
      }
      break;
  }
}
余下程序:
最终视频演示
本节课程序下载:


那个接线图怎么接啊
照着图来接就可以,不要接错了