

释放双眼,带上耳机,听听看~!
需要的组件:
- Arduino UNO -1
- 公对公跳线-104×4
- 键盘-14欧姆
- 扬声器 – 1A
- PC或笔记本电脑
电路连接:
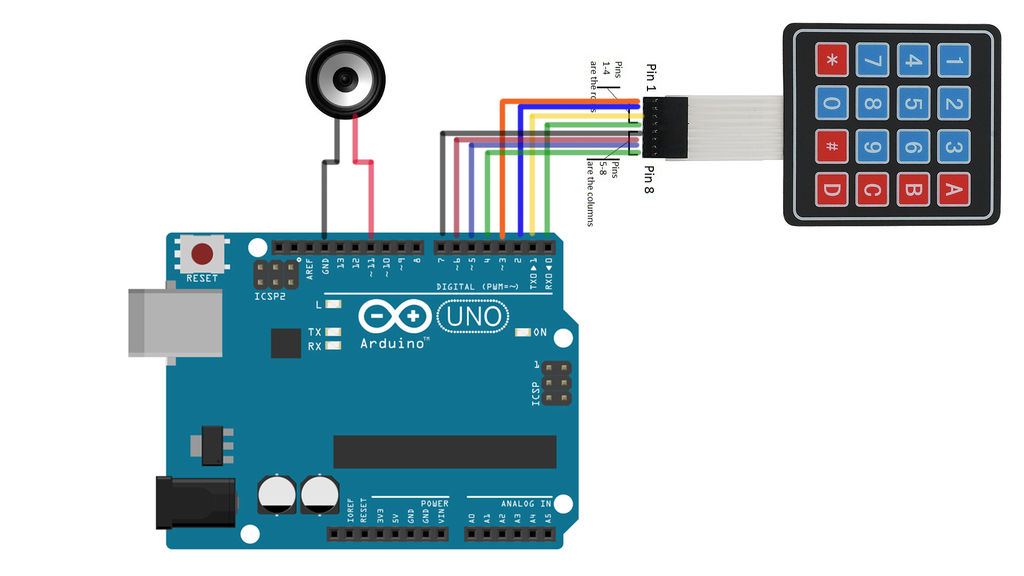
将键盘行线连接到Arduino的3 2 8 0引脚和列线到Arduino的7 6 5 4个引脚。
将扬声器引线连接到11和接地引脚。
如何设置硬件:
钢琴键(键盘)开关使用跳线连接。图中定义了哪些音符频率与每个钢琴键相关联。对于这个项目,我使用C4,D4,E4,F4,G4,A4,B4,C5,D5,E5,F5,G5,A5和B5,C4为开关’0’,D4为开关’1’,所以on …更改频率值,或添加其他开关以完全自定义您自己的项目!扬声器..要集成扬声器,只需将一端连接到Arduino引脚11,另一端连接到地。代码中的“音调”功能将查找此引脚以播放所调用的音符。
代码:
#include "Keypad.h"
#include "pitches.h"
#define GND 12
const byte ROWS = 4; //four rows
const byte COLS = 4; //four columns
const int SPEAKER=11;
//define the symbols on the buttons of the keypads
char hexaKeys[ROWS][COLS] = {
{'0','1','2','3'},
{'4','5','6','7'},
{'8','9','A','B'},
{'C','D','E','F'} };
byte rowPins[ROWS] = {3, 2, 8, 0}; //connect to the row pinouts of the keypad
byte colPins[COLS] = {7, 6, 5, 4}; //connect to the column pinouts of the keypad
//initialize an instance of class NewKeypad
Keypad customKeypad = Keypad( makeKeymap(hexaKeys), rowPins, colPins, ROWS, COLS);
void setup()
{
Serial.begin(9600);
pinMode(GND,OUTPUT);
digitalWrite(GND,LOW);
}
void loop()
{
char customKey = customKeypad.getKey();
if (customKey=='0')
{
Serial.println(customKey);
tone(SPEAKER,NOTE_C4,350);
}
if (customKey=='1')
{
    Serial.println(customKey);
    tone(SPEAKER,NOTE_D4,350);
 }
if (customKey=='2')
{
    Serial.println(customKey);
    tone(SPEAKER,NOTE_E4,350);
  }
  if (customKey=='3')
{
    Serial.println(customKey);
    tone(SPEAKER,NOTE_F4,350);
  }
  if (customKey=='4')
{
    Serial.println(customKey);
    tone(SPEAKER,NOTE_G4,350);
  }
if (customKey=='5')
{
    Serial.println(customKey);
    tone(SPEAKER,NOTE_A4,350);
  }
  if (customKey=='6')
{
    Serial.println(customKey);
    tone(SPEAKER,NOTE_B4,350);
  }
  if (customKey=='7')
{
    Serial.println(customKey);
    tone(SPEAKER,NOTE_C5,350);
  }
  if (customKey=='8')
{
    Serial.println(customKey);
    tone(SPEAKER,NOTE_D5,350);
  }
  if (customKey=='9')
{
    Serial.println(customKey);
    tone(SPEAKER,NOTE_E5,350);
  }
  if (customKey=='A')
{
    Serial.println(customKey);
    tone(SPEAKER,NOTE_F5,350);
  }
  if (customKey=='B')
{
    Serial.println(customKey);
    tone(SPEAKER,NOTE_G5,350);
  }
  if (customKey=='C')
{
    Serial.println(customKey);
    tone(SPEAKER,NOTE_A5,350);
  }
  if (customKey=='D')
{
    Serial.println(customKey);
    tone(SPEAKER,NOTE_B5,350);
  }
  if (customKey=='E')
{
    Serial.println(customKey);
    tone(SPEAKER,NOTE_C6,350);
  }
  if (customKey=='F  ')
{
    Serial.println(customKey);
    tone(SPEAKER,NOTE_D6,350);
  }
}
代码解释:
首先导入“Keypad.h”和“pitches.h”库,以便我们稍后可以在代码中引用它们中的各种项目。接下来,通过定义ROWS和COLUMNS的数量来确定代码,确定哪些引脚是输入与输出,并将SPEAKER引脚设置为ARDUINO的第11引脚。接下来,我们以MATRIX形式定义每个键的值,并指定连接行和列所需的引脚(在此项目中,我使用3,2,8,0引脚作为ROWS,使用7,6,5,4作为列)。
主循环……
我们将每个键值存储到’customkey’变量,并在ARDUINO IDE的串行监视器中打印该值。接下来,我们将比较每个自定义键并将SPEAKER引脚注和DURATION发送到音调功能。
键盘库:
keypad.zip
提取码:无
解压码:无
将其解压缩到ARDUINO文件夹中的库
注意:扬声器应连接到ARDUINO的任何PWM引脚,否则设置将无法键盘上工作。


