
释放双眼,带上耳机,听听看~!
一个if声明允许你选择两个分开的选项,真或假。当有超过2个的选项,你可以用多个if声明,或者你可以用switch声明。switch允许你选择多个选项。
简介
- 一个if声明允许你选择两个分开的选项,真或假。当有超过2个的选项,你可以用多个if声明,或者你可以用switch声明。switch允许你选择多个选项。
- 这个教程示范怎样用switch根据收到的字节数据来打开多个LED灯中的一个。并且根据字符a,b,c,d,e来打开特定的LED灯。
硬件要求
- Arduino 或者 Genuino 开发板
- 5*LEDs
- 5*220Ω电阻
- 连接线
- 面包板
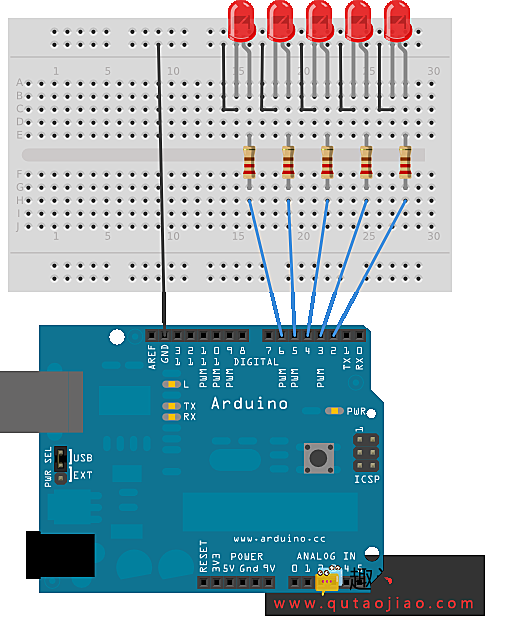
电路
- 5个LED灯通过串联的220 ohm电阻连接到数字引脚pin 2,3,4,5,6。
- 为了使程序工作,你的开发板需要连接到电脑。在Arduino IDE上打开串口监视器,并且发送字符 a,b,c,d,e来点亮相应的LED灯,或者其他东西来关闭它们。

原理图

样例代码
void setup() {
  // initialize serial communication:
  Serial.begin(9600);
  // initialize the LED pins:
  for (int thisPin = 2; thisPin < 7; thisPin++) {
    pinMode(thisPin, OUTPUT);
  }
}

void loop() {
  // read the sensor:
  if (Serial.available() > 0) {
    int inByte = Serial.read();
    // do something different depending on the character received.
    // The switch statement expects single number values for each case;
    // in this exmaple, though, you're using single quotes to tell
    // the controller to get the ASCII value for the character.  For
    // example 'a' = 97, 'b' = 98, and so forth:

    switch (inByte) {
      case 'a':
        digitalWrite(2, HIGH);
        break;
      case 'b':
        digitalWrite(3, HIGH);
        break;
      case 'c':
        digitalWrite(4, HIGH);
        break;
      case 'd':
        digitalWrite(5, HIGH);
        break;
      case 'e':
        digitalWrite(6, HIGH);
        break;
      default:
        // turn all the LEDs off:
        for (int thisPin = 2; thisPin < 7; thisPin++) {
          digitalWrite(thisPin, LOW);
        }
    }
  }
}

