

释放双眼,带上耳机,听听看~!
这篇文章旨在成为带有 Arduino 的诺基亚 5110 LCD 的完整指南。我将解释它的作用,展示它的规格,并分享一个Arduino项目示例,你可以采用并应用到你自己的项目中。
描述
诺基亚 5110 LCD 在 Arduino 中非常受欢迎。这些模块用于需要某种接口或向用户显示数据的各种应用。
这些模块非常便宜,您可以将它们与任何微控制器 (MCU) 一起使用。
规格诺基亚 5110 LCD
- 84*48点阵LCD(显示4行字符)
- 价格:$ 2 / $ 3
- 电压:3.3V
- 模块尺寸:45.2mm x 43.1mm
- 型号: Nokia 5510
- 控制器:PCD8544
Arduino与诺基亚5110 LCD
要制作此示例,您需要以下组件:
- 1x Arduino
- 1x 诺基亚 5110 LCD
- 1x 电位计
- 4x 10K Ohm 电阻
- 1x 1k 欧姆电阻
- 1x 330 欧姆电阻
- 面包板
库下载
以下是此项目所需的库:
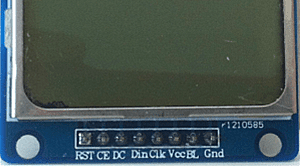
引脚排列
1) RST – 复位
2) CE – 芯片使能
3) D/C – 数据/命令选择
4) DIN – 串行输入
5) CLK – 时钟输入
6) VCC – 3.3V
7) LIGHT – 背光控制
8) GND – 接地
连接图
诺基亚 5110 LCD 的工作电压为 3.3V。因此,您无法直接连接Arduino Uno数字引脚。阅读这篇博文,了解如何将信号从 5V 电平转换到 3.3V。
我将添加一些与数据信号串联的电阻器,以保护 3.3V 线路。
使用逻辑电平转换器从5V切换到3.3V是与该LCD交互的最佳选择。

上传程序
在 Arduino IDE 中安装 PCD8544 库后,您可以在 HelloWorld > PCD8544 > 文件>示例中找到下面的程序。
/*
 * PCD8544 - Interface with Philips PCD8544 (or compatible) LCDs.
 *
 * Copyright (c) 2010 Carlos Rodrigues <cefrodrigues@gmail.com>
 *
 * To use this sketch, connect the eight pins from your LCD like this:
 *
 * Pin 1 -> +3.3V (rightmost, when facing the display head-on)
 * Pin 2 -> Arduino digital pin 3
 * Pin 3 -> Arduino digital pin 4
 * Pin 4 -> Arduino digital pin 5
 * Pin 5 -> Arduino digital pin 7
 * Pin 6 -> Ground
 * Pin 7 -> 10uF capacitor -> Ground
 * Pin 8 -> Arduino digital pin 6
 *
 * Since these LCDs are +3.3V devices, you have to add extra components to
 * connect it to the digital pins of the Arduino (not necessary if you are
 * using a 3.3V variant of the Arduino, such as Sparkfun's Arduino Pro).
 */

#include <PCD8544.h>

// A custom glyph (a smiley)...
static const byte glyph[] = { B00010000, B00110100, B00110000, B00110100, B00010000 };

static PCD8544 lcd;

void setup() {
  // PCD8544-compatible displays may have a different resolution...
  lcd.begin(84, 48);

  // Add the smiley to position "0" of the ASCII table...
  lcd.createChar(0, glyph);
}


void loop() {
  // Just to show the program is alive...
  static int counter = 0;

  // Write a piece of text on the first line...
  lcd.setCursor(0, 0);
  lcd.print("Hello, World!");

  // Write the counter on the second line...
  lcd.setCursor(0, 1);
  lcd.print(counter, DEC);
  lcd.write(' ');
  lcd.write(0);  // write the smiley

  // Use a potentiometer to set the LCD contrast...
  // short level = map(analogRead(A0), 0, 1023, 0, 127);
  // lcd.setContrast(level);

  delay(200);
  counter++;
}
示范
上传程序后,LCD 应打印以下字样:“Hello, World!”。


