


释放双眼,带上耳机,听听看~!
我们将在本教程中使用的点阵是一个 8×8 矩阵,这意味着它有 8 列和 8 行,因此它总共包含 64 个 LED。
MAX7219芯片使控制点阵变得更加容易,只需使用Arduino板的3个数字引脚即可。
我认为最好的选择是购买带有MAX7219芯片作为模块的点阵,这样可以简化布线。

您可以一次控制多个矩阵。为此,您只需要将它们相互连接,因为它们的两侧都有引脚来扩展点阵。
所需零件
对于本教程,您需要:
- 1x 8×8 点阵,带MAX7219
- Arduino UNO
- 1x 1k ohm 电位计
- 跳线
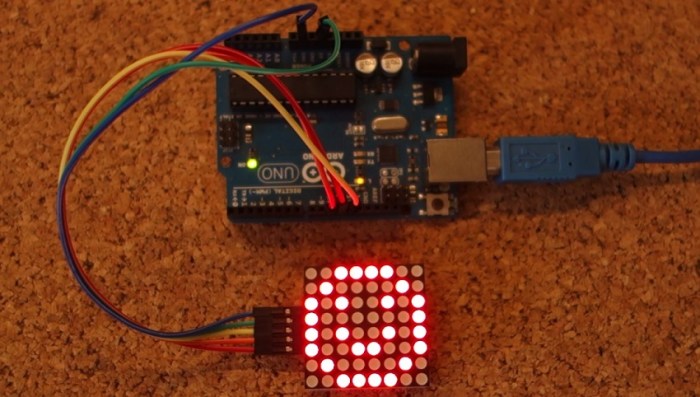
引脚接线
您只需要将点阵中的 5 个引脚连接到您的 Arduino 板。接线非常简单:
| 点阵引脚 | 连接到Arduino Uno |
| GND | GND |
| VCC | 5V |
| DIN | 数字引脚 |
| CS | 数字引脚 |
| CLK | 数字引脚 |
如何使用Arduino控制点阵
为了更轻松地控制点阵,您需要在 Arduino IDE 中下载并安装 LedControl 库。若要安装库,请按照下列步骤操作:
- 单击此处下载 LedControl 库。您的下载中应该有一个 .zip 文件夹
- 解压缩 .zip 文件夹,您应该会得到 LedControl-master 文件夹
- 将文件夹从 LedControl-master 重命名为 LedControl
- 将 LedControl 文件夹移动到 Arduino IDE 安装库文件夹
- 最后,重新打开Arduino IDE
使用 LedControl 库函数
在点阵上显示内容的最简单方法是使用函数 setLed()、setRow() 或 setColumn()。这些功能允许您一次控制单个 LED、一行或一列。
下面是每个函数的参数:
指数
如前所述,此矩阵有 8 列和 8 行。每个索引从 0 到 7。为了更好地理解,这是一个数字:
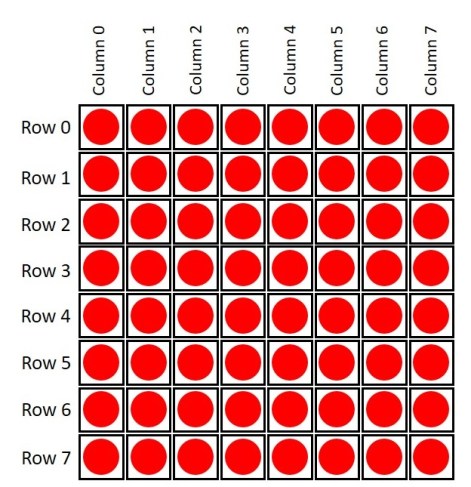
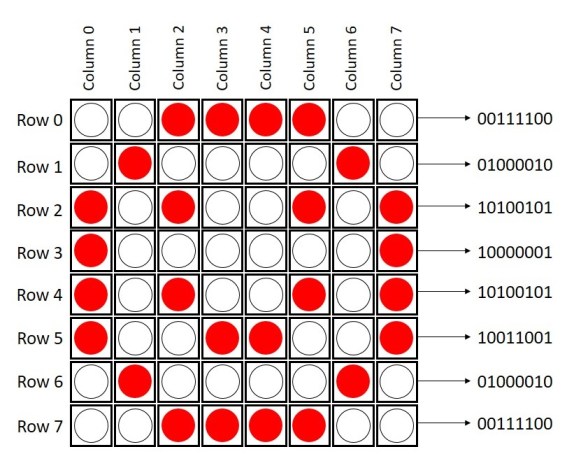
如果你想在矩阵中显示一些东西,你只需要知道在确定的行或列中,LED是打开还是关闭。
例如,如果你想展示一张快乐的脸,你需要做以下事情:
使用方法
这是一张简单的程序,展示了三种类型的面孔:悲伤的脸、中性的脸和快乐的面孔。将以下代码上传到您的开发板:
/*
 https://www.qutaojiao.com/
*/

#include "LedControl.h"
#include "binary.h"

/*
 DIN connects to pin 12
 CLK connects to pin 11
 CS connects to pin 10
*/
LedControl lc=LedControl(12,11,10,1);

// delay time between faces
unsigned long delaytime=1000;

// happy face
byte hf[8]= {B00111100,B01000010,B10100101,B10000001,B10100101,B10011001,B01000010,B00111100};
// neutral face
byte nf[8]={B00111100, B01000010,B10100101,B10000001,B10111101,B10000001,B01000010,B00111100};
// sad face
byte sf[8]= {B00111100,B01000010,B10100101,B10000001,B10011001,B10100101,B01000010,B00111100};

void setup() {
  lc.shutdown(0,false);
  // Set brightness to a medium value
  lc.setIntensity(0,8);
  // Clear the display
  lc.clearDisplay(0);
}

void drawFaces(){
  // Display sad face
  lc.setRow(0,0,sf[0]);
  lc.setRow(0,1,sf[1]);
  lc.setRow(0,2,sf[2]);
  lc.setRow(0,3,sf[3]);
  lc.setRow(0,4,sf[4]);
  lc.setRow(0,5,sf[5]);
  lc.setRow(0,6,sf[6]);
  lc.setRow(0,7,sf[7]);
  delay(delaytime);

  // Display neutral face
  lc.setRow(0,0,nf[0]);
  lc.setRow(0,1,nf[1]);
  lc.setRow(0,2,nf[2]);
  lc.setRow(0,3,nf[3]);
  lc.setRow(0,4,nf[4]);
  lc.setRow(0,5,nf[5]);
  lc.setRow(0,6,nf[6]);
  lc.setRow(0,7,nf[7]);
  delay(delaytime);

  // Display happy face
  lc.setRow(0,0,hf[0]);
  lc.setRow(0,1,hf[1]);
  lc.setRow(0,2,hf[2]);
  lc.setRow(0,3,hf[3]);
  lc.setRow(0,4,hf[4]);
  lc.setRow(0,5,hf[5]);
  lc.setRow(0,6,hf[6]);
  lc.setRow(0,7,hf[7]);
  delay(delaytime);
}

void loop(){
  drawFaces();
}
最后,你会得到这样的结果:
乒乓球比赛
您将要尝试的乒乓球游戏是由亚历山德罗·帕索蒂(Alessandro Pasotti)创建的。
对于乒乓球游戏,您只需要在前面的原理图中添加一个 1k 欧姆电位器即可。组装新电路,如下所示:
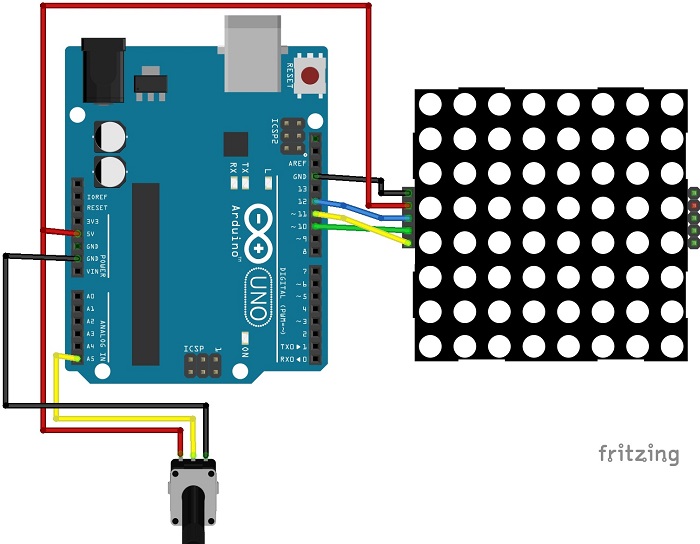
使用方法
然后,将以下代码上传到Arduino板:
/*
 *   Play pong on an 8x8 matrix - project from itopen.it
 */

#include "LedControl.h"
#include "Timer.h"

#define POTPIN A5 // Potentiometer
#define PADSIZE 3
#define BALL_DELAY 200
#define GAME_DELAY 10
#define BOUNCE_VERTICAL 1
#define BOUNCE_HORIZONTAL -1
#define NEW_GAME_ANIMATION_SPEED 50
#define HIT_NONE 0
#define HIT_CENTER 1
#define HIT_LEFT 2
#define HIT_RIGHT 3

//#define DEBUG 1

byte sad[] = {
B00000000,
B01000100,
B00010000,
B00010000,
B00000000,
B00111000,
B01000100,
B00000000
};

byte smile[] = {
B00000000,
B01000100,
B00010000,
B00010000,
B00010000,
B01000100,
B00111000,
B00000000
};

Timer timer;

LedControl lc = LedControl(12,11,10,1);

byte direction; // Wind rose, 0 is north
int xball;
int yball;
int yball_prev;
byte xpad;
int ball_timer;

void setSprite(byte *sprite){
    for(int r = 0; r < 8; r++){
        lc.setRow(0, r, sprite[r]);
    }
}

void newGame() {
    lc.clearDisplay(0);
    // initial position
    xball = random(1, 7);
    yball = 1;
    direction = random(3, 6); // Go south
    for(int r = 0; r < 8; r++){
        for(int c = 0; c < 8; c++){
            lc.setLed(0, r, c, HIGH);
            delay(NEW_GAME_ANIMATION_SPEED);
        }
    }
    setSprite(smile);
    delay(1500);
    lc.clearDisplay(0);
}

void setPad() {
    xpad = map(analogRead(POTPIN), 0, 1020, 8 - PADSIZE, 0);
}

void debug(const char* desc){
#ifdef DEBUG
    Serial.print(desc);
    Serial.print(" XY: ");
    Serial.print(xball);
    Serial.print(", ");
    Serial.print(yball);
    Serial.print(" XPAD: ");
    Serial.print(xpad);
    Serial.print(" DIR: ");
    Serial.println(direction);
#endif
}

int checkBounce() {
    if(!xball || !yball || xball == 7 || yball == 6){
        int bounce = (yball == 0 || yball == 6) ? BOUNCE_HORIZONTAL : BOUNCE_VERTICAL;
#ifdef DEBUG
        debug(bounce == BOUNCE_HORIZONTAL ? "HORIZONTAL" : "VERTICAL");
#endif
        return bounce;
    }
    return 0;
}

int getHit() {
    if(yball != 6 || xball < xpad || xball > xpad + PADSIZE){
        return HIT_NONE;
    }
    if(xball == xpad + PADSIZE / 2){
        return HIT_CENTER;
    }
    return xball < xpad + PADSIZE / 2 ? HIT_LEFT : HIT_RIGHT;
}

bool checkLoose() {
    return yball == 6 && getHit() == HIT_NONE;
}

void moveBall() {
    debug("MOVE");
    int bounce = checkBounce();
    if(bounce) {
        switch(direction){
            case 0:
                direction = 4;
            break;
            case 1:
                direction = (bounce == BOUNCE_VERTICAL) ? 7 : 3;
            break;
            case 2:
                direction = 6;
            break;
            case 6:
                direction = 2;
            break;
            case 7:
                direction = (bounce == BOUNCE_VERTICAL) ? 1 : 5;
            break;
            case 5:
                direction = (bounce == BOUNCE_VERTICAL) ? 3 : 7;
            break;
            case 3:
                direction = (bounce == BOUNCE_VERTICAL) ? 5 : 1;
            break;
            case 4:
                direction = 0;
            break;
        }
        debug("->");
    }

    // Check hit: modify direction is left or right
    switch(getHit()){
        case HIT_LEFT:
            if(direction == 0){
                direction =  7;
            } else if (direction == 1){
                direction = 0;
            }
        break;
        case HIT_RIGHT:
            if(direction == 0){
                direction = 1;
            } else if(direction == 7){
                direction = 0;
            }
        break;
    }

    // Check orthogonal directions and borders ...
    if((direction == 0 && xball == 0) || (direction == 4 && xball == 7)){
        direction++;
    }
    if(direction == 0 && xball == 7){
        direction = 7;
    }
    if(direction == 4 && xball == 0){
        direction = 3;
    }
    if(direction == 2 && yball == 0){
        direction = 3;
    }
    if(direction == 2 && yball == 6){
        direction = 1;
    }
    if(direction == 6 && yball == 0){
        direction = 5;
    }
    if(direction == 6 && yball == 6){
        direction = 7;
    }

    // "Corner" case
    if(xball == 0 && yball == 0){
        direction = 3;
    }
    if(xball == 0 && yball == 6){
        direction = 1;
    }
    if(xball == 7 && yball == 6){
        direction = 7;
    }
    if(xball == 7 && yball == 0){
        direction = 5;
    }

    yball_prev = yball;
    if(2 < direction && direction < 6) {
        yball++;
    } else if(direction != 6 && direction != 2) {
        yball--;
    }
    if(0 < direction && direction < 4) {
        xball++;
    } else if(direction != 0 && direction != 4) {
        xball--;
    }
    xball = max(0, min(7, xball));
    yball = max(0, min(6, yball));
    debug("AFTER MOVE");
}

void gameOver() {
    setSprite(sad);
    delay(1500);
    lc.clearDisplay(0);
}

void drawGame() {
    if(yball_prev != yball){
        lc.setRow(0, yball_prev, 0);
    }
    lc.setRow(0, yball, byte(1 << (xball)));
    byte padmap = byte(0xFF >> (8 - PADSIZE) << xpad) ;
#ifdef DEBUG
    //Serial.println(padmap, BIN);
#endif
    lc.setRow(0, 7, padmap);
}

void setup() {
  // The MAX72XX is in power-saving mode on startup,
  // we have to do a wakeup call
  pinMode(POTPIN, INPUT);

  lc.shutdown(0,false);
  // Set the brightness to a medium values
  lc.setIntensity(0, 8);
  // and clear the display
  lc.clearDisplay(0);
  randomSeed(analogRead(0));
#ifdef DEBUG
  Serial.begin(9600);
  Serial.println("Pong");
#endif
  newGame();
  ball_timer = timer.every(BALL_DELAY, moveBall);
}

void loop() {
    timer.update();
    // Move pad
    setPad();
#ifdef DEBUG
    Serial.println(xpad);
#endif
    // Update screen
    drawGame();
    if(checkLoose()) {
        debug("LOOSE");
        gameOver();
        newGame();
    }
    delay(GAME_DELAY);
}
示范
这是我玩乒乓球游戏的最后演示。玩得愉快!
总结
您是否曾经在Arduino项目中使用过点阵?
请在下面发表评论,让我知道。


