

这篇文章旨在成为 nRF24L01 – 2.4GHz RF 收发器模块的完整指南。我将解释它的用途、展示其规格并分享一个 Arduino 项目示例,您可以将其应用到您自己的项目中。

描述
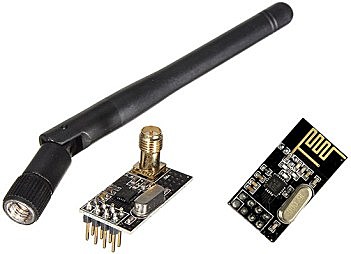
这些 RF 模块在 Arduino 爱好者中非常受欢迎。nRF24L01 用于需要无线控制的各种应用。它们是收发器,这意味着每个模块都可以发送和接收数据。
这些模块非常便宜,您可以将它们与任何微控制器 (MCU) 一起使用。
规格 nRF24L01 – 2.4GHz 射频收发器
- 低成本单芯片 2.4GHz GFSK 射频收发器 IC
- 带天线的范围:250Kb 速率(空旷区域)>1000 米
- 电源:超低功耗
- 输入电压:3.3V
- 引脚:5V 耐受
- 价格:2美元
带有 nRF24L01 的 Arduino
要制作此示例,您需要以下组件:
- 2 个 Arduino
- 2x nRF24L01 – 2.4GHz 射频收发器
- 面包板
库下载
以下是此项目所需的库:
该库非常棒,它适用于市场上几乎所有的射频模块。
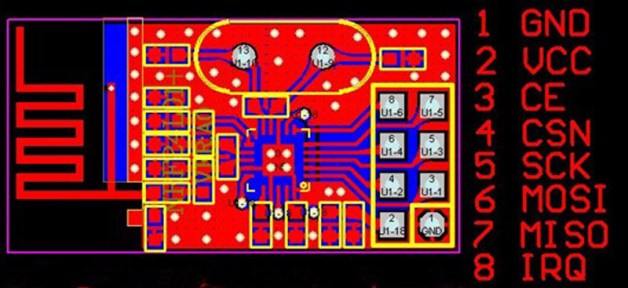
引脚排列
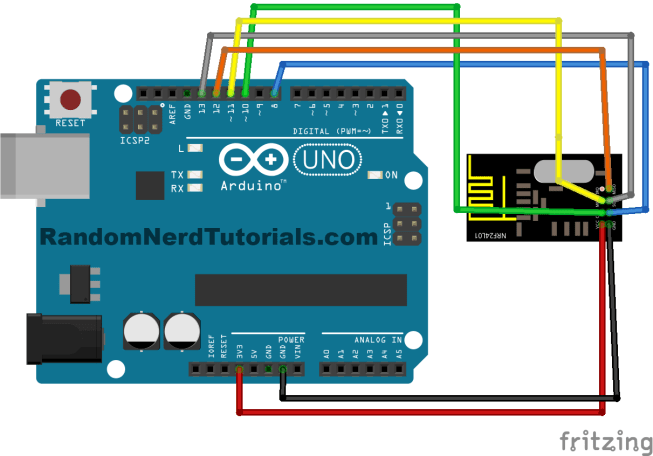
客户电路

输入电压为1.9V~3.6V,请勿超过此电压,否则会烧毁模块。重要提示:输入电压tage 为 1.9V~3.6V,不要超过此电压tage,否则会炸毁您的模块。
为您的客户遵循上面的电路。然后上传下面的代码,该代码可以在您的 Arduino IDE 中找到(安装 RadioHead 库后)。
转到文件 > 示例 > RadioHead > nrf24 > nrf24_client。
// nrf24_client

#include <SPI.h>
#include <RH_NRF24.h>

// Singleton instance of the radio driver
RH_NRF24 nrf24;
// RH_NRF24 nrf24(8, 7); // use this to be electrically compatible with Mirf
// RH_NRF24 nrf24(8, 10);// For Leonardo, need explicit SS pin
// RH_NRF24 nrf24(8, 7); // For RFM73 on Anarduino Mini

void setup()
{
  Serial.begin(9600);
  while (!Serial)
    ; // wait for serial port to connect. Needed for Leonardo only
  if (!nrf24.init())
    Serial.println("init failed");
  // Defaults after init are 2.402 GHz (channel 2), 2Mbps, 0dBm
  if (!nrf24.setChannel(1))
    Serial.println("setChannel failed");
  if (!nrf24.setRF(RH_NRF24::DataRate2Mbps, RH_NRF24::TransmitPower0dBm))
    Serial.println("setRF failed");
}


void loop()
{
  Serial.println("Sending to nrf24_server");
  // Send a message to nrf24_server
  uint8_t data[] = "Hello World!";
  nrf24.send(data, sizeof(data));

  nrf24.waitPacketSent();
  // Now wait for a reply
  uint8_t buf[RH_NRF24_MAX_MESSAGE_LEN];
  uint8_t len = sizeof(buf);

  if (nrf24.waitAvailableTimeout(500))
  {
    // Should be a reply message for us now
    if (nrf24.recv(buf, &len))
    {
      Serial.print("got reply: ");
      Serial.println((char*)buf);
    }
    else
    {
      Serial.println("recv failed");
    }
  }
  else
  {
    Serial.println("No reply, is nrf24_server running?");
  }
  delay(400);
}
服务器电路
 输入电压为1.9V~3.6V,请勿超过此电压,否则会烧毁模块。重要提示:输入电压tage 为 1.9V~3.6V,不要超过此电压tage,否则会炸毁您的模块。
对于您的服务器,请遵循上面的电路。然后上传下面的代码,该代码可以在您的 Arduino IDE 中找到(安装 RadioHead 库后)。
转到文件 > 示例 > RadioHead > nrf24 > nrf24_server。
// nrf24_server

#include <SPI.h>
#include <RH_NRF24.h>

// Singleton instance of the radio driver
RH_NRF24 nrf24;
// RH_NRF24 nrf24(8, 7); // use this to be electrically compatible with Mirf
// RH_NRF24 nrf24(8, 10);// For Leonardo, need explicit SS pin
// RH_NRF24 nrf24(8, 7); // For RFM73 on Anarduino Mini

void setup()
{
  Serial.begin(9600);
  while (!Serial)
    ; // wait for serial port to connect. Needed for Leonardo only
  if (!nrf24.init())
    Serial.println("init failed");
  // Defaults after init are 2.402 GHz (channel 2), 2Mbps, 0dBm
  if (!nrf24.setChannel(1))
    Serial.println("setChannel failed");
  if (!nrf24.setRF(RH_NRF24::DataRate2Mbps, RH_NRF24::TransmitPower0dBm))
    Serial.println("setRF failed");
}

void loop()
{
  if (nrf24.available())
  {
    // Should be a message for us now
    uint8_t buf[RH_NRF24_MAX_MESSAGE_LEN];
    uint8_t len = sizeof(buf);
    if (nrf24.recv(buf, &len))
    {
//      NRF24::printBuffer("request: ", buf, len);
      Serial.print("got request: ");
      Serial.println((char*)buf);

      // Send a reply
      uint8_t data[] = "And hello back to you";
      nrf24.send(data, sizeof(data));
      nrf24.waitPacketSent();
      Serial.println("Sent a reply");
    }
    else
    {
      Serial.println("recv failed");
    }
  }
}
示范
在这个项目中,客户发送一条消息“Hello World!” 通过 RF 发送到服务器,服务器发送回以下消息“And hello back to you”。这些消息显示在串行监视器中。这是您应该在串行终端窗口中看到的内容(参见下图)。

注意:在左侧窗口中,我正在与 PuTTY.org 建立串行通信。在右侧窗口中,我使用的是 Arduino IDE 串行监视器。
结论
使用此模块时您需要有一些现实的期望。当接收器和发射器彼此非常接近时,它们工作得非常好。如果你把它们分开得太远,你就会失去沟通。
通信范围会有所不同。这取决于您的环境中有多少噪音、是否有任何障碍物以及您是否使用外部天线。


