我们认为为Arduino创建比我们在JavaScript中更严格的命令行界面(又名CLI)会很有趣。
例如,在嵌入式系统(如本文中所述)上的CLI与Linux中的Shell完全不同,因为您通常没有操作系统来支持多任务处理。有很多解决方法,但是在此示例中,为简单起见,我们将所有内容保持顺序。这意味着多个任务无法同时运行,并且一个任务必须先完成才能开始新任务。

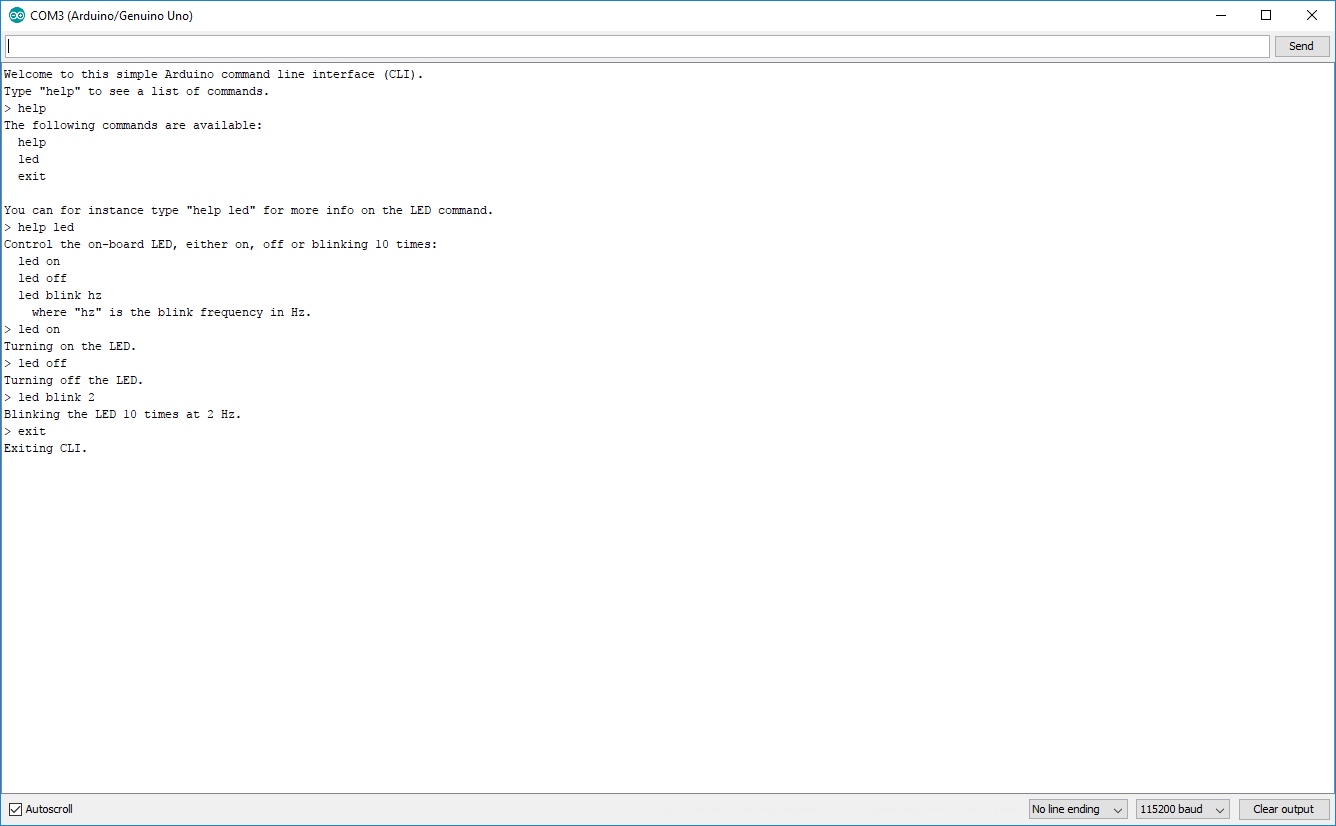
我们的CLI在Arduino的串行监视器中是什么样的
在Arduino上使用这样的CLI的目的是能够在运行时向其发送文本命令,以执行某些任务,例如控制伺服器,在屏幕上显示文本。
基本上,我们将快速浏览本文中的代码块。但是首先,我们将简要说明程序的功能
我们的CLI
此特定代码的主要目的是控制与Arduino的引脚13相连的板载LED。您可以将其打开,关闭或以给定的频率闪烁10次。我们还包括一个帮助命令,该命令解释了每个命令的作用以及一个退出命令,该命令仅使程序处于一种while(1)状态。
代码
代码本身只有200多行,其中许多只是纯打印功能,因此核心功能并不那么复杂。
设置东西
让我们从全局变量,定义setup()和loop()函数开始:
#define LINE_BUF_SIZE 128   //Maximum input string length
#define ARG_BUF_SIZE 64     //Maximum argument string length
#define MAX_NUM_ARGS 8      //Maximum number of arguments

int LEDpin = 13;
int blink_cycles = 10;      //How many times the LED will blink
bool error_flag = false;

char line[LINE_BUF_SIZE];
char args[MAX_NUM_ARGS][ARG_BUF_SIZE];

//Function declarations
int cmd_help();
int cmd_led();
int cmd_exit();

//List of functions pointers corresponding to each command
int (*commands_func[])(){
    &cmd_help,
    &cmd_led,
    &cmd_exit
};

//List of command names
const char *commands_str[] = {
    "help",
    "led",
    "exit"
};

//List of LED sub command names
const char *led_args[] = {
    "on",
    "off",
    "blink"
};

int num_commands = sizeof(commands_str) / sizeof(char *);

void setup() {
    Serial.begin(115200);
    pinMode(13, OUTPUT);

    cli_init();
}

void loop() {
    my_cli();
}
当用户输入命令时,程序会将其与输入的字符串进行比较,commands_str和commands_func使用相同的索引调用函数。
高级功能
在setup()中调用的cli_init()函数只显示一条简短的欢迎消息,而my_cli()则是魔术开始发生的地方。
void cli_init(){
    Serial.println("Welcome to this simple Arduino command line interface (CLI).");
    Serial.println("Type \"help\" to see a list of commands.");
}


void my_cli(){
    Serial.print("> ");

    read_line();
    if(!error_flag){
        parse_line();
    }
    if(!error_flag){
        execute();
    }

    memset(line, 0, LINE_BUF_SIZE);
    memset(args, 0, sizeof(args[0][0]) * MAX_NUM_ARGS * ARG_BUF_SIZE);

    error_flag = false;
}
CLI的精髓
在内部调用了三个重要功能my_cli()。这些是:
- read_line()–等待用户输入并将其存储在line字符串中。
- parse_line()–这会将输入分为参数,并将其存储在args列表中。使用的定界符是一个空格。
-
execute() –这将根据用户的输入调用正确的功能。
memset函数将line字符串和args列表重置为零。
void read_line(){
    String line_string;

    while(!Serial.available());

    if(Serial.available()){
        line_string = Serial.readStringUntil("\n");
        if(line_string.length() < LINE_BUF_SIZE){
          line_string.toCharArray(line, LINE_BUF_SIZE);
          Serial.println(line_string);
        }
        else{
          Serial.println("Input string too long.");
          error_flag = true;
        }
    }
}

void parse_line(){
    char *argument;
    int counter = 0;

    argument = strtok(line, " ");

    while((argument != NULL)){
        if(counter < MAX_NUM_ARGS){
            if(strlen(argument) < ARG_BUF_SIZE){
                strcpy(args[counter],argument);
                argument = strtok(NULL, " ");
                counter++;
            }
            else{
                Serial.println("Input string too long.");
                error_flag = true;
                break;
            }
        }
        else{
            break;
        }
    }
}

int execute(){
    for(int i=0; i<num_commands; i++){
        if(strcmp(args[0], commands_str[i]) == 0){
            return(*commands_func[i])();
        }
    }

    Serial.println("Invalid command. Type \"help\" for more.");
    return 0;
}
在read_line()函数中,我们并不能真正避免很长的输入。它仍然存储在line_stringArduino字符串中。这意味着很长的输入仍然会打乱我们的记忆。
在parse_line()功能上,strtok()才是真正的重点。此函数将字符串拆分为几个子字符串,在该子字符串中找到指定的分隔符,在本例中为空白。
该execute()功能非常简单。请注意,在for循环中从此函数返回时,将调用commands_funcat索引i中的函数。
获得帮助
int cmd_help(){
    if(args[1] == NULL){
        help_help();
    }
    else if(strcmp(args[1], commands_str[0]) == 0){
        help_help();
    }
    else if(strcmp(args[1], commands_str[1]) == 0){
        help_led();
    }
    else if(strcmp(args[1], commands_str[2]) == 0){
        help_exit();
    }
    else{
        help_help();
    }
}

void help_help(){
    Serial.println("The following commands are available:");

    for(int i=0; i<num_commands; i++){
        Serial.print("  ");
        Serial.println(commands_str[i]);
    }
    Serial.println("");
    Serial.println("You can for instance type \"help led\" for more info on the LED command.");
}

void help_led(){
    Serial.print("Control the on-board LED, either on, off or blinking ");
    Serial.print(blink_cycles);
    Serial.println(" times:");
    Serial.println("  led on");
    Serial.println("  led off");
    Serial.println("  led blink hz");
    Serial.println("    where \"hz\" is the blink frequency in Hz.");
}

void help_exit(){
    Serial.println("This will exit the CLI. To restart the CLI, restart the program.");
}
这里有所有的帮助功能。当用户键入help并按enter时,将调用cmd_help()函数。此函数检查用户在帮助后编写的内容,并基于此调用正确的函数。help_help(), help_led()和help_exit()是将内容打印到终端的函数。
LED控制与退出功能
int cmd_led(){
    if(strcmp(args[1], led_args[0]) == 0){
        Serial.println("Turning on the LED.");
        digitalWrite(LEDpin, HIGH);
    }
    else if(strcmp(args[1], led_args[1]) == 0){
        Serial.println("Turning off the LED.");
        digitalWrite(LEDpin, LOW);
    }
    else if(strcmp(args[1], led_args[2]) == 0){
        if(atoi(args[2]) > 0){
            Serial.print("Blinking the LED ");
            Serial.print(blink_cycles);
            Serial.print(" times at ");
            Serial.print(args[2]);
            Serial.println(" Hz.");

            int delay_ms = (int)round(1000.0/atoi(args[2])/2);

            for(int i=0; i<blink_cycles; i++){
                digitalWrite(LEDpin, HIGH);
                delay(delay_ms);
                digitalWrite(LEDpin, LOW);
                delay(delay_ms);
            }
        }
        else{
            Serial.println("Invalid frequency.");
        }
    }
    else{
        Serial.println("Invalid command. Type \"help led\" to see how to use the LED command.");
    }
}

int cmd_exit(){
    Serial.println("Exiting CLI.");

    while(1);
}
该cmd_led()函数是唯一使用三个参数的函数。第三个参数(闪烁频率)直接用于计算中,而不仅仅是定义要调用的函数。
在cmd_exit()不检查其他参数,所以无论你以后写什么退出,这将正常运行。
总结
从这篇文章需要了解最重要的东西是my_cli(),read_line(),parse_line()和execute()和程序的一般流程。为了使命令“ 同时 ” 运行成为可能,您将必须对程序流进行一些根本性的更改,并使读取功能无阻塞。


